Select and Create your Source
The Source Menu provides the ability to select and upload audio WAV or ADM files to be encoded. Once saved, these files are organized as sources within the system. Each source consists of one or more audio files, accompanied by metadata such as format and layout information. This allows for efficient management and organization of audio sources, making it easier to configure and process them for encoding tasks according to the desired settings and requirements. By providing a user-friendly interface for managing audio sources, the Source Menu streamlines the encoding workflow, enabling users to quickly and effectively prepare their audio files for the encoding process.

Figure 3 – 2 | Source Menu Overview
1. Management Buttons and Status
The Management Buttons, located at the top right corner of the menu, provide options to add, edit, and delete the sources.
When the Edit or Add Button is pressed, the source menu switches to Edit Mode, which is indicated by a white frame that flashes around the menu, providing a visual notification of the mode change. This helps users easily identify when they are in Edit Mode for making modifications or additions to the sources.
Pressing the Save Button will switch the mode back to Selection Mode, which allows users to navigate and select existing sources. In Selection Mode, users can browse and choose from the available sources without making any modifications, providing a streamlined experience for managing and selecting sources within the source menu.
Based on the current mode, relevant Management Buttons are filtered to ensure ease of use.
• Save Button: When the Save Button is pressed, it stores the current source and switches to Selection Mode, while keeping the current source selected for convenience. It’s worth noting that the Save Button remains greyed out if no files are specified in the Upload Area, ensuring that only valid sources with specified files can be saved and selected, maintaining data integrity and preventing errors.
• Cancel Button: Pressing the Cancel Button will discard all current changes and switch to Selection Mode, allowing users to cancel any modifications made to the source without saving.
• Edit Button: The Edit Button switches to Edit Mode, enabling users to modify the currently selected source, making it convenient to edit source details such as audio files or metadata.
• “+” Button: Clicking the “+” Button creates a new source and switches to Edit Mode with a blank new source to populate, making it easy to add new sources and configure them according to the desired settings.
• “-” Button: The “-” Button deletes the currently selected source. However, note that a source cannot be deleted if it is currently used in the Queue List, preventing accidental deletion of sources that are being actively used.
• “IN USE” Status: If the selected source is currently being used by any of the Encodings in the Queue List, an “IN USE” flag appears, indicating that the source is in use and cannot be deleted or modified until it is no longer being used. This helps prevent unintended modifications or deletions of sources that are actively being used in encoding tasks.
2. Source Name Field and Source Presets Drop Down Menu
The name input text field in the Source Menu is used to specify the name of a source. It is a required field and must be a non-empty string, meaning it cannot be left blank. Furthermore, the name must be unique and different from any other source within the system to avoid conflicts.
Once the source is saved, the specified name becomes a preset available within the Source Name Drop Down Menu in Selection Mode. This allows users to easily select and switch between different sources by name, making it convenient to manage and select from multiple sources during the encoding process.
3. File Type Drop Down Menu
The File Type Drop Down Menu in the Source Menu allows users to select the file format of a particular source.
There are four possible types of file formats:
• mono channel WAV: Multiple mono WAV files.
• multi channel WAV: A single multi channel WAV file.
• ADM: A single ADM file.
• dual multi ch. WAV: A combination of two multi channels WAV files.
4. Layout Drop Down Menu
The Layout Drop Down Menu provides options for the user to specify the speaker configuration of the input file(s).
The available choices include:
• Mono
• Stereo
• LCR
• Quad
• 7.1.6 (7.1+6H) | Transmixed into an Auro 11.1 (7.1+4H) configuration during the Auro-Codec Encoding process.
• 9.1.6 (9.1+6H) | Transmixed into an Auro 11.1 (7.1+4H) configuration during the Auro-Codec Encoding process. *
• 7.1.2 (7.1+2H) | Transmixed into an Auro 11.1 (7.1+4H) configuration during the Auro-Codec Encoding process.
• 5.1.2 (5.1+2H) | Transmixed into an Auro 9.1 (5.1+4H) configuration during the Auro-Codec Encoding process.
• Surround 5.0
• Surround 5.1
• Surround 7.0
• Surround 7.1
• Auro-222 (4.0+2H)
• Auro 8.0 (4.0+4H)
• Auro 9.0 (5.0+4H)
• Auro 9.1 (5.1+4H)
• Auro 10.1 (5.1+4H+T)
• Auro 11.0 (5.0+5H+T)
• Auro 11.0 (7.0+4H)
• Auro 11.1 (5.1+5H+T)
• Auro 11.1 (7.1+4H)
• Auro 13.0 (7.0+5H+T)
• Auro 13.1 (7.1+5H+T)
* It is important to note that the Height Back Channels will be encoded into the Lower Surround Channels, and not into the Lower Back Channels.
This is because the Auro-Codec technology is not designed not to use the Lower Back Channels as encoded carriers.
![]() More information about AURO-3D® Speaker Configurations can be found HERE.
More information about AURO-3D® Speaker Configurations can be found HERE.
5. Import Method Drop Down Menu
The Import Method Drop Down Menu is exclusively available when the AURO-3D® Encoder is operating on the local server. If the web interface is running on the same machine as the encoder application, users have the option to choose between copying the input files or specifying the file paths, which can help save disk space.
On macOS, the files are copied into the Users/Shared/AES folder.
On Windows, the files are copied into the Users/Public/AES folder.
• Copy Files: This option allows you to make duplicates of the input files and store them in the designated AES folder.
• Use Paths: This option enables the application to read the input files directly from their original locations without making any copies.
![]() Important: In Remote Mode, the “Use Path” option is not available and the “Copy” option is automatically applied.
Important: In Remote Mode, the “Use Path” option is not available and the “Copy” option is automatically applied.
6. Upload Area
The Upload Area provides a user-friendly interface to easily create sources in the system. You can see at a glance what files are expected to be uploaded and click on the folder-shaped icon adjacent to each list element to select the desired file(s) for upload using the file chooser.
If the Import Method is set to “Copy File”, you can also directly drag and drop the files into the input fields.”
The Upload Area behaves differently according to the selected File Type:
• Creating a Source based on multiple Mono Channel WAV Files:
When the File Type is set to “mono channel WAV”, it is necessary to upload as many files as needed for the selected Layout. The number of input fields and the corresponding channel order depend on the selected Layout and Channel Order Type. When multiple files are simultaneously imported into the input fields using the folder-shaped icons, the system will attempt to automatically sort them based on their file suffix. However, if the file suffix recognition fails, the unrecognized file will be discarded. If only a single file is selected, no automatic sorting will be performed and the file will be added to the corresponding row. Note that the automatic sorting feature is not only applicable when using the folder-shaped icons to import multiple mono files into the input fields, but also when opting to drag and drop the input files onto the source fields.
• Creating a Multi Channel WAV File source:
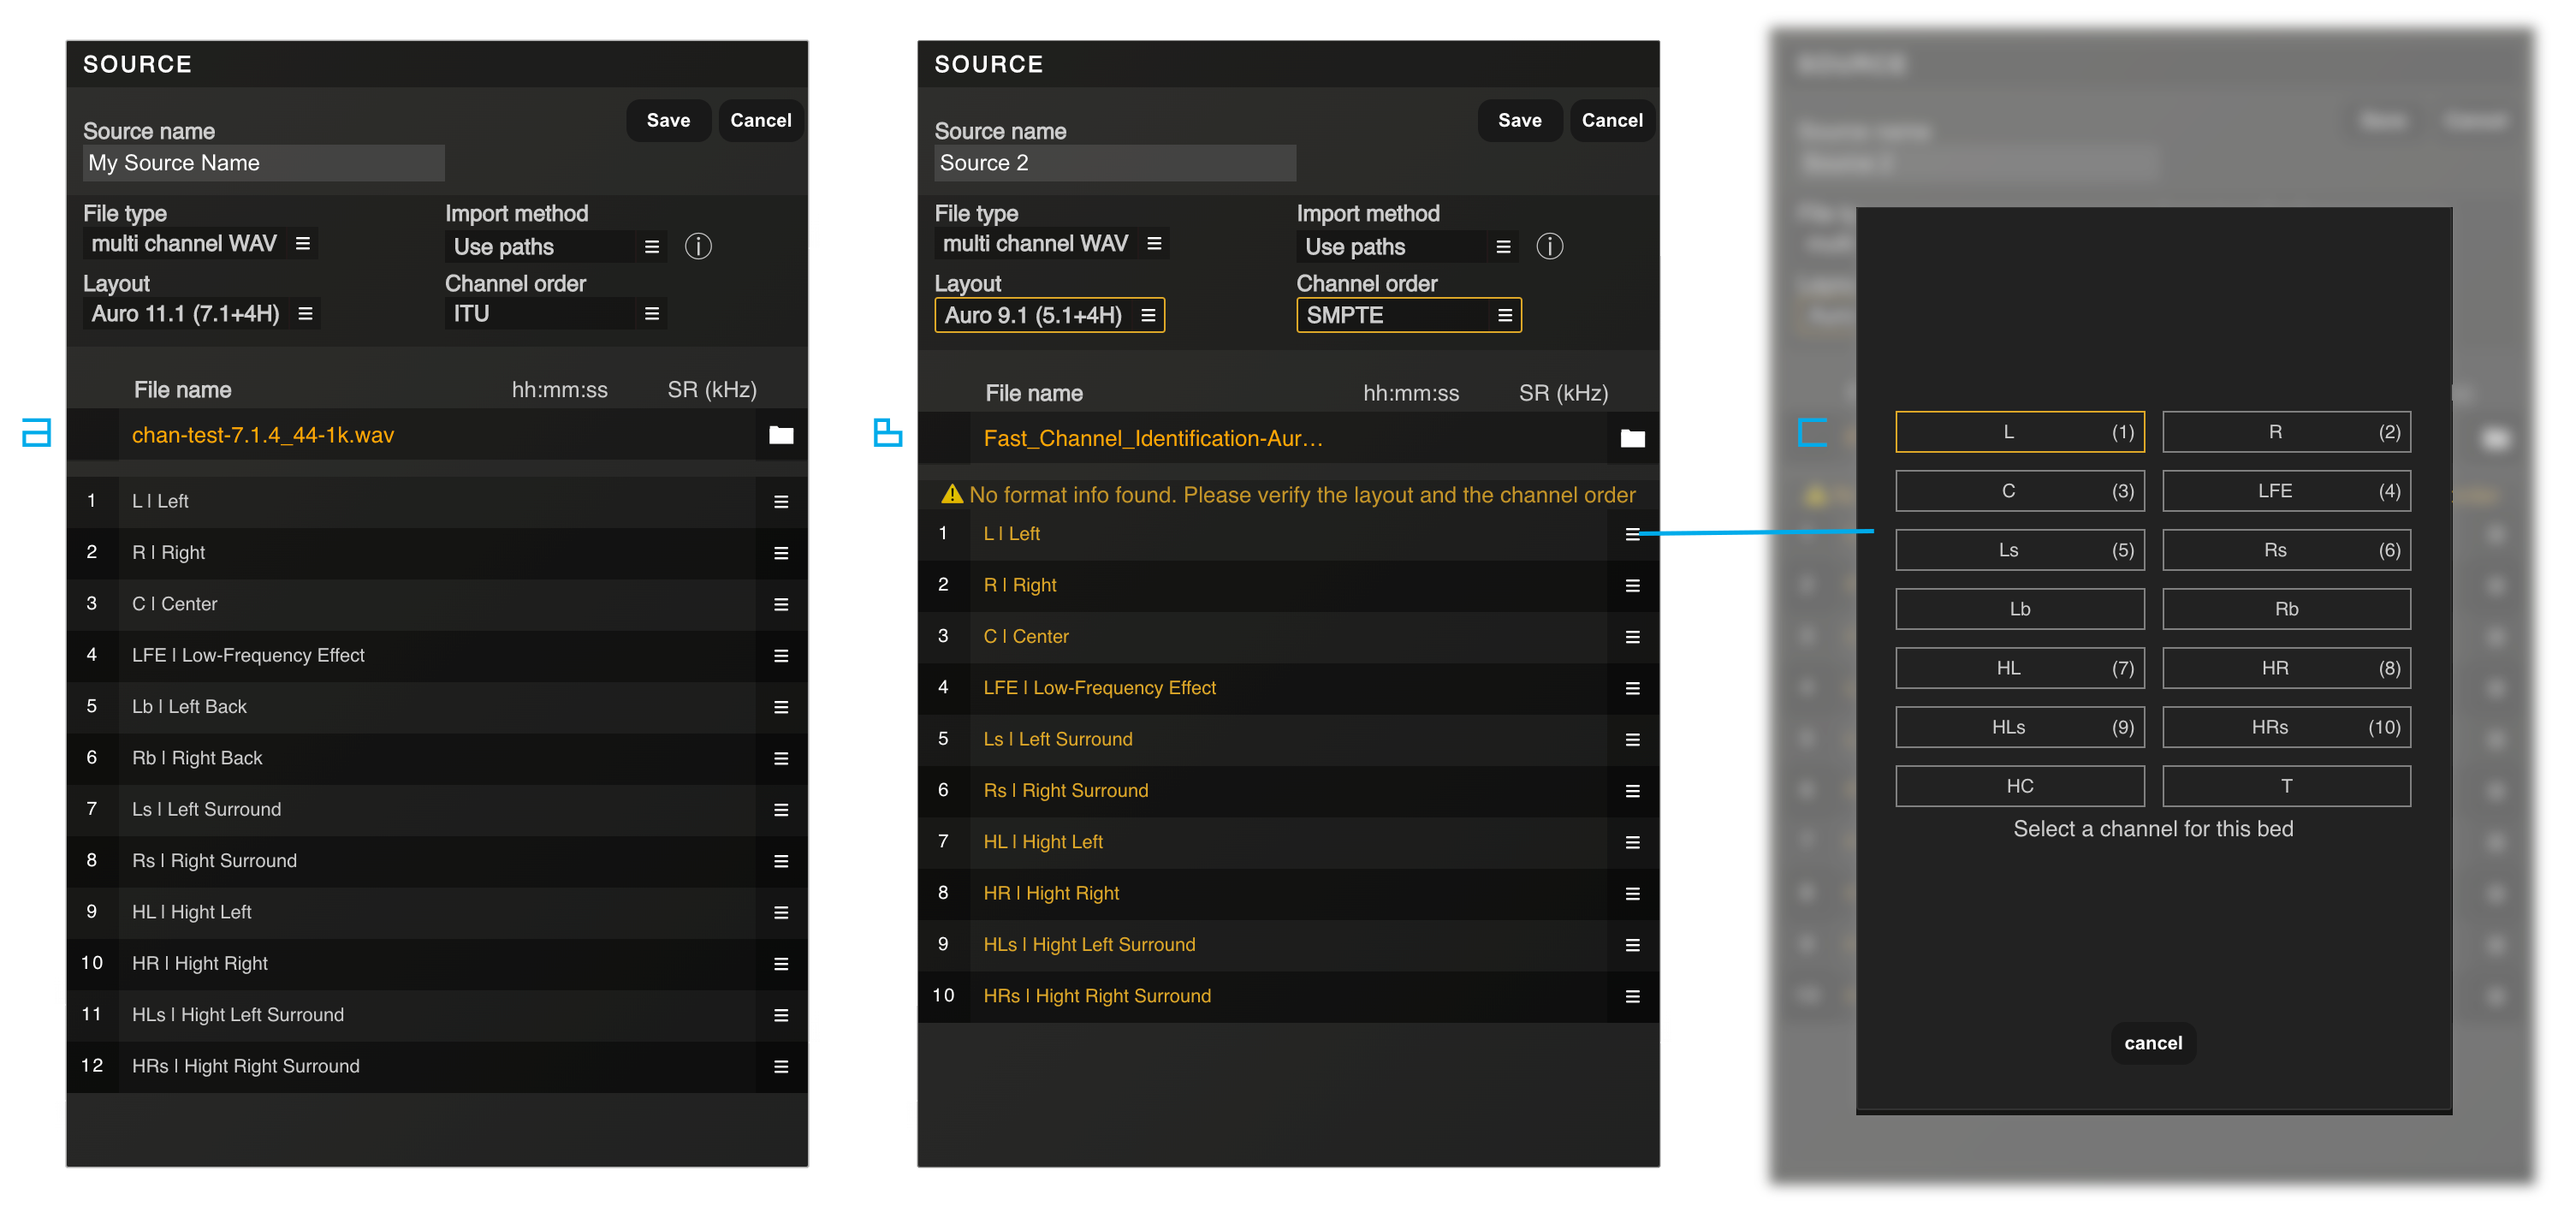
Figure 3.6 – 1 | Uploading a multi channel WAV File Type
The Auro-3D Encoder Service supports uploading of multi-channel WAV-files with up to 16 channels with ITU, SMPTE, or custom channel orders. If the provided WAV file contains a defined channel mask, the system will automatically detect and apply the channel format and layout as defined in the WAVEX specification, which is also referred to as the ITU channel order. This is demonstrated in Example “A” of Figure 3.6 – 1. However, you are still free to change the order of the channels if necessary, using the folder-shaped icon located next to each input field, as shown in Example “C”.
For files without a defined channel-mask, you will be prompted with a message that states “No format info found. Please verify the layout and channel order.” The system will then automatically select the most likely format for the number of channels and the related SMPTE channel order. You can then manually verify and reorganize the channel order as needed. This user-friendly interface gives you the flexibility to import multi-channel files according to your specific needs, regardless of the used channel order.
• Creating a Source based on a single ADM File:
The “ADM File” upload provides to option to import ADM-BWF-files according to the “Audio Definition Model” standard (ITU-R BS.2076-2). Multiple ADM profiles are supported, including the “Emission Profile”.
ADM-BWF files can contain object-based audio that will be automatically rendered into the selected AURO-3D format when selecting the “Auro-Codec” or “Conversion” Encoder Types from the Configuration menu.
• Creating a Source based on dual multi channel WAV files:
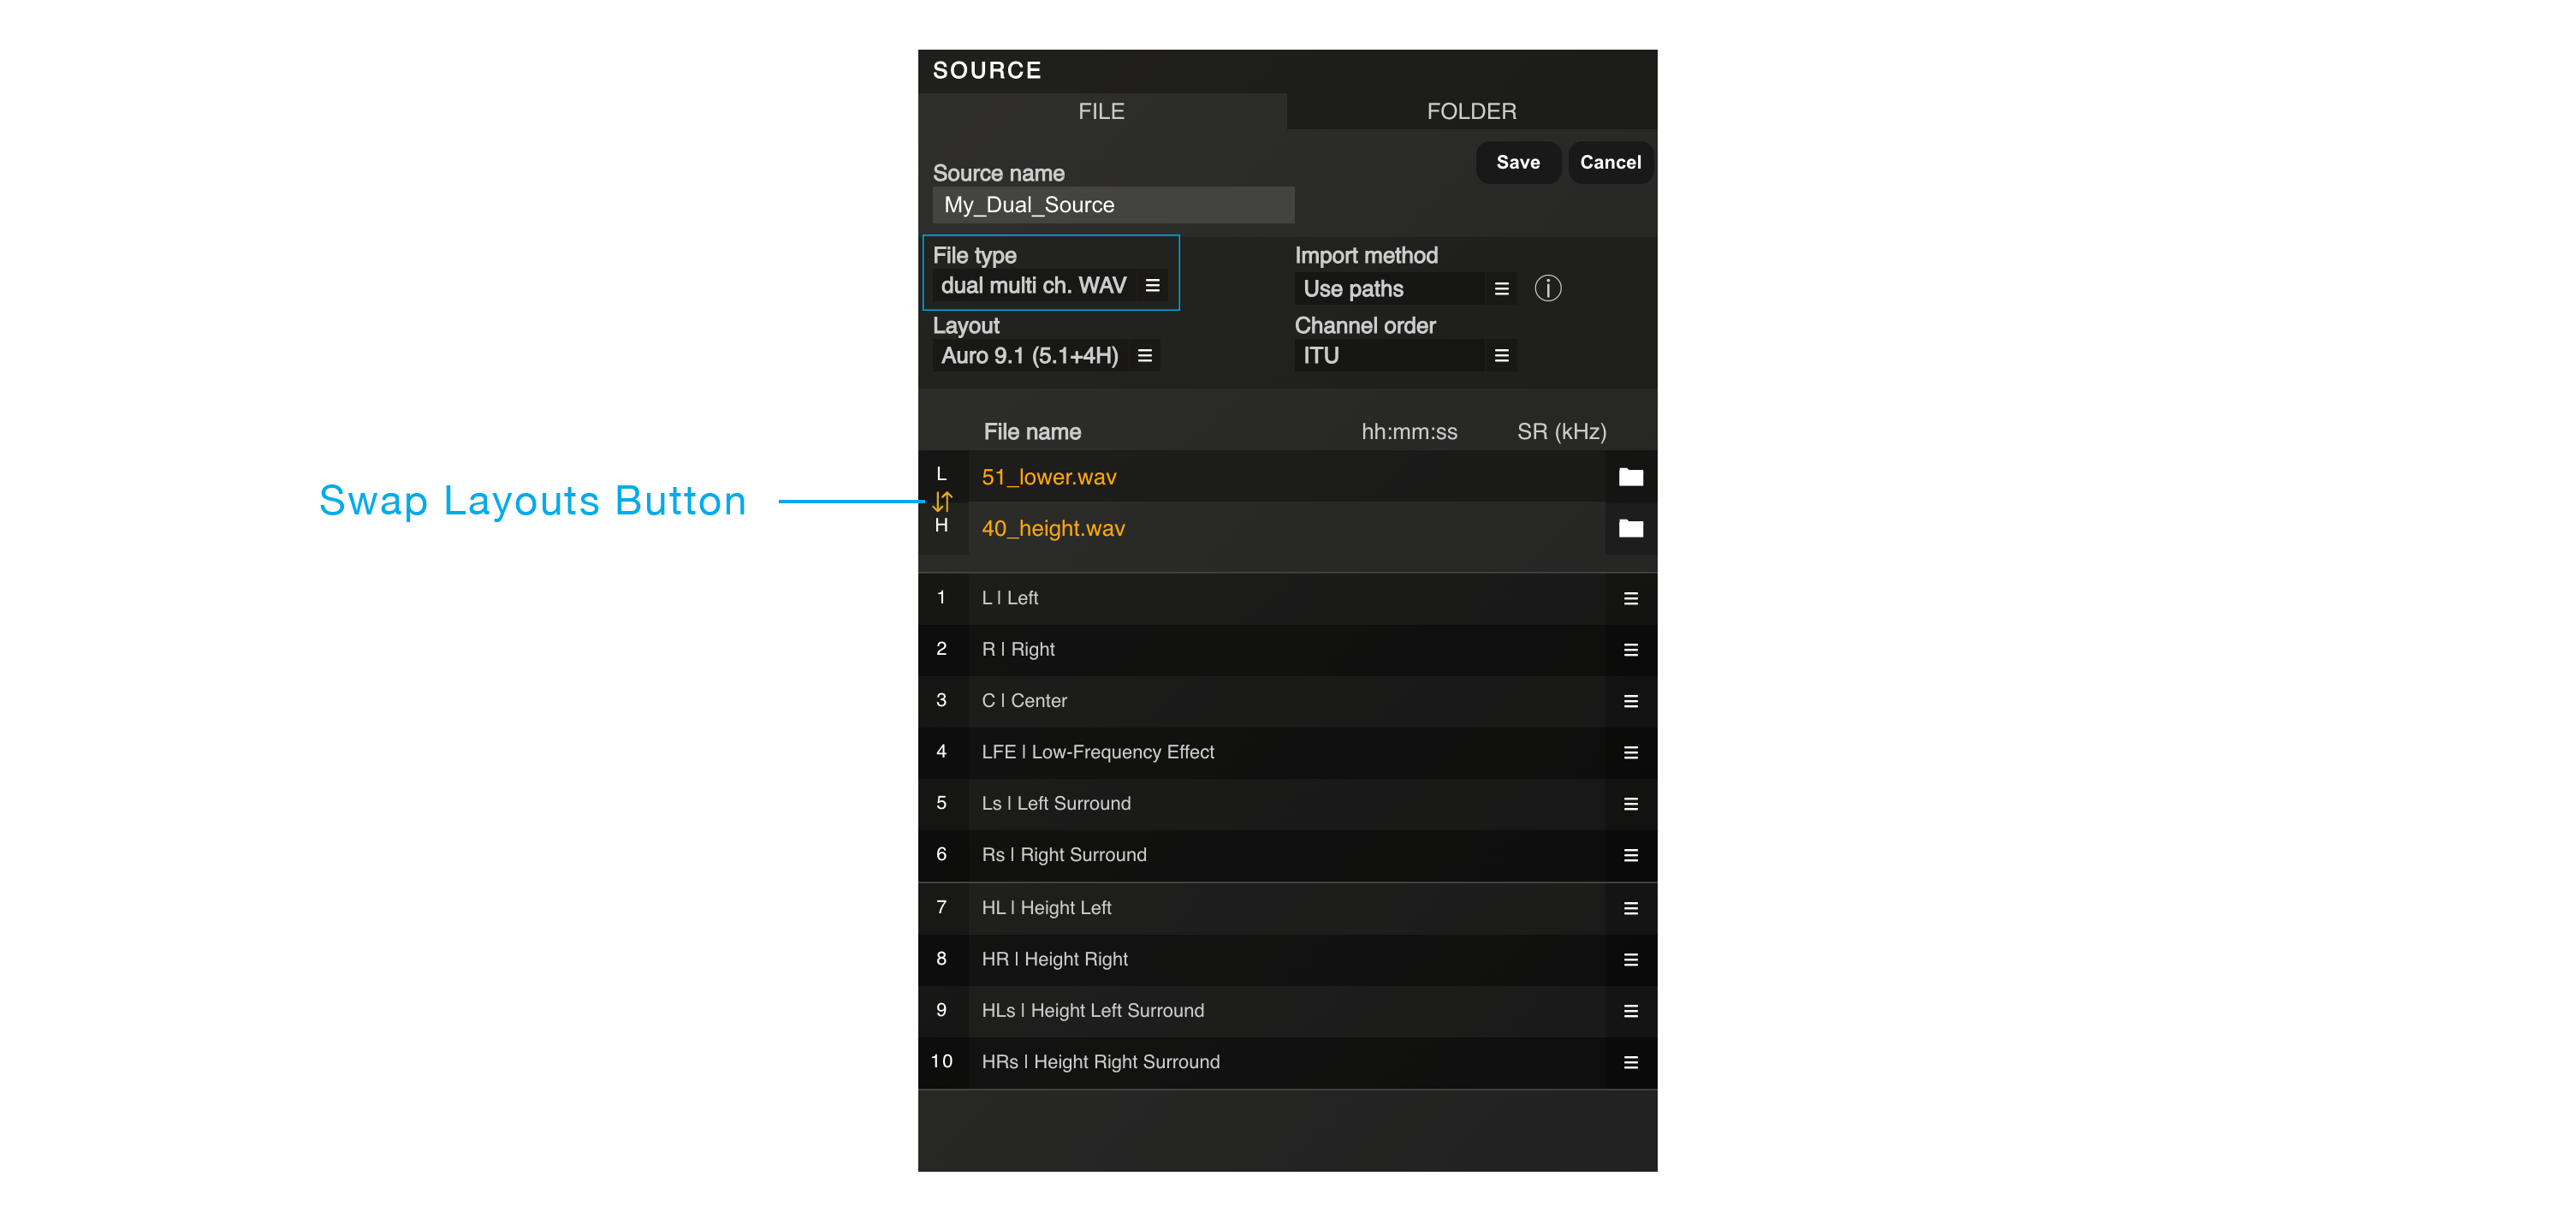
Figure 3.6 – 2 | Combining two multi channels WAV files into a single source
To cater to the preferences of many audio engineers who opt to export their 3D audio mix as two separate multi-channel WAV files, distinguishing the lower layout from the height layout, the AURO-3D® Encoder Service offers a specialised feature called the “dual multi ch. WAV” option.
This option is conveniently located in the File Type Drop Down Menu within the Source Panel, aiming to streamline the encoding process for such files.
When selecting the “dual multi ch. WAV” option, the effortless merging of two multi-channel WAV files into a single source becomes possible.
The Upload Area’s table will reflect this selection by displaying two rows: L (representing the Lower layout) and H (representing the Height layout).
Simply clicking on the folder-shaped icons next to each row will open a window where the desired multi channels WAV files can be selected for upload.
Once both files are specified, the system will automatically detect and apply the appropriate channel format and layout based on the specifications outlined in the WAVEX standard, commonly known as the ITU channel order, provided the specified files contain a defined channel mask.
In cases where files lack a defined channel mask, the system will intelligently deduce the most likely format based on the number of channels and the corresponding SMPTE channel order.
In any case, it is still perfectly possible to manually review and modify the channel order as needed.
Swap Layouts Button: The Swap Layouts Button provides a convenient way to quickly interchange the multi-channel WAV files currently assigned to the H (Height layout) and L (Lower layout) fields.
Remark: To prevent user-errors and ensure a smooth encoding process, adding encoding to the queue is not allowed in Edit Mode. You must first exit the Edit Mode by saving the current Source or discarding the changes you made.
7. Channel Order Drop Down Menu
The Channel Order Drop Down Menu allows to specify the ITU, SMPTE or ProTools channel order for the selected source.
It is important to be aware that for all File types, except the mono channel WAV format, the system automatically detects and applies the channel format and layout as defined in the WAVEX specification, which is also referred to as the ITU channel order.
For files without a defined channel-mask, the system will then automatically select the most likely format for the number of channels and the related SMPTE channel order.
In any case, it is also perfectly possible to manually review and modify the channel order as needed into the Upload Area.
8. Folder Tab
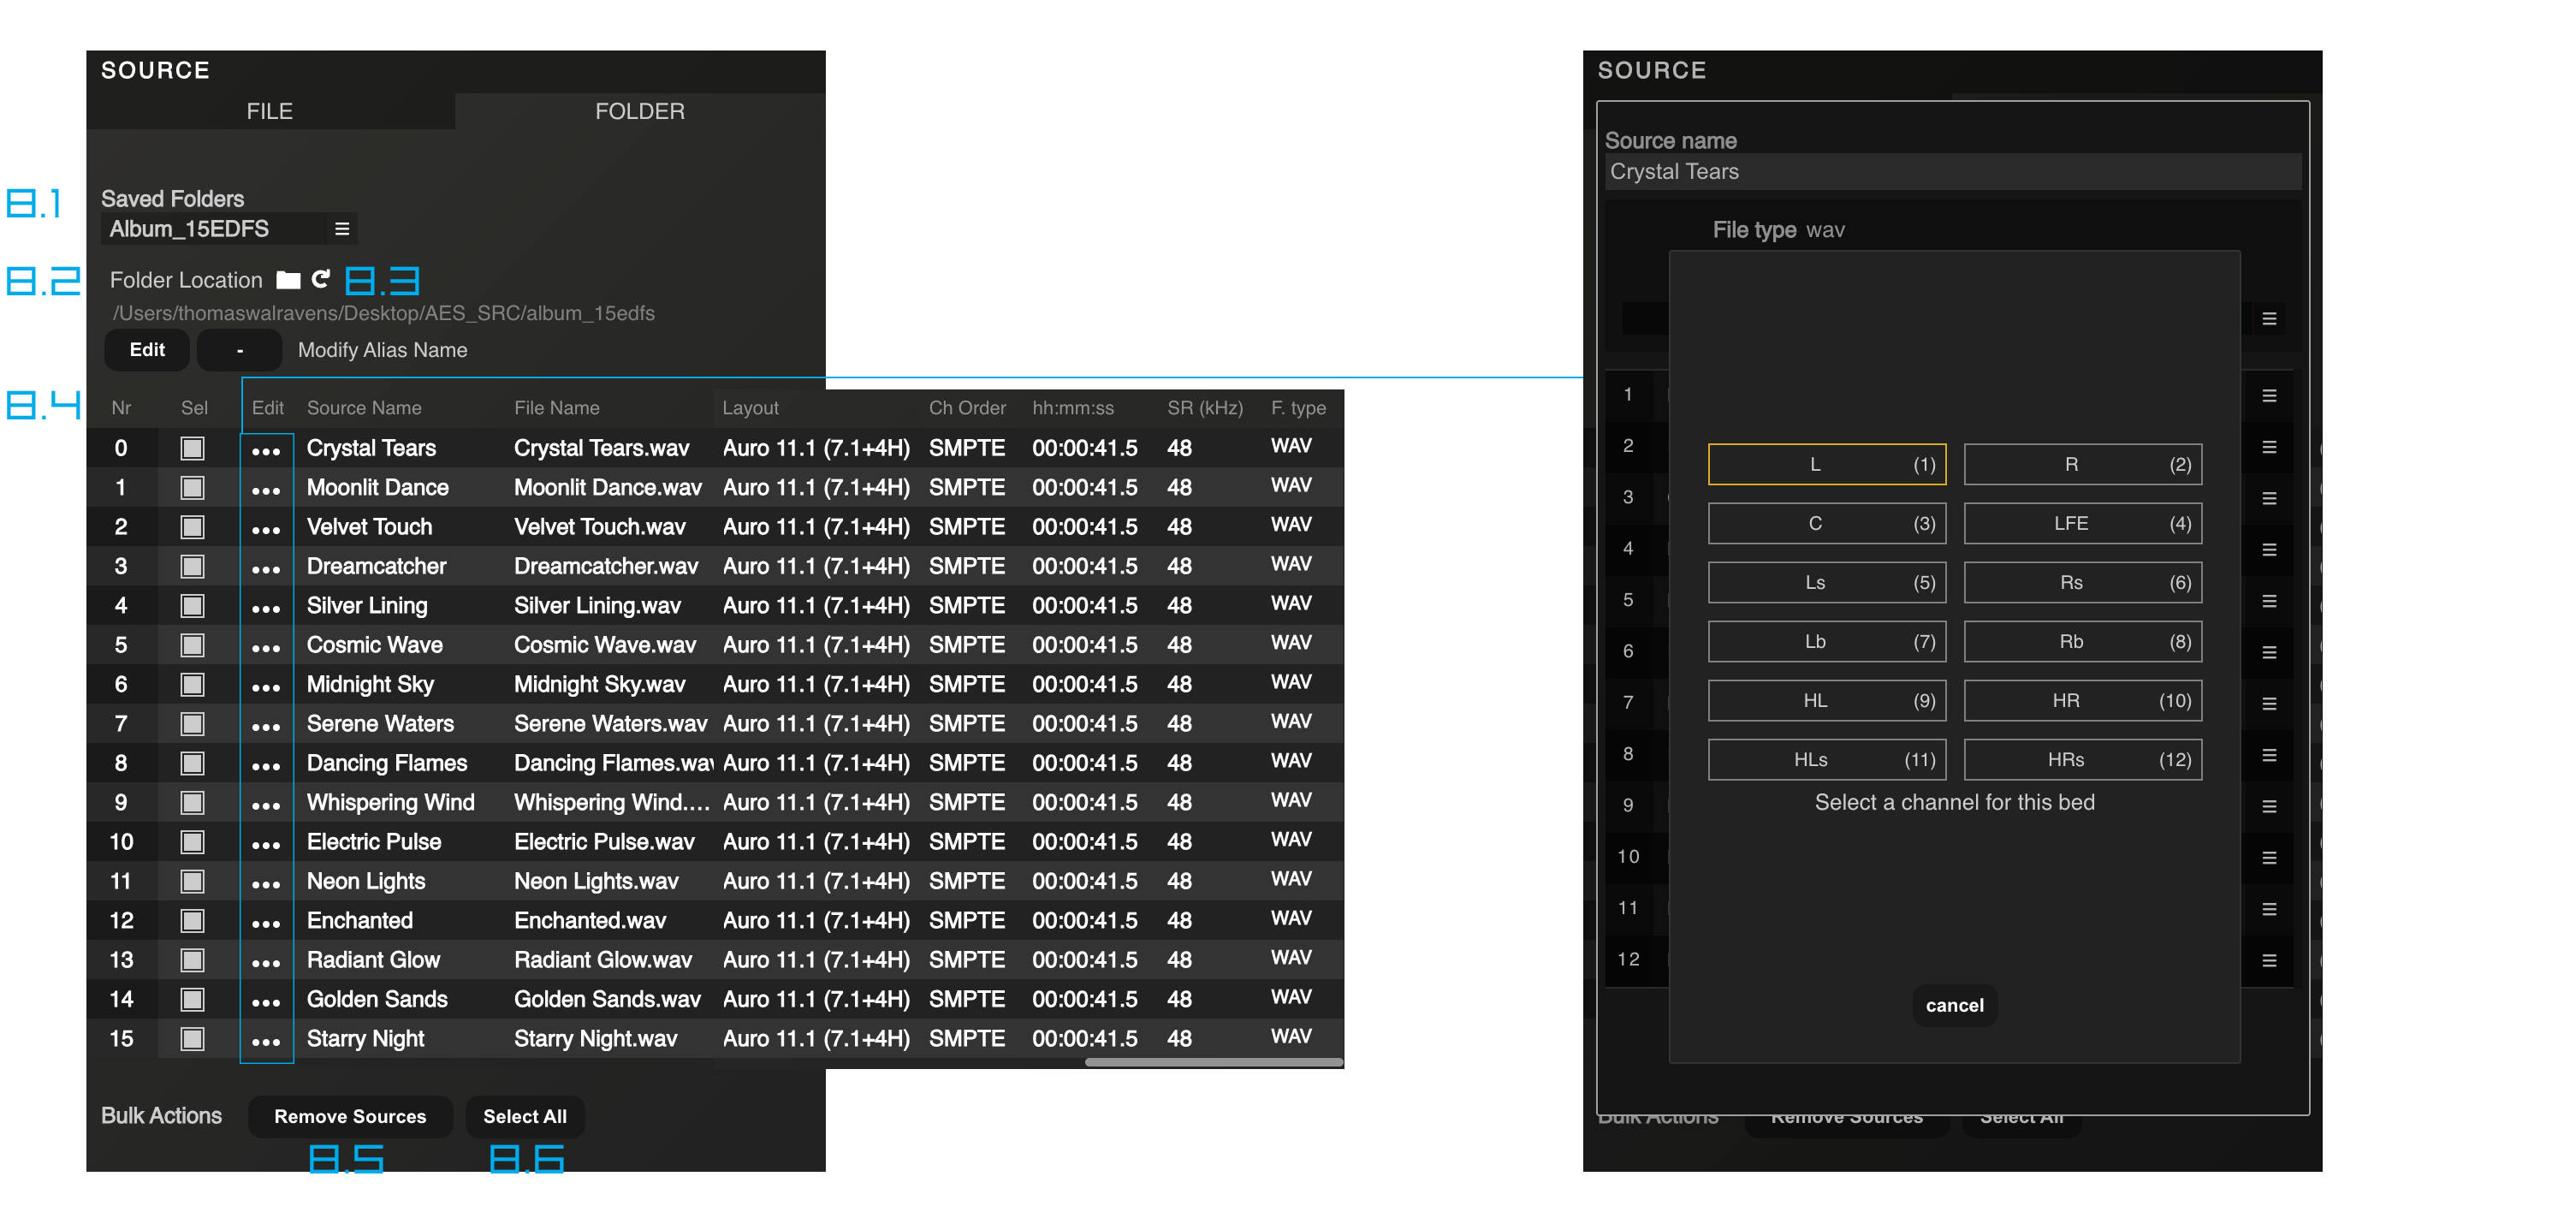
Figure 3.8 – 1 | Scanning a folder in the Folder Tab
The Folder Tab is an efficient tool for encoding multiple files simultaneously, making it especially useful for processing entire albums or collections.
By selecting this tab, access is granted to a comprehensive menu that facilitates the dynamic scanning of folders containing numerous files.
These files can be effortlessly uploaded, configured, and added to the encoding queue in a single operation.
In addition to these functionalities, the Folder Tab offers further conveniences, such as the ability to save favourite folders as aliases.
It is essential to observe that, alongside the addition of new sessions to the queue, the Large ADD Button automatically generates corresponding sources for each selected file within the folder.
Consequently, these corresponding sources will appear individually listed in the Source Presets Drop Down Menu found in the File Tab.
This, in turn, allows for effortless re-selection and combination with other configurations if necessary.
Furthermore, the dedicated Bulk Action Button “Remove Sources” allows for the easy removal of any previously generated sources that are no longer necessary in the queue list.
This feature contributes to a well-organised and efficient workspace.
Moreover, sessions can be filtered by folder aliases in the queue list using the drop down menu “Filter by Folder” situated at the top left of the Queue Panel.
• 8.1 Saved Folders Drop Down Menu:
Upon saving a selected folder as an alias, its name becomes a preset accessible within the Saved Folders Drop Down Menu.
It is crucial to note that solely the folder’s path is stored, while the folder’s content is dynamically updated.
• 8.2 Folder Location Button:
The Folder Location Button, represented by a folder-shaped icon, serves the purpose of selecting the folder to be scanned and potentially saved as an alias at a later stage.
• 8.3 Refresh Folder Button:
The Refresh Folder Button, represented by a looping arrow icon, performs the function of scanning the currently selected folder to update its content.
• 8.4 Upload Area:
Similar to the File Tab, the Upload Area offers a user-friendly interface that simplifies the process of scanning, reviewing, configuring, and creating sources from the selected folder within the system.
After the scanning process, users have the option to select the files they wish to include in the queue by using the File Selection Checkboxes.
If the selected source is currently being used by any of the Encodings in the Queue List, an “IN USE” flag appears, indicating that the source is in use and cannot be deleted or modified until it is no longer being used.
This helps prevent unintended modifications or deletions of sources that are actively being used in encoding tasks.
As always, the system intelligently detects and applies the appropriate channel format and layout based on the WAVEX standard (ITU channel order) specifications, provided that the specified files contain a defined channel mask.
In cases where files within the folder lack a defined channel mask, the system cleverly deduces the most likely format based on the number of channels and the corresponding SMPTE channel order.
For enhanced customisation, the ability to manually review and modify the channel order of each file is available using the Edit Buttons, ensuring specific preferences are met.
After pressing the Large ADD Button and adding all files from the folder to the queue, the source names will be automatically derived from the file names.
• 8.5 Bulk Action Remove Sources Button:
The Bulk Action Button “Remove Sources” removes any previously generated sources that are no longer necessary in the queue list.
• 8.6 Bulk Action Select All Button:
The Bulk Action Button “Select All Button” lets swiftly select all files within the currently chosen folder.
It is possible also possible to perform the same action by clicking on the label “Sel” situated at the top of the selection column in the Folder Upload Area.