Select and Configure your Encoding Preset
The Configurations Menu and its various parameters, along with the Management Buttons and Preset Drop-Down Menu, are useful for users as they provide a high level of customization and control over the encoding process. Users can customize the encoding settings to match their specific source material and desired output format, such as selecting the appropriate Encoder Type, Output File Type, Profile, Frame Rate, and other parameters. This allows users to optimize the encoding process for their specific use case, whether it’s encoding for music or movies profiles, and achieve the desired quality and file format for their encoded files. The ability to save and edit presets also allows users to easily apply custom configurations for future use without having to manually adjust the settings each time. Overall, these features provide flexibility and convenience for users to achieve the best possible encoding results based on their preferences and requirements.
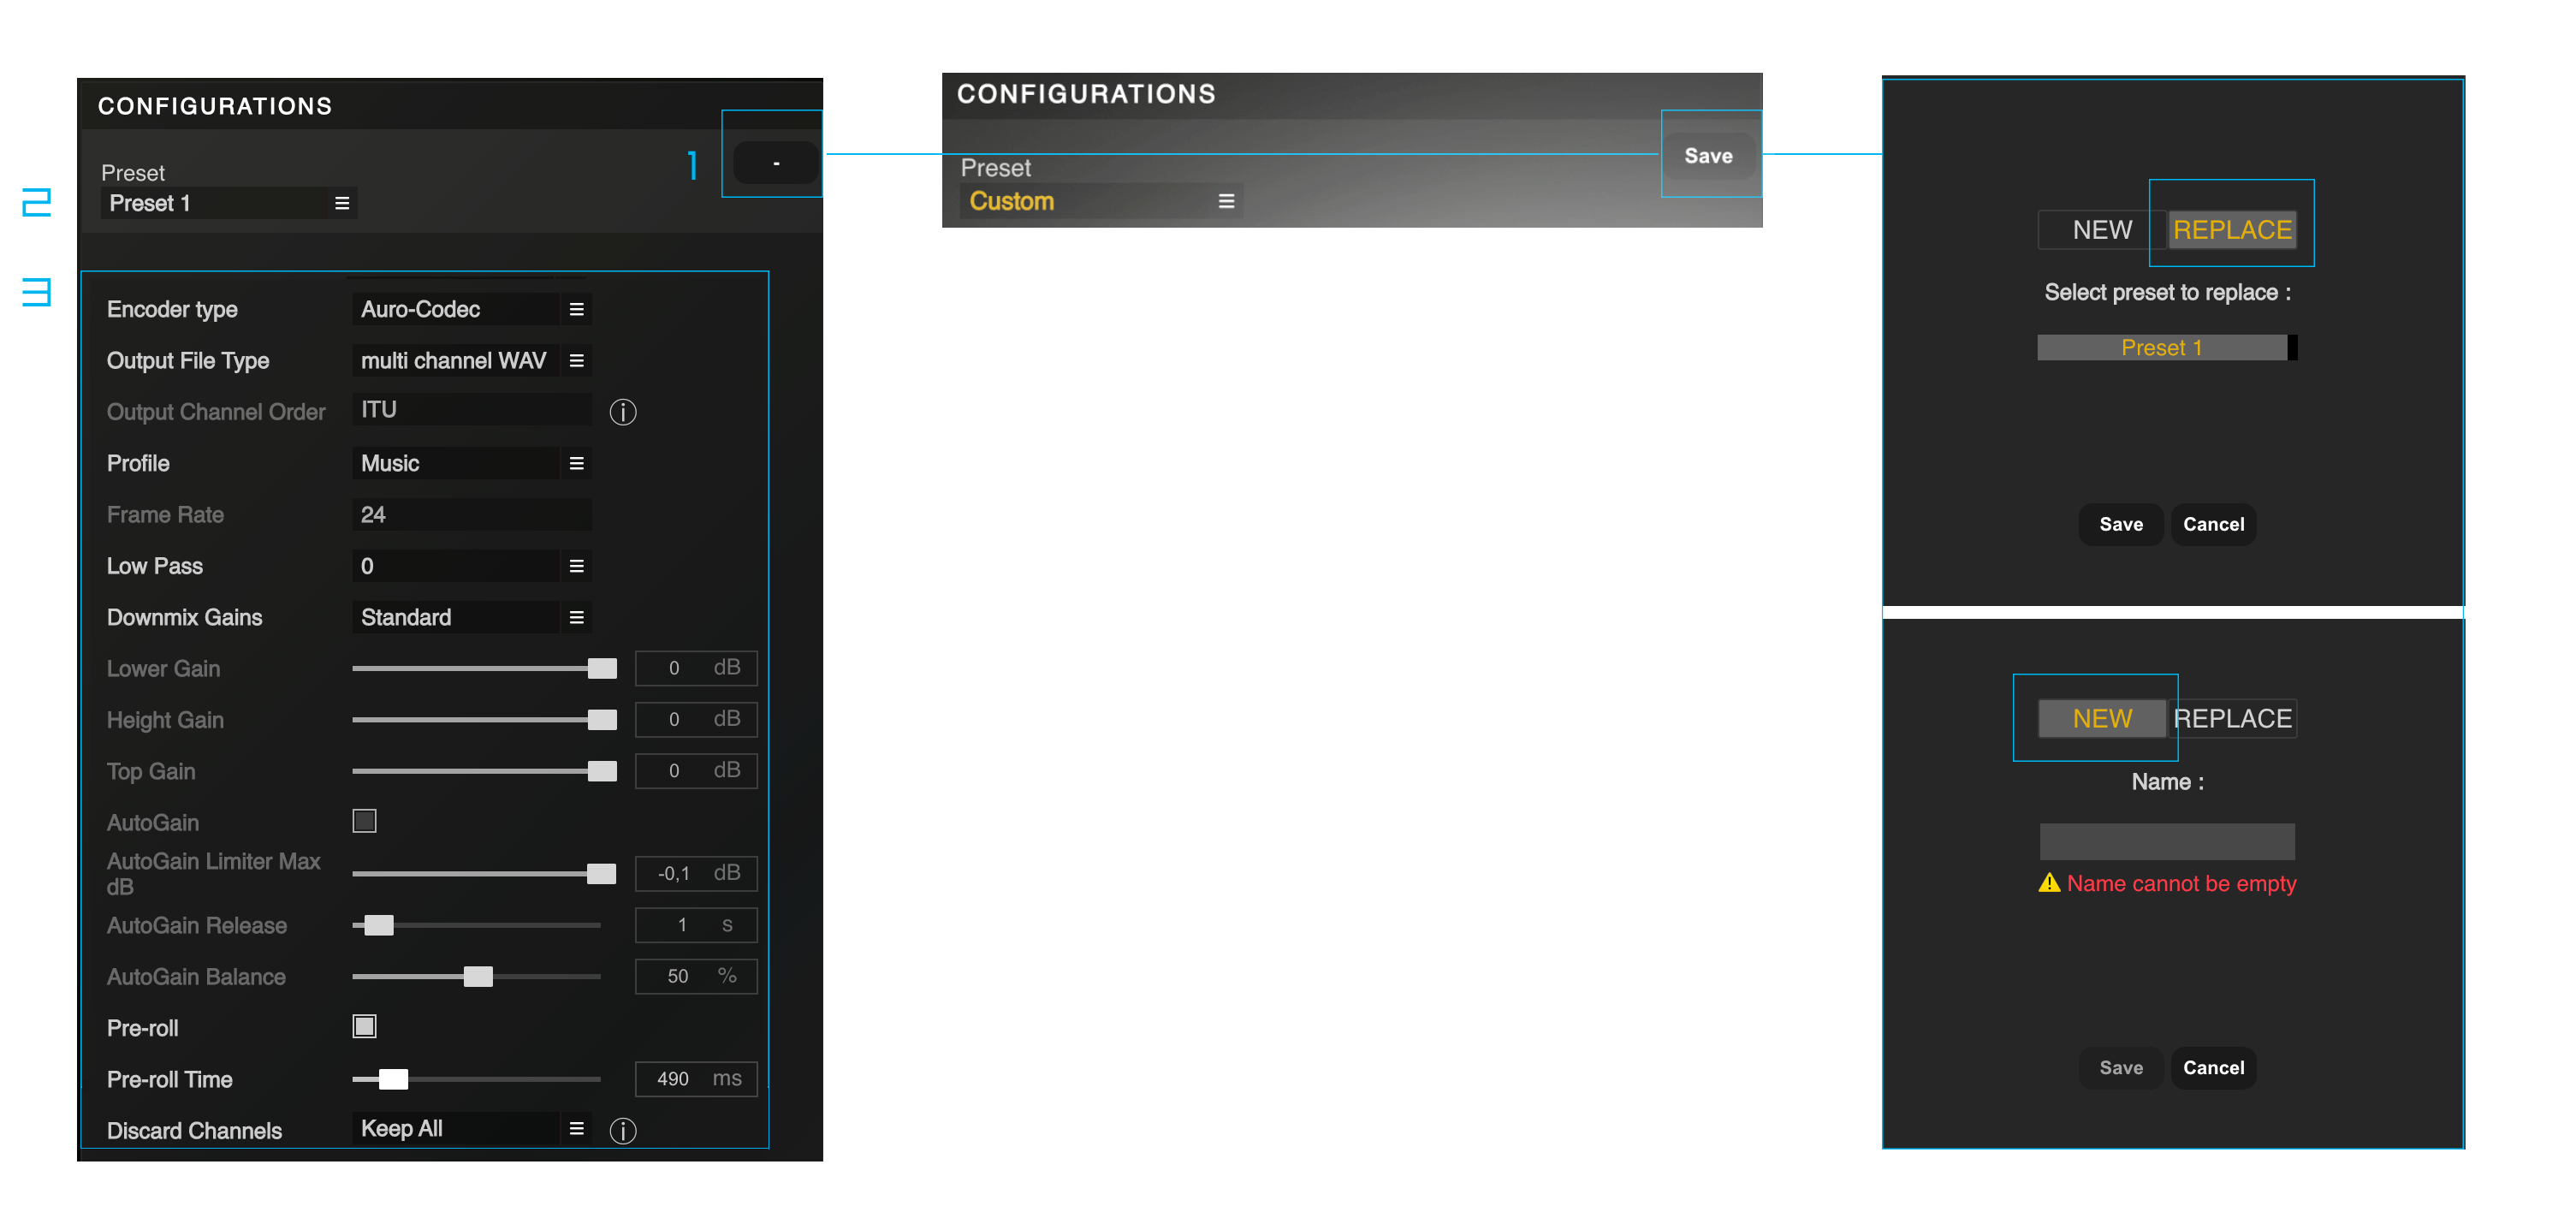
Figure 3 – 3 | Configurations Menu Overview
1. Management Buttons
The Configurations Management Buttons enable the ability to save, edit, and delete encoding presets.
• Save Button: By pressing the Save Button on the top right, you can save a particular configuration in a preset.
After clicking the Save Button, you can choose whether to create a new configuration preset or override an existing one.
It’s important to note that the Save Button will only be enabled once changes have been made to one or more parameter values in the current preset.
• Cancel Button: The Cancel Button drops all the current changes.
• “-” Button: The “-” Button allows for the deletion of the currently selected configuration..
2. Preset Drop Down Menu
The Preset Drop-Down Menu allows for the selection of the desired configuration preset.
• “Custom” Status: The Custom status appears if the current configuration is not stored as a preset.
It’s important to note that it is possible to apply a custom configuration to a source and add the corresponding session to the Queue List without the need to save the configuration as a preset.
3. Configuration’s Parameters
The parameters provide the ability to configure the type of encoding and define specific behaviors to be applied to the currently selected source.
• Encoder Type: The Encoder Type Drop-Down Menu provides options to select the desired encoder. Each selection has its own set of parameters.
The possible choices are:
• Auro-Codec: The renowned Auro-Codec enables distribution of immersive mixes via a single file, supporting 2D + 3D formats in a single carrier. Uncompressed PCM quality is available for 5.1 Surround and 7.1 mixes, and systems equipped with an Auro-Decoder can playback the original AURO-3D® mix.
• Convert: Allows conversion of an input file format into a different output file format by specifying the Output File Type value. For example, converting an ADM file into a multi-channel WAV file (objects will be printed into the channel-based bed), or converting a multi-channel WAV file into multi-mono WAV files (all channels will be extracted from the original interleaved file), and so on.
• Output Channel Order: The Output Channel Order Drop Down Menu is only visible when the Output File Type “multi-channel WAV” is selected. This parameter determines the organization of audio channels within the resulting interleaved WAV file.
The Channel Order within a multi-channel WAV-file has an important impact on the correct channel mapping during playback. It should be chosen carefully depending on the target playback system or device, which can expect or support different channel orders.
When the Encoder Type is set to “Conversion”, you can choose between ITU and SMPTE channel orders. For a multi-channel WAV file in Auro 13.1 format, the ITU and SMPTE channel orders are as follows:
When the Encoder Type “Auro-Codec” is selected, the Output Channel Order is automatically set to the “ITU” channel order. This is because Auro-Codec encoded content must follow the ITU channel order to ensure proper playback on most devices.
For both 5.1-based and 7.1-based Auro-Codec encoded surround carriers, the ITU channel order is as follows:
• ITU Channel Order for 5.1-based Auro-Codec encoded surround carriers:
L, R, C, LFE, Ls, Rs.
• ITU Channel Order for 7.1-based Auro-Codec encoded surround carriers:
L, R, C, LFE, Lb, Rb, Ls, Rs.
(Note that the channel orders of all other formats with fewer channels can be easily deducted from the example provided above by simply omitting the unused channels from the list, as they follow the same channel order sequence).
• Output File Type Drop Down Menu: This feature allows you to select the desired format for the output file.
There are four available options:
• multi channel WAV: Select this option if you want the output file to be in a multi-channel WAV format, which supports multiple audio channels in a single file.
• mono channel WAV: Choose this option if you prefer the output file to be in a mono-channel WAV format, where each audio channel is saved as a separate file.
• FLAC: Select this option if you want the output file to be in FLAC format, which is a lossless audio compression format known for its high-quality audio reproduction.
• FLAC + WAV: Choose this option if you want to generate both FLAC and WAV versions of the output file, with FLAC being a lossless compressed format and WAV being an uncompressed format.
![]() Remarks about the FLAC Export Option:
Remarks about the FLAC Export Option:
The FLAC export option allows users to encode audio files in the FLAC format, which is a lossless audio compression format known for its high audio quality and small file size. However, in order for the FLAC export option to work, the “flac” Application must be installed on the user’s system. If the “flac” Application is not installed, the FLAC export option will not function properly.
Checking for FLAC Application Existence:
To determine if the “flac” Application is installed on your system, you can use the following method:
On macOS:
Open a terminal window.
Type “flac -v” in the terminal window and press Enter.
If the “flac” Application is installed, the version information for “flac” will be displayed in the terminal window, confirming its existence on your system.
On Windows:
Open a command prompt window.
Type “flac -v” in the command prompt window and press Enter.
If the “flac” Application is installed, the version information for “flac” will be displayed in the command prompt window, confirming its existence on your system.
Note: If the “flac” Application is not installed on your system, you will need to install it in order to use the FLAC export option provided by the 3D Audio Encoder software. You can download and install the “flac” Application from the official FLAC website or through package managers available on your operating system.
Flac version 1.3.4 is recommended
How to Install the FLAC Application:
Click HERE to learn how to enable the FLAC Export Options in the AURO-3D® Encoder by installing the FLAC Application.
• Profile Drop Down Menu: When the Encoder Type is set to Auro-Codec, you are presented with the option to select either the Music or the Movie profile.
The Movie profile provides the ability to specify a specific fps (frames per second) value for the encoding process, while the Music profile grants access to additional Pre-Roll parameters to ensure proper encoding at the start time of the resulting encoded file.
• Frame Rate Drop Down Menu: Provides the option to select different frame rates for encoding Auro-Codec encoded content in the Movie profile. There are eight available values to choose from:
• 23.976 fps
• 24 fps
• 25 fps
• 29.97 fps
• 30 fps
• 48 fps
• 60 fps
• 72 fps
• Low Pass Filter Drop Down Menu: The Low-pass filter dropdown menu allows you to apply a low-pass filter to the output of the mix. It offers cut-off frequencies of 0 Hz, 18 kHz, 19 kHz, and 20 kHz to choose from. This filter is disabled by default and set to 0.
• Downmix Gains Drop Down Menu: Allows you to switch between Custom or Standard mode for the downmix behaviour. In Standard mode, no dynamic treatments will be applied to the encoded version of the file, while in Custom mode, the user has complete control over all optional dynamic parameters, such as layer gain sliders and Auto Gain options.
• Lower, Height and Top Gain Sliders: These parameters enable adjustment of how the original layers of the immersive mix will be downmixed into the 6 or 8 channels encoded carrier, and how they will then be played back dynamically on a surround configuration. Note that the Downmix Gains Drop Down Menu must be set to Custom in order to enable the Lower, Height and Top Gain Sliders
• Auto Gain Button: When the Auto Gain button is activated, it automatically adjusts the Encoded Downmix levels to prevent potential audio saturation in certain encoded channels. This saturation issue may occur during the encoding process when summing 2 or 3 channels (e.g. L and HL channels, or L, HL and T channels) into one encoded channel (e.g. encoded L channel). The behaviour of this dynamic tool can be further adjusted using the corresponding Release, Balance and Limiter parameters.
• Auto Gain Limiter Max dB: Sets the ceiling value for the Auto Gain mechanism, ensuring that the audio remains within a desired dynamic range and avoids clipping or distortion during the encoding process.
• Auto Gain Release: The Release drop-down menu is available only when the Auto Gain button is activated. The release time corresponds to the total time it takes for the signal to return to its original state after being trimmed by the Auto Gain mechanism. Release times of 0.1, 0.5, 1, 5, 10, and 50 seconds are available for selection. The default value is set to 1 second.
• Auto Gain Balance: The Balance Drop Down Menu is only accessible if the Auto Gain Button is activated. This parameter lets you modify the behaviour of the Auto Gain mechanism. Its default value “50” implies that the trim effects will be identical and equally applied to all channels. Lower values (e.g. 30, 40) cause the lower channels to be more subjected to the trim effects.
Inversely, higher values (e.g. 60, 70) cause the height channels to be more subjected to the trim effects.
• Pre roll Button: When activated, a pre-roll of silence will be included at the beginning of the encoded file. The length of this early silence can be adjusted using the Pre roll Time parameter. Many playback systems require around 300 to 500 ms to start decoding encoded content, and this pre-roll ensures smooth decoding performance for the starting samples of the encoded file. By including a period of silence before the actual audio content begins, potential decoding issues or audio artifacts that may occur during the initial playback can be mitigated, resulting in a more seamless listening experience for the end-user.
• Pre roll Time Parameter: The Pre roll Time parameter allows to specify the duration of the Pre roll in milliseconds. This parameter determines the length of the silence that will be included at the beginning of the encoded file when the Pre roll Button is activated.
• Discard Channels Drop Down Menu: This feature allows for the selective discarding of surround or back channels during the encoding process, enabling downmixing from a higher channel format to a lower channel format. For example, a 7.1-based immersive audio source, such as Auro 11.1 (7.1+4H), can be downmixed to a 5.1-based encoded format, such as Auro 9.1 (5.1+4H). This downmixing process involves selectively omitting audio channels to create a new audio format with fewer channels. It’s important to note that this downmixing technique may result in some loss of audio information, particularly for mixes that include moving audio elements. However, it can sometimes be a useful option for projects based on 3D field recording techniques that require downmixing for compatibility with lower channel format playback systems. Note that when the option “Discard Surrounds” is selected, the original back channels will end up in the surrounds channels of the encoded result.