
Select and Create your Source
The Source Menu consists of two tabs: the Source Tab and the Albums Tab.
In the Source Tab (1), sources can be managed, organized, and configured.
This tab is used to
select and upload audio WAV or ADM files for encoding. Once saved, these files are cataloged as sources within the
system.
A source consists of a Main Program, accessible via the Programs Tab
(C), including one or more Elements, found in the Elements Tab (B), each
individually linked to Media Files, available in the Media Tab (A), and optionally accompanied by
Metadata that is parsed or defined in the Metadata Tab (D):
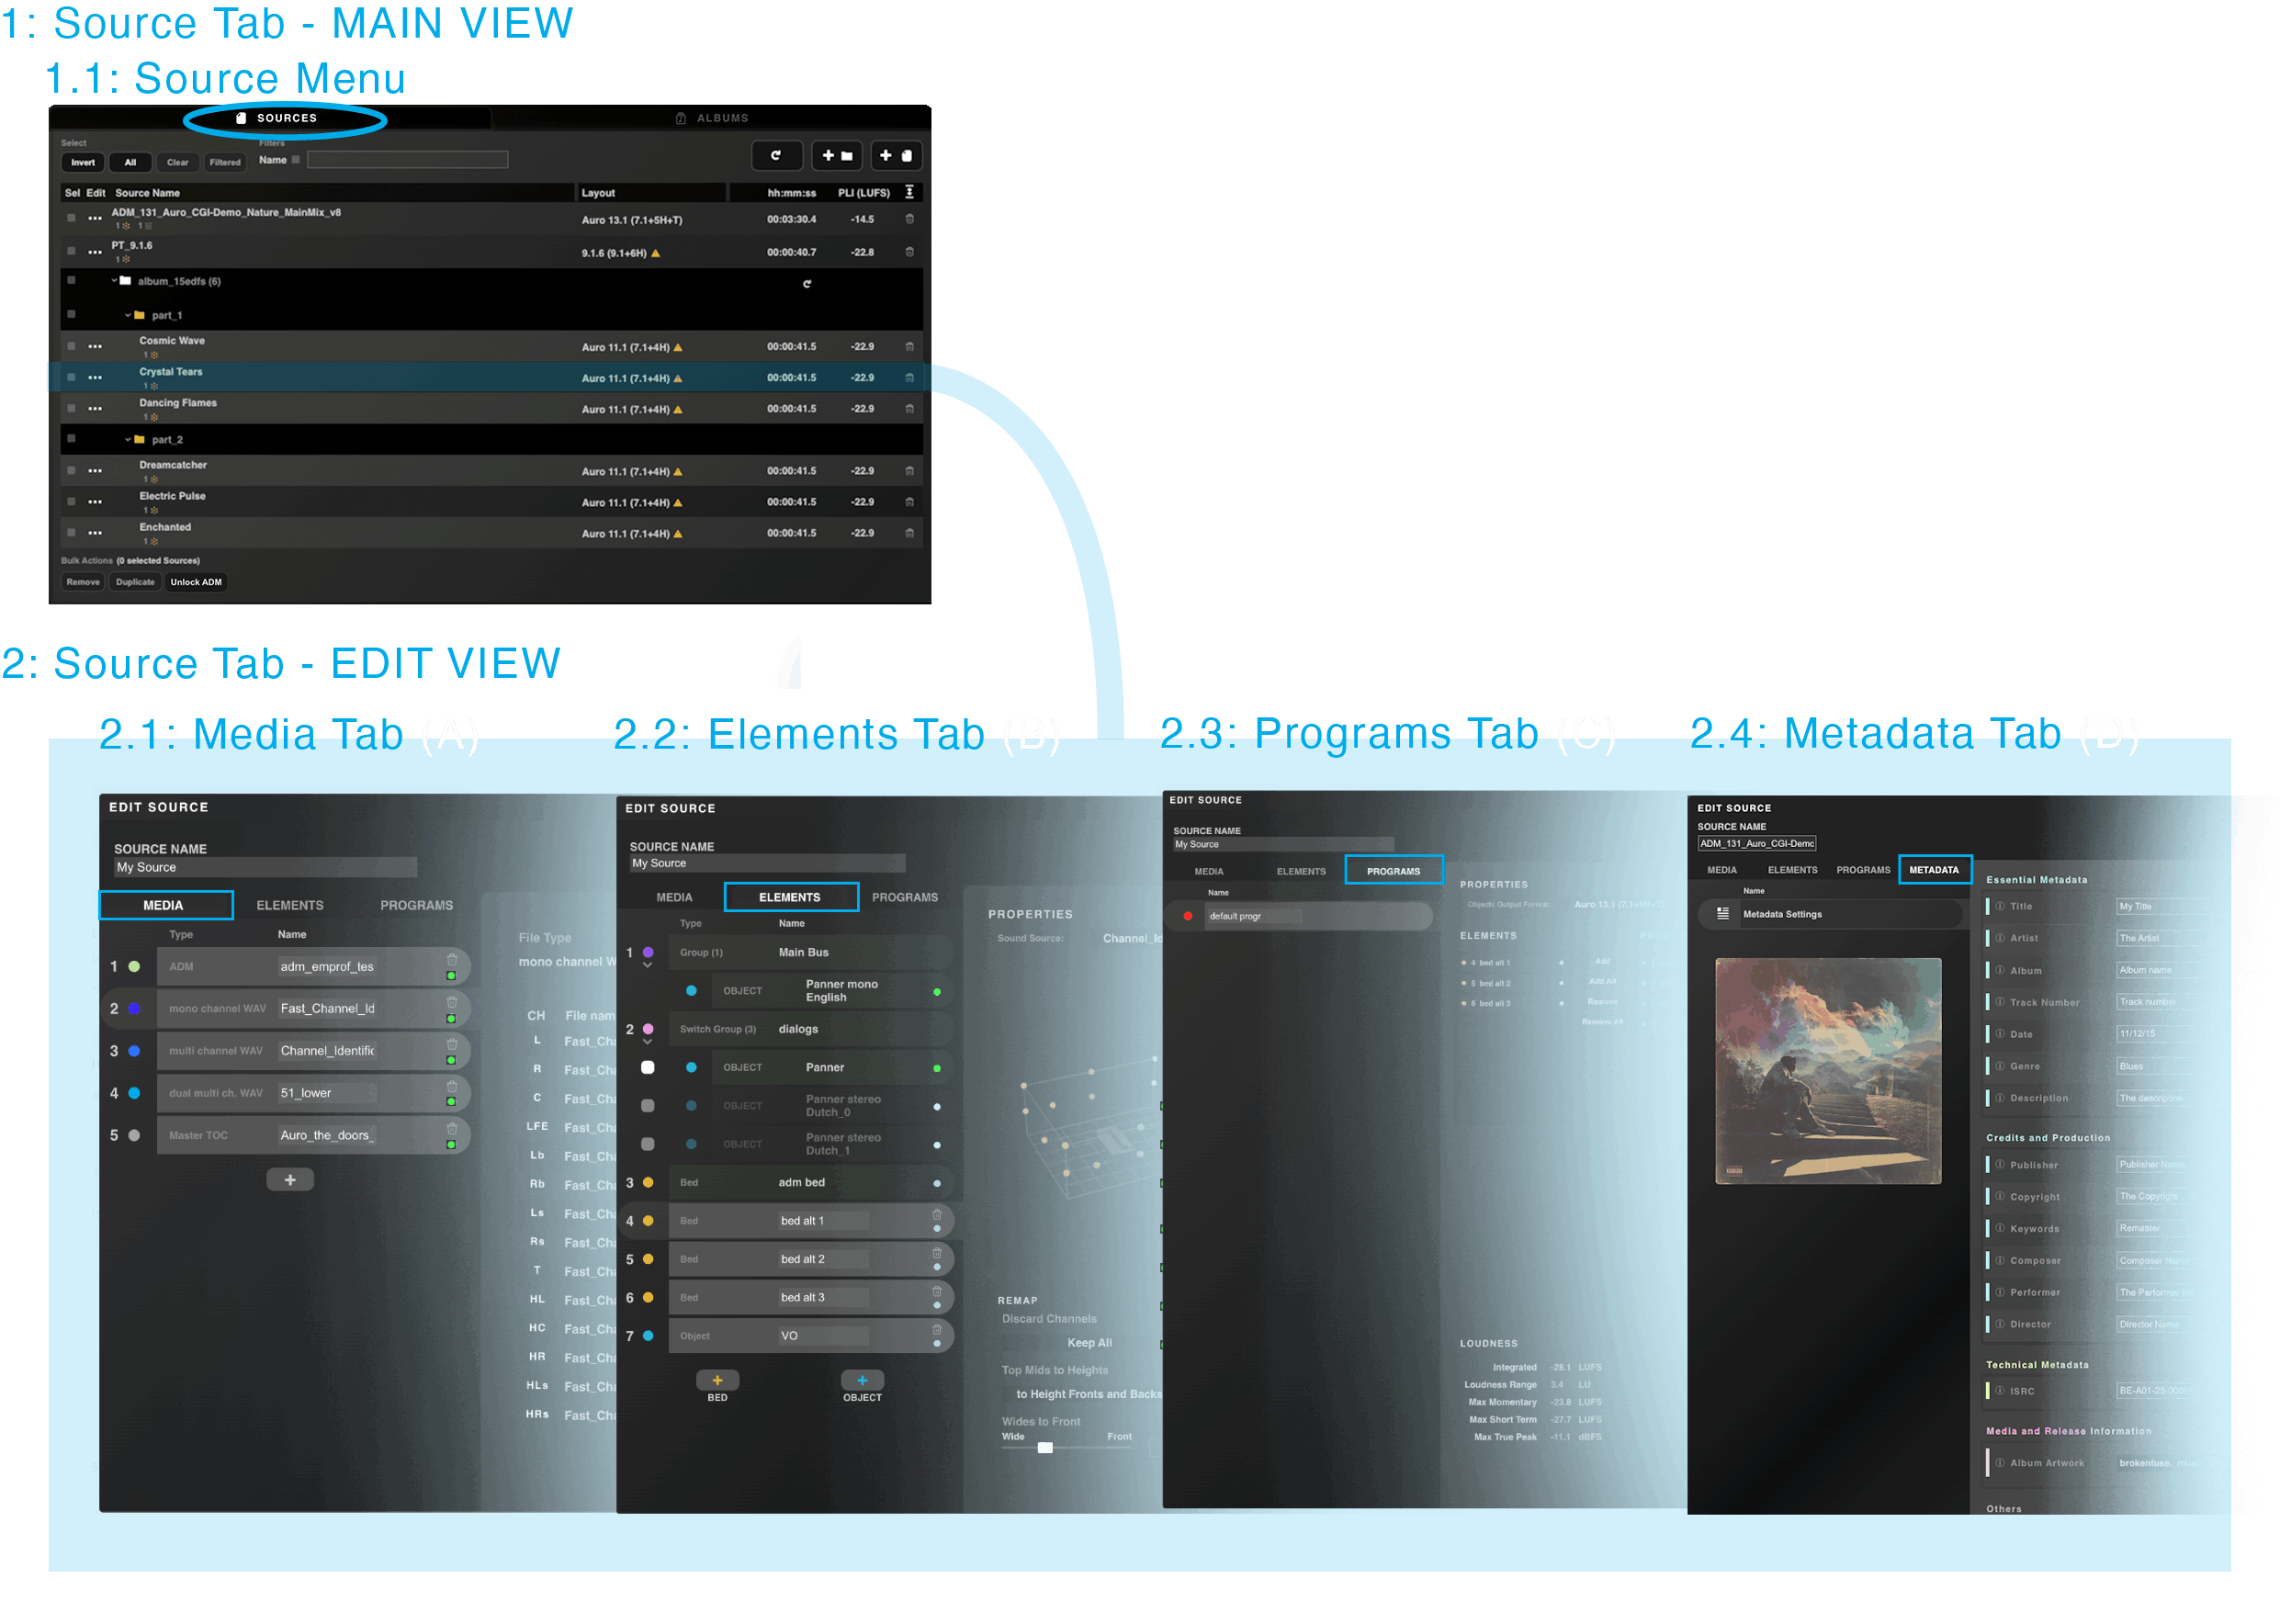
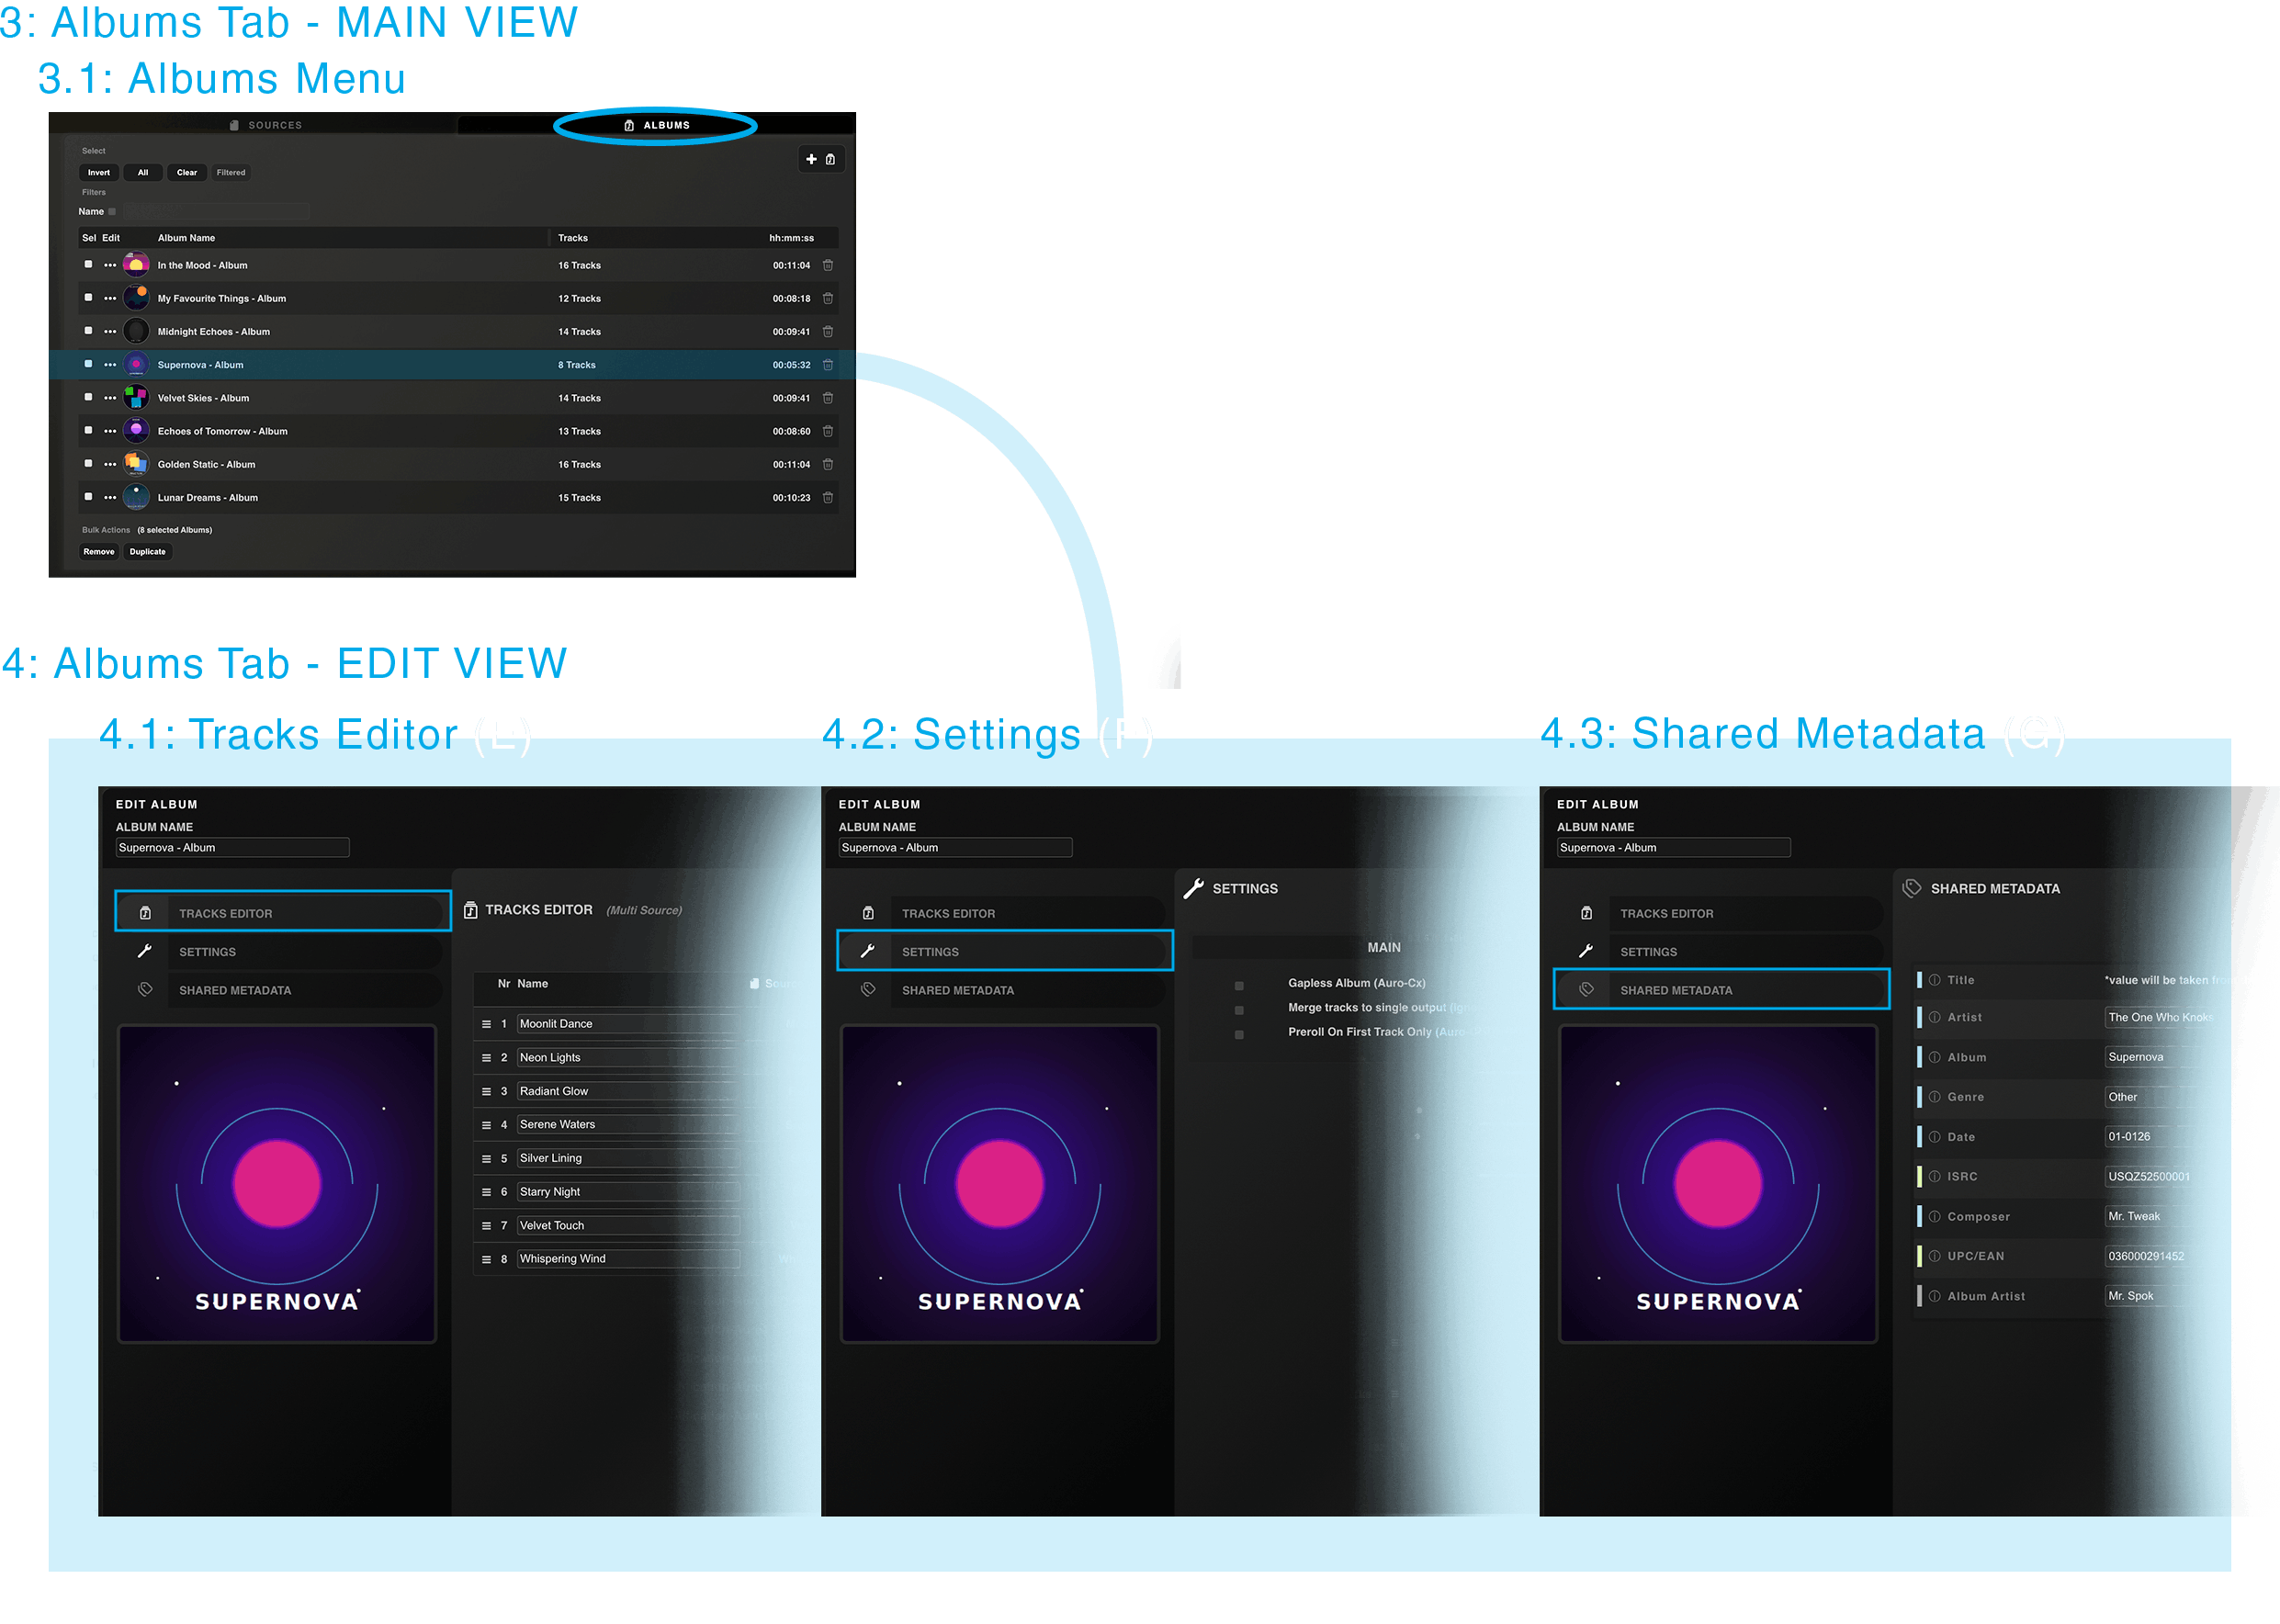
Figure 3.1 – 1 | Source Menu Generic Overview
Creating a new source in the Source Tab typically involves uploading the necessary media
files
(A), associating them with relevant elements (B), deciding whether to include
these elements in the main program or not (C), with or without associated metadata
(D): (A) Initially, each source hosts one or more media files, which are uploaded
via the Media Tab. Supported file formats include multi-channel WAV, mono-channel WAV, and dual multi-channel WAV
(with the mix separated into lower and upper interleaved files), as well as ADM (.wav or bwf) files.
Each media can be supplemented with source settings such as layout, channel order, and more.x (B)
Next, in the Elements Tab, all existing media files within the source can be linked to Bed or Object Elements. Bed
Elements include Downmix, Auto Gain, and optional Remap settings, while Object Elements are accompanied by Levels,
Position, and Spread parameters. It’s noteworthy that for ADM files, the corresponding Bed and Object elements are
automatically retrieved and generated upon uploading the ADM file (read only). (C) Next, these
elements can be optionally included in the main source program via the Programs Tab. (D) A source
can include Metadata defined in the Metadata Tab. The original file metadata, even the cover image, can be
automatically parsed by enabling “Copy Metadata from File” in the global settings (see Chapter 3.9). The metadata
included in the final encoding is managed through the “Metadata Management” table in the global settings.
The Albums Tab (3) groups sources, typically for music albums. Groups can
be created from
files or from sources already present in the Source List. For the Single Source album type (one source only,
consisting of a single audio material file), an EDL file can be imported to split that file into multiple tracks.
In all cases, the resulting tracks remain
represented in the Source List. Sources within an album use the
same settings as regular sources in the Source Tab, with additional album-level properties defined in this tab.
Creating an album in the Albums Tab typically involves selecting or importing source
tracks,
then, in the Albums Tab Main View, optionally editing their timing and order in the Track Editor Tab
(E), defining album playback behavior in the Settings Tab (F), and reviewing
album-level metadata shared across all
tracks in the Shared Metadata Tab (G): (E) Track order and timing can be edited
in the Track Editor Tab. (F) Album playback behavior is defined in the Settings Tab.
(G) Metadata shared across all tracks in the album is reviewed in the Shared Metadata Tab.
1. Source Tab – Main View
The Main View of the Source Tab provides an overview of all available sources that can be
combined with one or more selected configuration sets (see Chapter 3.2) and a single output name configuration (see
Chapter 3.3) to create customized encodings. For a detailed view or to modify a source’s configuration and settings,
switch from the Main View to the Edit View, where each source can be edited and configured (see Chapter 3.1.2).
3.1 Albums Menu
The Source Menu enables the creation, editing, duplication, and deletion of sources. It
also provides options to select sources for adding to the Queue List and filter them by name. The table displays all
available sources along with key details, such as length and loudness calculation progress: 
Figure 3.1.1.1 – 1 | Source Menu – Main View
3.1.1 Management Buttons:
•  Rescan All Button: The Rescan All button verifies that all existing sources
still have their referenced media files available on the local system. This applies to all source types, whether
organized in a folder structure or added as individual files. If any media files are missing (for example, audio
files .wav or image files .jpeg), the system clearly indicates this in the Source
Table within the Main View, as well as in the Media Tab in Edit View, making the source unusable
until the path issue is resolved – “One or more files are missing“. Note that the
Rescan All button updates the folder contents if new sources have been added to the corresponding physical
directory, automatically creating these newly added files as new sources. 
Figure 3.1.1.1.1 – 1 |Rescan All Button revealing a missing media within an
existing source (Main and Edit Views)
•  Add Folder Button: The Add Folder button allows creating multiple sources
at once from the audio media files contained in a selected folder on the system. After selection, the system
automatically generates corresponding sources, which appear individually in the Source Table. The original
folder structure is visually represented in the table, with parent folder icons shown in white and subfolder
icons in yellow. Only interleaved WAV and ADM files within the folder are scanned. These files can be quickly
uploaded, configured, and added to the encoding queue in a single operation. When used together with the output
options “Preserve Folder Structure” in the Folder Structure Tab of the Output Menu (see Chapter 3.3), the
original folder structure can optionally be preserved, organizing the resulting encodings relative to their
original folder structures. Note that the Source Table is not a real-time file manager; it serves as a visual
aid to help identify files according to their original organization and to maintain that structure in the final
output. Nevertheless, it is still perfectly possible to update a physical folder by adding new sources to it and
then manually rescanning the folder in the Source Table in order to include the newly added sources in their
expected locations within the folder structure.

Figure 3.1.1.1.1 – 2 |Automatically creating sources from an added folder
Sources organized within a folder structure offer additional convenience, such as the
ability to select all sources within a folder or subfolder at once by clicking the selection button next to the
folder or subfolder icons. It is then possible to swiftly choose one or more configuration sets and an output
naming configuration to add the selected sources to the encoding queue. Each parent folder can also be rescanned
individually by clicking the small rescan icon located in the same row as the corresponding folder:
⚠️ When adding a folder containing multiple ADM files, each resulting source must be
manually unlocked. Additionally, it is currently not possible to apply certain parameter values to multiple
sources simultaneously. This limitation is a known inconvenience and will be addressed in future versions of the
software.
•  New Source Button: The New Source Button lets create an individual source
manually. Clicking it switches to the Edit View with a blank new source, allowing the addition and configuration
of new sources according to the desired settings.
•  Edit Button: The Edit Button transitions the Source Menu from Main View to
Edit View, allowing modifications to the selected source. This includes editing the Source Name, Layout, Channel
order of included Media Files, configuration of related Element parameters, and Main Program content. If the
source is currently in use by any encodings in the Queue List, a “SOURCE IN
USE” label appears in the top left corner of the Edit View, and a padlock icon replaces the
edit icon in the source table in Main View.  This
This
design prevents accidental changes or deletions of sources involved in ongoing encoding tasks.
3.1.2 Select Buttons
In addition to the selection checkboxes within the Source Table in the Source Main
View, a set of Select Buttons is available to facilitate more advanced selection methods:
• Select Invert Button: Unselects the currently selected sources in
the Source Table and selects the currently unselected ones. • Select All Button:
Selects all existing sources in the Source Table. • Select Clear Button: Unselects all
existing sources in the Source Table. • Select Filtered Button: Selects the sources
that match the current name set in the Filters Field.
3.1.3 Filters Field
The Filters Field allows for filtering of existing sources in the Source Table within
the Main View. Currently, the available filter is the Name Filter, which can be activated by selecting the
checkbox next to the ‘Name’ label under the Filters section. Once the Name checkbox is selected, a custom word
can be entered in the Filter Field, and upon pressing the ‘Select Filtered’ button, only sources matching the
specified name will be displayed in the Source Table.
3.1.4 Source Table
The Source Table provides functionality to select, edit, and delete existing sources.
Its simple interface facilitates the encoding workflow, enabling quick and efficient addition of selected
sources to the encoding process via the prominent ‘ADD’ button in the Control Section. In combination with the
current configuration in the Configurations menu, these added sources create new sessions in the Encoder Queue
list, awaiting encoding initiation by pressing the large ‘START’ button in the Control Section. The Source Table
consists of five columns, each serving a distinct purpose:

Figure 3.1.1.1.4 – 1 | Source Table in the Main View
• 3.1.4.1 Select Column: Allows selection of sources to be added to
the Queue List. Selected sources can also be deleted or duplicated via the Bulk Actions.
•
3.1.4.2 Edit Column: Opens the Edit View of the corresponding source. If the selected source
is currently in use by any encodings in the Queue List, a “SOURCE IN
USE” label is displayed at the top left corner within the Edit View, along with a padlock
icon replacing the edit icon in the Source Table in the Main View.
These visual indicators highlight that the source is currently inaccessible for deletion or modification until
it is no longer in use in the Queue List. This design feature prevents accidental alterations or deletions of
sources engaged in ongoing encoding tasks.
• 3.1.4.3 Source Name Column: Displays
the custom Source Name of the corresponding source.
• 3.1.4.4 Layout
Column: Displays the original layout of the primary audio media file included in the corresponding
source. Note that a single source cannot contain media files with different layouts or sample rates, and the
system supports only one bed element per source. A warning icon “⚠️” may appear next to the Layout Column to
draw the user’s attention. This indicates that additional actions are required in Edit Mode, such as defining
a missing channel order or assigning an unlinked media file to an element.
• 3.1.4.5 Length
Column: Displays the duration of the longest media file included in the corresponding source.
• 3.1.4.6 PLI Column: Displays the pending calculation and, once completed, the
resulting Program Loudness Integrated (PLI) value in LUFS. Note that the automatic calculation of sources can
be disabled in the global settings (see Chapter 3.9). The loudness calculation is a process that may take
longer for large source files. Note that the source can still be added to the Queue List while its loudness is
being calculated. As a reminder, the current version of the software supports only one program per source and
therefore displays the loudness values of that single program, whether here in the Source Table or in the
Statistic Panel (c.f. chapter 3.5).
• 3.1.4.7 Delete Column: Enables the permanent
deletion of the corresponding source. The Delete Column is topped by a special “Max Height Toggle Button”:
 This button toggles between a fixed and dynamic table height. When set to a fixed height,
the table remains within a specific size, requiring scrolling to view all the sources. In dynamic mode, the
table automatically adjusts its height to display all available sources, providing an instant overview of the
total number of entries without the need for scrolling. This feature is particularly useful when working with
large datasets, as it allows for quick visual access to the complete list of sources.
3.1.5 Bulk Actions
Bulk Actions allow the application of specific actions to multiple selected sources
simultaneously.
• The Remove Button: Permanently removes all selected sources from
the Source Table (without deleting their corresponding media files on the local system). Note that sources
marked as “SOURCE IN USE” cannot be deleted until they are
no longer in use.
• The Duplicate Button: Allows duplication of all selected sources.
Each duplicated source is added to the Source Table with a new identifier, preserving the original data while
creating a copy for further modification or use. Note that when duplicating sources within a folder structure,
each source is duplicated at its corresponding position within that structure.
• The Unlock ADM
Button:
Unlocks all selected sources of ADM File Type simultaneously, enabling modification of their retrieved
elements
and parameters. ADM sources are initially locked by default to preserve the original file integrity and
prevent
unintended modifications to the automatically scanned elements. The batch unlock function addresses the
workflow
constraint of processing multiple ADM sources, where individually accessing each source’s edit view to unlock
them would require repetitive navigation steps. Once unlocked via this bulk action, the selected ADM sources
permit modification to their bed, object, and other retrieved elements. Note that this operation only affects
ADM File Type sources in the current selection; other media types are unaffected by this action.
2. Source Tab – Edit View
The Source Edit View is accessible upon creating a new source with the Management Button
“+”, or upon editing an existing source by pressing the “Edit Buttons” located in the Source or Folder Tables. The
top left corner of the Edit View includes the Source Name Field, which serves the purpose of defining a distinctive
name for each source. Upon saving the source, the specified name becomes an accessible item within the Source Table
in the Main View.

Figure 3.1.2 – 1 | Source Menu – Edit View – Source Name Field
A source consists of a Main Program, accessible via the Programs Tab (C),
including one or more Elements, found in the Elements Tab (B), each individually linked to Media
Files, available in the Media Tab (A). Optionally, a source can be accompanied by Metadata that is
parsed or defined in the Metadata Tab (D):

Figure 3.1.2 – 2 | Source Menu – Edit View Tabs
Creating a new source in the Source Tab typically involves uploading the necessary media
files
(A), associating them with relevant elements (B), and ultimately deciding whether
to include these elements in the main program or not (C), with or without associated metadata
(D):
2.1 Media Tab
Initially, each source hosts one or more media files, which are uploaded via the Media
Tab. Supported file formats include multi-channel WAV, mono-channel WAV, dual multi-channel WAV (with the mix
separated into lower and upper interleaved files), as well as ADM (.wav or .bwf) files. Each media
can be supplemented with source settings such as layout, channel order, and more. Each Media can be manually
renamed in the sidebar, allowing for easier identification and organization within the project. A new Media can be
added by pressing the large “+” button located in the sidebar of the Media Tab within the Source Menu in Edit
View:
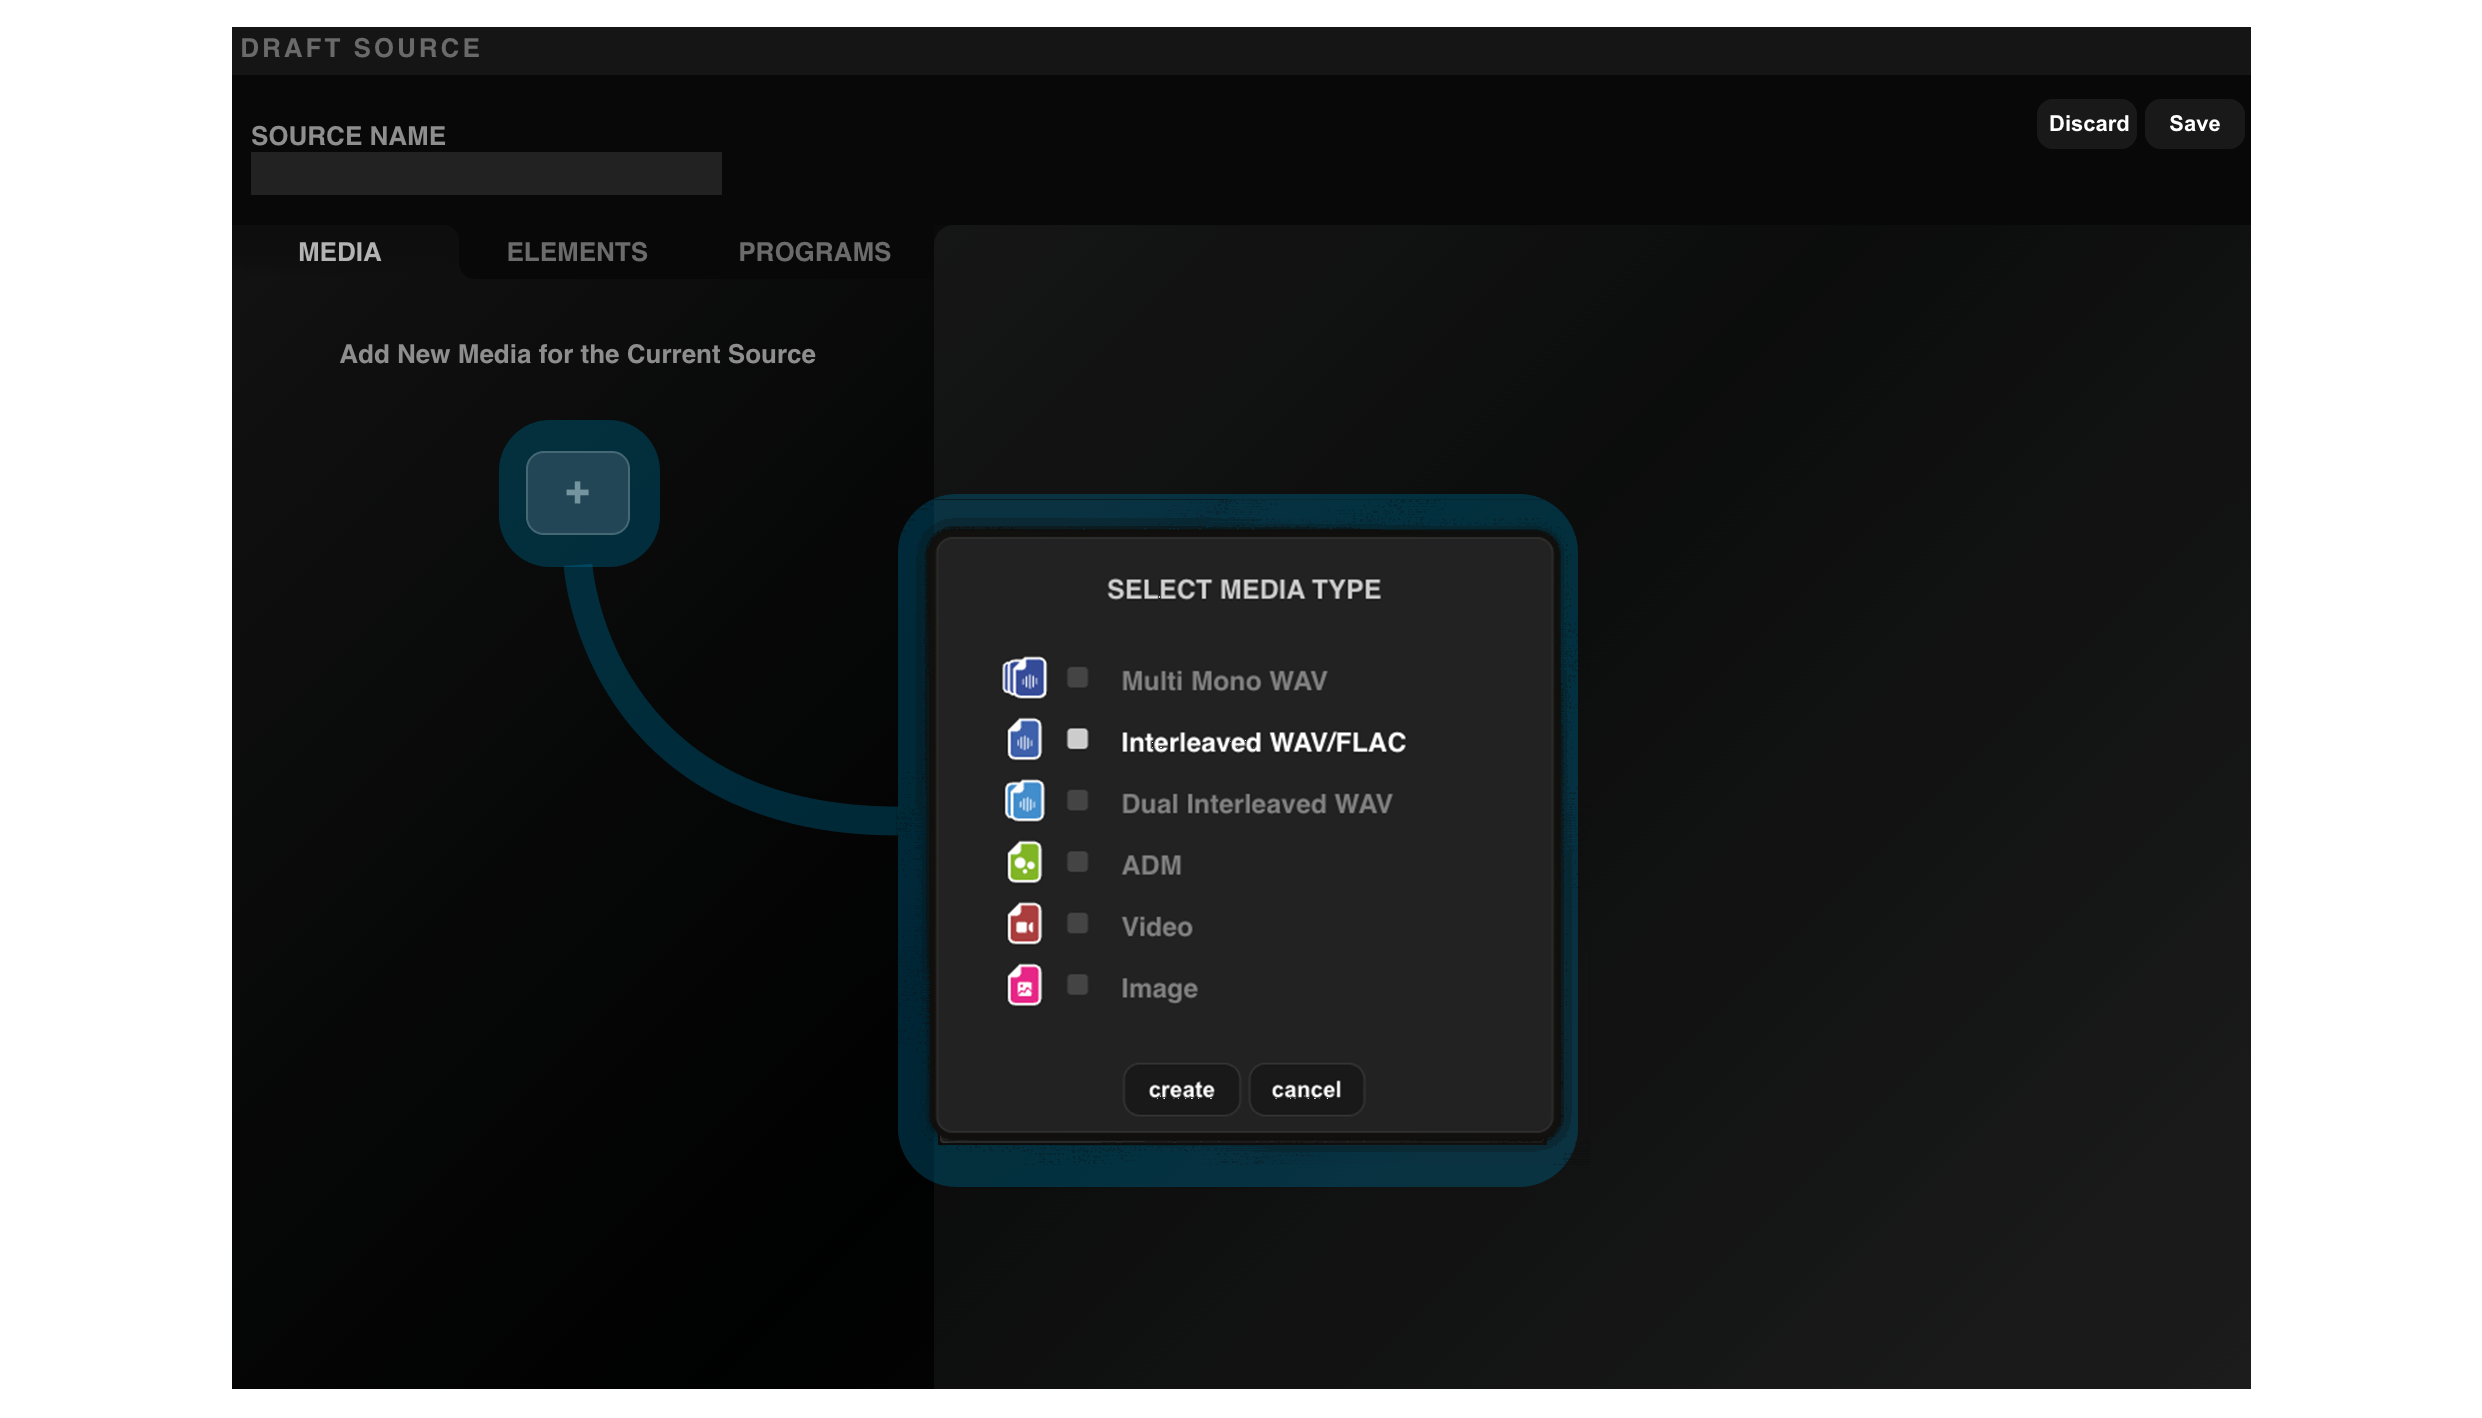
Figure 3.1.2.1 – 1 | Adding a New Media in a Source
⚠️ Note: The TOC File Type shown in this figure is no longer present
and has been replaced by the EDL file functionality in the Album structure since version 2.3.0.
• Mono Channel WAV Type: Multiple mono WAV files.
•
Multi Channel WAV Type: A single interleaved WAV file.
• Dual Multi-Channel
WAV Type: A combination of two interleaved WAV files (one representing the lower layer and the other
representing the height layer in a 3D audio mix).
• ADM File Type: ADM (Audio
Definition Model) files, in either the ‘.wav’ or ‘.bwf’ format, that typically contains both channel-based and
object-based metadata.
• Video Type: A combination of audio media and a single video
file, automatically multiplexed into an MP4 container output.
• Image Type: An image file that is embedded as artwork metadata in the audio output file.
The first three WAV types involve one or multiple WAV files in the ‘.wav’ file format,
containing pure channel-based content. These types of sources automatically include a unique Bed Element
corresponding to the pure channel-based content.
The ADM File Type involves an ADM file, which can be in the ‘.wav’ or ‘.bwf’ file
formats, and typically incorporates both channel-based and object-based content. Upon selecting and saving the ADM
file as a source, the bed and object elements within the ADM file undergo an automatic scan. After being scanned,
all elements from the ADM file are retrieved and automatically stored in the Elements Tab. Extra information such
as the layout and the channel order are also automatically retrieved after selecting an ADM File in the Media Tab.
⚠️ While it is possible to retrieve and modify object elements, it is important to note that all encoders in the
current version of the Auro-3D Encoder Service only output pure channel-based content. This means that
object-based elements are processed but ultimately rendered as traditional channel-based audio in the final
output.
The location(s) of the file(s) for any source type can be specified by clicking the
folder-shaped icon(s) in their respective Upload Tables.

Figure 3.1.2.1 – 2 | Adding a New Media in a Source
⚠️ Note: The TOC File Type shown in this figure is no longer present
and has been replaced by the EDL file functionality in the Album structure since version 2.3.0.
An ADM File Type is initially locked, meaning that its retrieved elements cannot be
modified. This is done to preserve the original file integrity and to prevent any unintended modifications to the
Elements’ parameters. However, it is possible to unlock the ADM source by clicking the “Unlock Button” under the
“Edit Mode” label:

Figure 3.1.2.1 – 3 | Edit Mode Status of an ADM Media
All WAV Media Types have a set of parameters that can be automatically or manually set:
the Layout Drop Down Menu, the Channel Order Drop Down Menu, and the Upload Table.

Figure 3.1.2.1 – 4 | Dynamic Parameters of WAV File Types
• Layout Drop Down Menu: The behavior of the Layout Drop Down Menu in
the Source Edit View can vary depending on the selected Media Type. In all cases, the system attempts to detect
the original layout of the file. For ADM File types specifically, the available layout options are determined by
the information retrieved from the ADM file but the encoded output layout will be determined by the “Objects
Output Format” that can be set in the Program Tab. For WAV File types, the Layout Drop Down Menu provides all
possible layout options according to the detected number of channels. Note that the optional Element’s
parameters such as the “Discard Channels Drop Down Menu”, the “Top Mids to Heights” and the “Wides to Fronts”
will also influence the resulting encoded output layout.
• Mono • Stereo • LCR •
Quad • 7.1.6 (7.1+6H) | Transmixed into an Auro 11.1
(7.1+4H) configuration during the Auro-Codec Encoding process. • 9.1.6 (9.1+6H) |
Transmixed into an Auro 11.1 (7.1+4H) configuration during the Auro-Codec Encoding process. *
• 7.1.2 (7.1+2H) | Transmixed into an Auro 11.1 (7.1+4H) configuration
during the Auro-Codec Encoding process. • 5.1.2 (5.1+2H) | Transmixed into an Auro
9.1 (5.1+4H) configuration during the Auro-Codec Encoding process. • Surround 5.0
• Surround 5.1 • Surround 7.0 • Surround 7.1 •
Auro-222 (4.0+2H) • Auro 8.0 (4.0+4H) • Auro 9.0 (5.0+4H) •
Auro 9.1 (5.1+4H) • Auro 10.1 (5.1+4H+T) • Auro 11.0
(5.0+5H+T) • Auro 11.0 (7.0+4H) • Auro 11.1 (5.1+5H+T) •
Auro 11.1 (7.1+4H) • Auro 13.0 (7.0+5H+T) • Auro 13.1
(7.1+5H+T)
* It is important to note that the Height Back Channels will be encoded into the
Lower Surround Channels, not into the Lower Back Channels. This is because the Auro-Codec technology is not
designed to use the Lower Back Channels as encoded carriers.

More information about AURO-3D® Speaker Configurations can be found HERE.
• Channel Order Drop Down Menu: The Channel Order Drop Down Menu
allows users to specify the ITU, SMPTE, or ProTools channel order for the selected source. For most Source
Types, the system automatically detects and applies the appropriate channel format based on the WAVEX
specification (ITU channel order). In cases where a channel mask is missing, the system intelligently selects
the most likely format and SMPTE channel order. Manual adjustments to the channel order can be made in the
Upload Table.
• Upload Table: The Upload Table provides an intuitive interface to
easily select, check, and modify the audio files within the selected Media. The table adapts based on the chosen
Source Type, allowing the selection of the appropriate files for upload by clicking on the folder-shaped
icons.

Figure 3.1.2.1 – 5 | Media Upload Table
2.1.1 Creating a Source Based on an ADM File
The AURO-3D® Encoder service supports the import of .wav or .bwf files that adhere to
the “Audio Definition Model” (ADM) standard (ITU-R BS.2076-2). Multiple ADM profiles are supported, including
the “Emission Profile”. To add an ADM file, press the “+” button in the Media Tab and select the “ADM File”
Media Type. The file can also be replaced by clicking the folder-shaped icon next to the ‘File Location’ label
in the Upload Table of the corresponding ADM Media:

Figure 3.1.2.1.1 – 1 | Upload an ADM File Media
Once the ADM file is selected and saved as a source, an automatic scan is performed.
The scanned data is stored within the source and displayed as new elements in the Elements Tab, including Bed,
Object, Object Group, and Switch Group elements. Elements retrieved from an ADM file are easily distinguishable
in the Elements Tab due to their greenish color in the Elements sidebar.
An ADM File Type is initially locked, meaning its retrieved elements cannot be
modified. This is to preserve the original file integrity and prevent unintended modifications to the elements’
parameters. However, the ADM source can be unlocked by clicking the “Unlock Button” under the “Edit Mode” label
in the detailed view of the ADM media.

Figure 3.1.2.1.1 – 2 | Unlock Button of an ADM Media
⚠️ Reminder: While object elements can be retrieved and modified, both
channel-based and object-based content will ultimately be rendered as pure channel-based audio files, depending
on the selected “Objects Output Format” in the Program Tab. This applies to all Encoder Types, including
Auro-Codec, Auro-CX, and Convert Encoder Types.
2.1.2 Creating a Source Based on Multiple Mono Channel WAV Files
When creating a source with multiple mono-channel WAV files, it is necessary to upload
as many files as required for the selected layout.

Figure 3.1.2.1.2 – 1 | Upload Table of a Mono Channel WAV File Media
The number of input fields and the corresponding channel order depend on the selected
Layout and Channel Order Type. When multiple files are simultaneously imported into the input fields using the
folder-shaped icons, the system will attempt to automatically sort them based on their file suffix. However, if
the file suffix recognition fails, the unrecognized file will be discarded. If only a single file is selected,
no automatic sorting will be performed and the file will be added to the corresponding row. Note that the
automatic sorting feature is not only applicable when using the folder-shaped icons to import multiple mono
files into the input fields, but also when opting to drag and drop the input files onto the source fields.
2.1.3 Creating a Multi-Channel WAV File Source
The Auro-3D Encoder Service supports multi-channel WAV files with up to 16 channels and
allows for the selection of ITU, SMPTE, ProTools, or custom channel orders.

Figure 3.1.2.1.3 – 1 | Uploading a Multi-Channel WAV File
If the provided WAV file contains a defined channel mask, the system will automatically
detect and apply the channel format and layout as defined in the WAVEX specification, which is also referred to as
the ITU channel order. However, the order of the channels can still be manually modified if necessary, using the
folder-shaped icon located next to each input field. For files without a defined channel-mask, the message that
states “No format info found. Please verify the layout and channel order.” will be dusplayed unerneath the Channel
Order Drop Down Menu. The system will then automatically select the most likely format for the number of channels
and the related SMPTE channel order. It is then possible to manually verify and reorganize the channel order as
needed by simply dragging and dropping them:
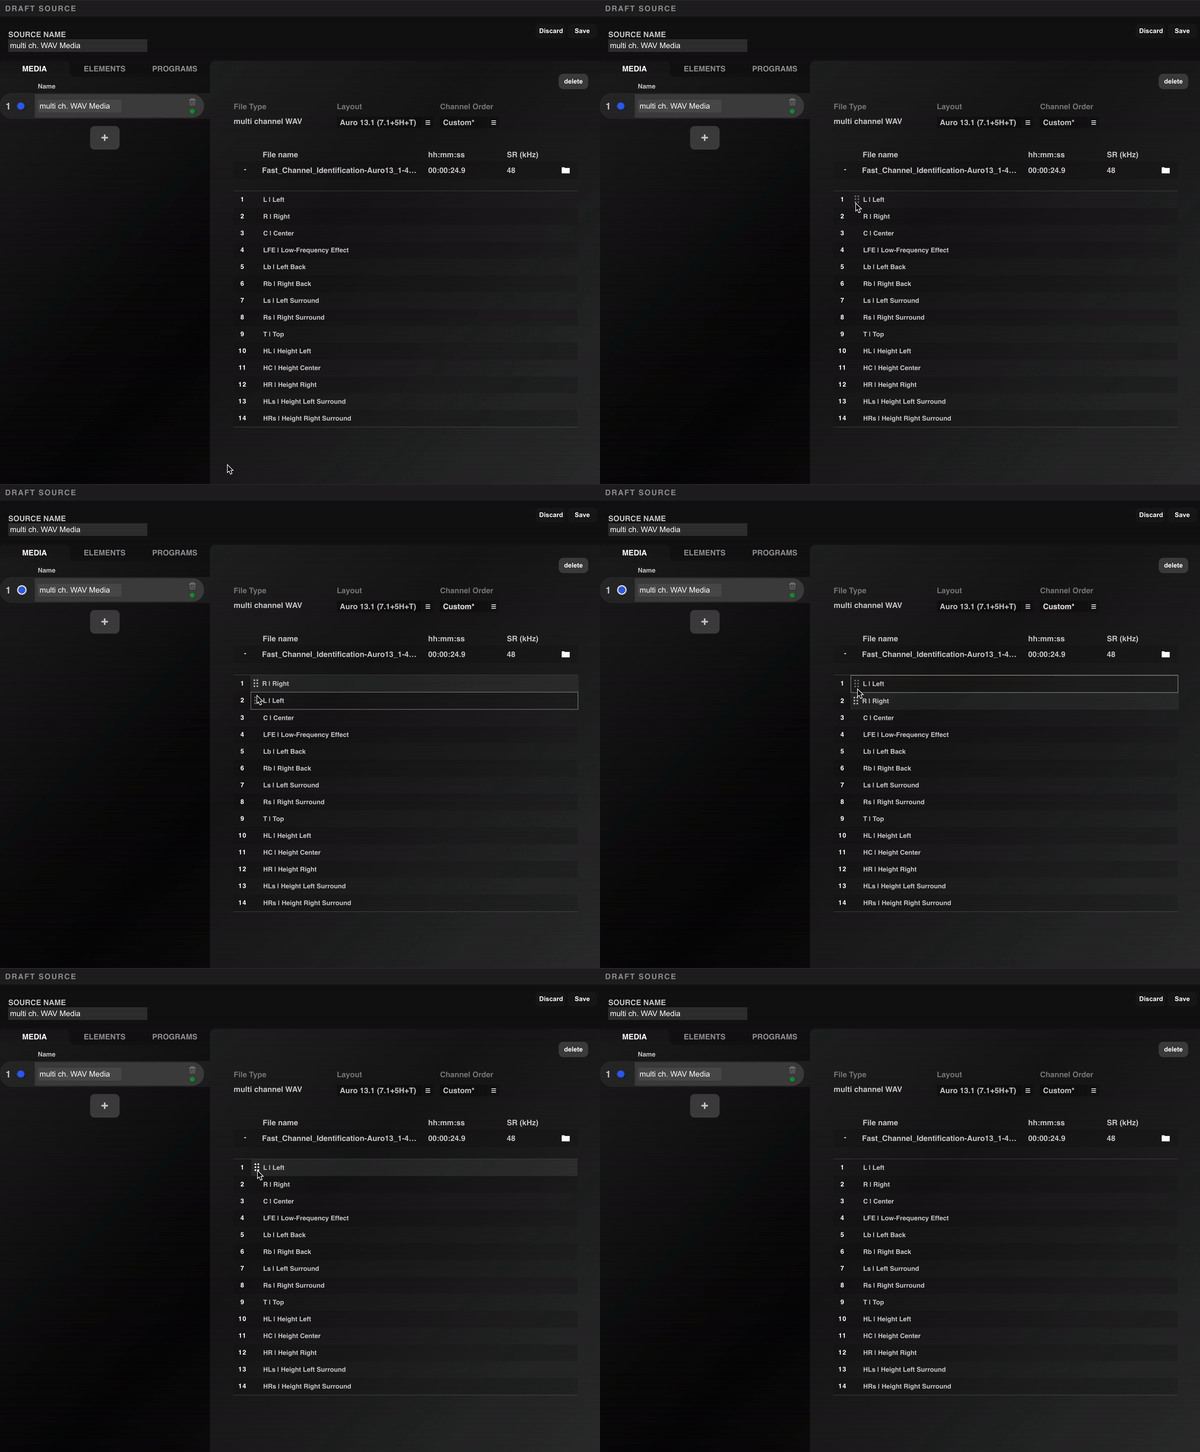
Figure 3.1.2.1.3 – 2 | Manually Organising the Channel Order of a multi channel WAV
Source
This flexible mechanism allows for flexibility to import multi-channel files according
to any specific needs.
2.1.4 Creating a Source Based on Dual Multi-Channel WAV Files
To cater to the preferences of many audio engineers who opt to export their 3D audio
mix as two separate multi-channel WAV files, distinguishing the lower layout from the height layout, the
AURO-3D® Encoder Service offers a specialised feature called the “dual multi ch. WAV” option. 
Figure 3.1.2.1.4 – 1 | Combining two multi channels WAV files into a single
source
When selecting the “dual multi ch. WAV” option, the effortless merging of two
multi-channel WAV files into a single source becomes possible. The Upload Table will reflect this selection by
displaying two rows: L (representing the Lower layout) and H (representing the
Height layout). Simply clicking on the folder-shaped icons next to each row will open a window where the desired
multi channels WAV files can be selected for upload. Once both files are specified, the system will
automatically detect and apply the appropriate channel format and layout based on the specifications outlined in
the WAVEX standard, commonly known as the ITU channel order, provided the specified files contain a defined
channel mask. In cases where files lack a defined channel mask, the system will intelligently deduce the most
likely format based on the number of channels and the corresponding SMPTE channel order. Just like the multi
channel WAV source tupes, it is still perfectly possible to manually review and modify the channel order by
dragging and dropping the channel lines as needed.
ℹ️ Remark: To prevent errors and ensure a smooth encoding process,
adding a source to the queue is disabled while in Edit Mode. Exiting Edit Mode, either by saving the current
source or discarding changes, is required before proceeding with adding the source to the queue.
2.1.5 Creating a Source Based on Video Media
The Video Media Type enables the multiplexing of separately imported audio and video
content into a single MP4 container file. This media type addresses the workflow requirement where audio and video
streams must be combined after independent processing stages.
The muxing process follows a two-step import sequence: first, the audio media is imported
using any of the supported audio formats (multi-mono WAV files, multi-channel WAV files, or ADM files).
Subsequently, a single video file is imported. The system automatically initiates the multiplexing operation upon
detection of both audio and video components, generating an MP4 output file.
This automatic muxing is subject to a critical temporal constraint: the audio and video
streams must be sample-exact in duration. The requirement for exact sample alignment exists because the container
format does not permit temporal resampling or padding during the multiplexing stage. Any discrepancy in duration,
even at the sample level, will prevent the muxing operation from completing successfully.
The Video Media Type is exclusively compatible with Auro-Cx encoding output. This
limitation stems from the encoding architecture, where Auro-Cx produces channel-based audio streams that maintain
the temporal precision and format specifications required for direct container multiplexing. Other encoding types
do not guarantee the necessary stream characteristics for reliable muxing operations.
To add a Video Media, press the “+” button in the Media Tab and select the “Video” Media Type. The audio content must be imported first through the corresponding Upload Table, followed by the video file selection.
2.1.6 Creating a Source Based on Image Media
The Image Media Type provides the mechanism for embedding visual artwork directly into the audio output file as metadata. This media type functions as a metadata carrier rather than as an independent content stream, integrating cover art or other visual information within the audio file container structure.
When an image is added to a source through the Image Media Type, the system automatically embeds the image data as metadata during the encoding process. This embedded artwork becomes an integral part of the output file, accessible to media players and audio management software that support artwork display functionality. The image embedding operates independently of the audio encoding pipeline, writing the visual data into designated metadata fields within the container format.
The Image Media Type is compatible with output formats that support embedded metadata, specifically WAV and FLAC file formats. These formats provide standardized metadata chunks or blocks where image data can be stored without affecting the audio stream itself. The metadata embedding follows the respective format specifications: WAV files utilize LIST INFO chunks for metadata storage, while FLAC files employ VORBIS_COMMENT blocks with PICTURE metadata blocks for artwork embedding.
To add an Image Media, press the “+” button in the Media Tab and select the “Image” Media Type. The image file can then be selected through the Upload Table. Supported image formats include JPEG and PNG, which offer the necessary compression characteristics and widespread compatibility required for embedded artwork applications.
2.2 Elements Tab
The Elements Tab in the AURO-3D® Encoder Service provides tools for managing different
types of audio elements linked to existing Medias. These Elements can either be extracted from an ADM File or
connected to a single WAV Media type. Elements originating from ADM files are visually distinguished with a
greenish highlight in the sidebar. Additionally, users can manually create new Bed or Object Elements by clicking
the “+” button in the sidebar and configure any new elements in their respective detailed views. It’s important to
note that in the current version of the AURO-3D Encoder, the output remains purely channel-based, even when object
elements are included in the source. Each Element can be manually renamed in the sidebar, allowing for easier
identification and organization within the project.

Figure 3.1.2.2 – 1 | Overview of the Elements Tab
2.2.1 Bed Elements
A Bed Element refers to channel-based audio content. These elements serve as the
foundational layer of an audio mix, providing a fixed auditory backdrop in the spatial sound field. Unlike dynamic
audio objects that can shift or move, bed elements maintain a consistent position, contributing to the stable
framework of the mix.

Figure 3.1.2.2.1 – 1 | Bed Element Properties
The parameters of Bed Elements enable fine-tuning of transmixing, downmixing, and
dynamic behaviors for the encoding process of the selected source. The distinct values for each parameter can be
directly configured in the Detailed View of the selected Bed Element. Some of these parameters are exclusively
available for specific types of layouts. For instance, the ‘Discard Channels’ parameter is pertinent only to a
7.1-based layout. Similarly, the ‘Top Mods to Heights’ parameter is only present for layouts that contain Top Mids
channels, and the ‘Wides to Front’ is only accessible for layout that contain Wide Channels. It is also crucial to
note that downmix parameters, such as the ‘Top, Height, and Lower Gains’ parameters configured in the Source, will
only take effect in the encoding process after selecting the ‘Source’ option for the Downmix Gains parameter in
the global Configurations Menu; a distinct menu from the Source Menu.
• Sound Source Drop Down Menu: Allows the selection of the media
source for the bed element, such as mono or multi-channel WAV files.
• Delete
Button: Deletes the bed element from the source.
• Preset Buttons:
• Apply Default: Apply the currently saved user preset to all
parameters.
• Set as Default: Saves the current values of all present parameters in the
user preset.
• Reset: Resets the values of all parameters to factory default.
• 3D Scene: A visual representation of the bed element’s position in
the 3D sound field.
• Downmix Parameters: ⚠️ In the current version of the Auro
Encoder Service, the Downmix Gains values influence both the bed and all object elements within the source. This
behavior is scheduled for revision in a future update.
• Lower Gain: This parameter allows for the adjustment of how the
original lower layer of the immersive mix will be downmixed into the 6 or 8 channels encoded carrier and
played back dynamically on a surround configuration. The downmix level can be fine-tuned from 0 dB to -24 dB.
It is often recommended to set a maximum value of -9 dB to avoid potential issues with the signal-to-noise
ratio in the encoded channels. It is also important to remember that the Downmix Gains Drop Down Menu in the
Configurations Menu must be set to ‘Source’ to enable and apply the Lower Gain value.
• Height
Gain: Similarly, this parameter also allows for the adjustment of how the original height layer of
the immersive mix will be downmixed into the 6 or 8 channels encoded carrier and played back dynamically on a
surround configuration. Again, the downmix level can be fine-tuned from 0 dB to -24 dB. It is often
recommended to set a maximum value of -9 dB to avoid potential issues with the signal-to-noise ratio in the
encoded channels. It is also important to remember that the Downmix Gains Drop Down Menu in the Configurations
Menu must be set to ‘Source’ to enable and apply the Height Gain value.
• Top Gain:This
downmix parameter is only relevant for layout that contains a Top layer. This parameter allows for the
adjustment of how the original Top layer of the immersive mix will be downmixed into the 6 or 8 channels
encoded carrier and played back dynamically on a surround configuration. Again, the downmix level can be
fine-tuned from 0 dB to -24 dB. It is often recommended to set a maximum value of -9 dB to avoid potential
issues with the signal-to-noise ratio in the encoded channels. It is also important to remember that the
Downmix Gains Drop Down Menu in the Configurations Menu must be set to ‘Source’ to enable and apply the Top
Gain value.
• Auto Gain:
• AutoGain: When the Auto Gain button is activated, it
automatically adjusts the Encoded Downmix levels to prevent potential audio saturation in certain encoded
channels. This saturation issue may occur during the encoding process when summing 2 or 3 channels (e.g. L and
HL channels, or L, HL and T channels) into one encoded channel (e.g. encoded L channel). The behaviour of this
dynamic tool can be further adjusted using the corresponding Release, Balance and Limiter parameters.
•
AutoGain Limiter Max dB: Sets the ceiling value for the Auto Gain mechanism, ensuring that
the audio remains within a desired dynamic range and avoids clipping or distortion during the encoding
process.
• AutoGain Release: The Release drop-down menu is available only when the Auto
Gain button is activated. The release time corresponds to the total time it takes for the signal to return to
its original state after being trimmed by the Auto Gain mechanism. Release times of 0.1, 0.5, 1, 5, 10, and 50
seconds are available for selection. The default value is set to 1 second.
• AutoGain
Balance: The Balance Drop Down Menu is only accessible if the Auto Gain Button is activated. This
parameter lets you modify the behaviour of the Auto Gain mechanism. Its default value “50” implies that the
trim effects will be identical and equally applied to all channels. Lower values (e.g. 30, 40) cause the lower
channels to be more subjected to the trim effects. Inversely, higher values (e.g. 60, 70) cause the height
channels to be more subjected to the trim effects.
• Remap Parameters:
• Discard Channels: This feature allows for the selective
discarding of surround or back channels during the encoding process, enabling downmixing from a higher channel
format to a lower channel format. For example, a 7.1-based immersive audio source, such as Auro 11.1 (7.1+4H),
can be downmixed to a 5.1-based encoded format, such as Auro 9.1 (5.1+4H). This downmixing process involves
selectively omitting audio channels to create a new audio format with fewer channels. It’s important to note
that this downmixing technique may result in some loss of audio information, particularly for mixes that
include moving audio elements. However, it can sometimes be a useful option for projects based on 3D field
recording techniques that require downmixing for compatibility with lower channel format playback systems.
Note that when the option “Discard Surrounds” is selected, the original back channels will end up in the
surrounds channels of the encoded result.
• Top Mids to Heights: This feature allows you
to determine how Top Mid channels will be trans-mixed in the Auro-3D format. You can evenly distribute the Top
Mid channels into the Height Left, Height Right, Height Center (if applicable), Height Left Surround, and
Height Right Surround encoded channels by selecting the option ‘to Height Fronts and Backs’. Alternatively,
you can trans-mix them into the Center Top channel (if applicable) by choosing the option ‘Center Top’. This
parameter is available only when relevant and depends on the Source layout and the Rendering layout of the
Source.
• Wides to Front: This option allows you to determine the extent to which the
Wide channels will be trans-mixed into the front channels of the encoded Auro-3D format by specifying the
‘Wide to Fronts’ percentage. A setting of 100% results in moving the Wide channels completely to the Left and
Right channels of the encoded layout, while 0% results in the complete absence of the original Wide channels
in the front.
• Loudness Measurement: Automatically calculates the loudness for the
bed element, including Integrated Loudness, Loudness Range, and related metrics.
2.2.2 Object Elements
An Object Element contains audio content paired with metadata, defining its spatial
positioning. Its initial vector-based position can be viewed in both 3D and 2D coordinate systems within the Edit
View. Object Elements can either be imported from an ADM file (indicated by a greenish color) or manually created,
in which case they are represented in grey.

Figure 3.1.2.2.2 – 1 | Object Element Properties
The Object Elements Parameters allow for adjusting the properties of Object Elements. If
the objects originate from an ADM file, the corresponding ADM Media must first be unlocked to enable
modifications. When an object extracted from an ADM file is altered, a prominent message appears at the top of the
Object Element’s Detailed View: “This Object was manually modified, so any of the settings (including eventual
dynamic behavior) will be overruled!”. While the system can preserve dynamic movements of Object Elements
retrieved from ADM files, it’s important to note that in the current version of the Auro Encoder Service, once
modifications are made, only a static position can be set for these elements. If needed, pressing the “Reset”
button under the message will revert the object’s properties to their original state.
• Sound Source Drop Down Menu: Allows the selection of the media
source for the bed element, such as mono or multi-channel WAV files.
• Delete
Button: Deletes the object element from the source.
• Reset Button: This
button appears only after any properties of an Object originating from an ADM File Media have been modified.
Pressing it will reset the object to its original status. It is worth reminding that once the object’s position
is modified, it becomes static and loses any dynamic behavior it may have had in the original ADM file.
• Horizontal Plane: An interactive grid that enables adjustment of the object’s position
along the X and Y axes by dragging the blue circular icon. This feature allows precise control over the object’s
placement in the 2D plane.
• Vertical Plane: An interface that allows adjustment of
the object’s position along the Z axis, controlling its height within the sound field. This enables precise
vertical placement for a more immersive audio experience.
• 3D Scene: Provides a
visual representation of the object’s position in the 3D space, reflecting changes made in the horizontal and
vertical planes.
• Levels:
• Gain: Controls the object’s volume.
• LFE
Send: Determines how much of the object’s signal is sent to the subwoofer channel.
• Position & Spread:
• X, Y, Z: Controls the object’s
position along the X, Y, and Z axes.
• Spread: Adjusts how widely the object’s sound is
dispersed.
• Snap: Locks the object to the nearest grid point when adjusting its
position.
• Static Label: Indicates whether the current object’s position is dynamically
changing over time (0) or if the object’s position is static (1). This label helps distinguish between dynamic
and fixed positioning of the object.
• Loudness Measurement: Provides metrics like Integrated Loudness,
Loudness Range, and other related loudness measurements for the object.
2.2.3 Object Group Elements
Object Group Elements consist of multiple objects grouped together. At present, this
type of element is exclusively retrieved from scanned ADM files. However, it remains fully possible to modify
any individual object within the group by selecting it from the sidebar in the Elements Tab for further
customization.

Figure 3.1.2.2.3 – 1 | Object Group Element Properties
• Members: Lists all objects within the group. Each object is
displayed with its name and type. Selecting an object allows for individual modifications of its
properties.
2.2.4 Switch Group Elements
A Switch Group Element allows for switching between different objects based on specific
scenarios, such as multi-language dialog tracks or alternate audio versions. Just like Object Group Elements,
Switch Group Elements are exclusively retrieved from scanned ADM files. Only one object from the switch group
can be active at a time, and in the current version of the AURO-3D Encoder, only the selected object will be
encoded and printed as channel-based content.

Figure 3.1.2.2.4 – 1 | Switch Group Element Properties
• Members: Displays all objects within the switch group. The
currently selected object is highlighted, and only this object will be printed as channel-based content in the
final output.
Note that objects included in a switch group may contain additional metadata, such as
information regarding their “language.” The current version of the system retrieves this data and clearly
displays it in the object’s detailed view.

Figure 3.1.2.2.4 – 2 | Language Properties of an Object within a Switch Group
Element
ℹ️ Reminder: All elements retrieved from ADM files are converted to
channel-based content during the final encoding process.
2.3 Program Tab
The Program Tab in the AURO-3D® Encoder Service is designed to manage and organize
elements, such as Beds and Objects, into a unified program for final output. The current version of the Auro
Encoder Service supports only one Main Program per source. In this tab, it is possible to add or remove elements
from the program, trim the level of each Element, and check the input loudness levels for compliance.

Figure 3.1.2.3 – 1 | Overview of the Program Tab
2.3.1 Program Name Input Field
The name of the Program that is set to “Default Progr” by default. However, it is
possible rename the program in the Program Name Input Field located in the side-bar.
2.3.2 Properties Section
The Properties Section provides essential settings related to the Program.

Figure 3.1.2.3.1 – 1 | Overview of the Program Tab
• Objects Output Format: If the source contains Object Elements,
the “Object Output Format” drop-down menu becomes active, enabling the selection of various relevant output
layouts, in which all Objects and Bed Elements will be rendered accordingly. However, if the source does not
contain any Object Elements, the “Object Output Format” is disabled (greyed out), and the output layout will
solely depend on the settings of the Bed Element.
2.3.2.1 Elements List
The Elements List displays all available Elements that can be added to or removed
from the program. These elements can be used to form the final mix, and the interface allows for easy
management of which elements should be included or excluded. Each element is listed by name, and a status
indicator light shows whether the element is currently part of the program or not.
• Add Button: Adds the currently selected element from the
Elements List to the program.
• Add All Button: Quickly adds all available elements
from the Elements List to the program in one click.
• Remove Button: Removes the
selected element from the program.
• Remove All Button: Removes all elements from the
program, clearing the entire selection.
2.3.2.2 Program Elements
This section shows the elements that are effectively included in the program. Each
Element, whether Bed or Object, is represented by its name and type. Users can modify specific settings, such
as gain and loudness, directly within this list. The loudness measurement for each element is also displayed,
ensuring that each component of the mix complies with the overall loudness goals.
• Gain Slider: A slider to adjust the gain for each element,
allowing fine-tuned control over the volume balance between elements.
• Loudness Meter:
Displays the current integrated level of the element in LUFS, helping monitor the loudness of each
individual element within the program.
2.3.2.3 3D Scene
The 3D Scene is a visual representation of the spatial layout of elements within the
program. This feature provides an interactive view of how the elements are positioned in the 3D audio field.
It is particularly useful for visualizing how the beds and objects interact with each other in space and for
understanding how the final audio will be perceived in an immersive environment. Selecting one or more Element
in the Program Elements List will automatically highlight their corresponding representations in the 3D Scene
2.3.2.4 Program Loudness
The Program Loudness section provides real-time measurements of the loudness levels
of the entire program. This section is essential for ensuring compliance with loudness standards and provides
detailed information about the loudness profile of the program, including peak levels, short-term loudness,
and integrated loudness. Keeping track of these metrics helps maintain consistent loudness across different
elements and output formats.
• Integrated: Measures the average loudness of the entire
program, calculated over the duration of the mix.
• Loudness Range: Indicates the
dynamic range within the program, showing the difference between the loudest and quietest parts.
•
Max Momentary: Displays the highest loudness measured over a brief time window (400ms),
indicating short-term peaks in the audio.
• Max Short Term: Shows the highest loudness
level measured over a three-second window, providing insight into louder moments in the mix.
Remark: The Program Tab is vital for managing the arrangement and
behavior of beds and objects within the final audio mix. Each program allows for precise control over how
elements are organized.
2.4 Metadata Tab
A source can include metadata defined in the Metadata Tab. The
original file metadata from .wav or .bwf files, including the cover image, can be
automatically parsed by enabling “Copy Metadata from File” in the global settings (see Chapter
3.9).
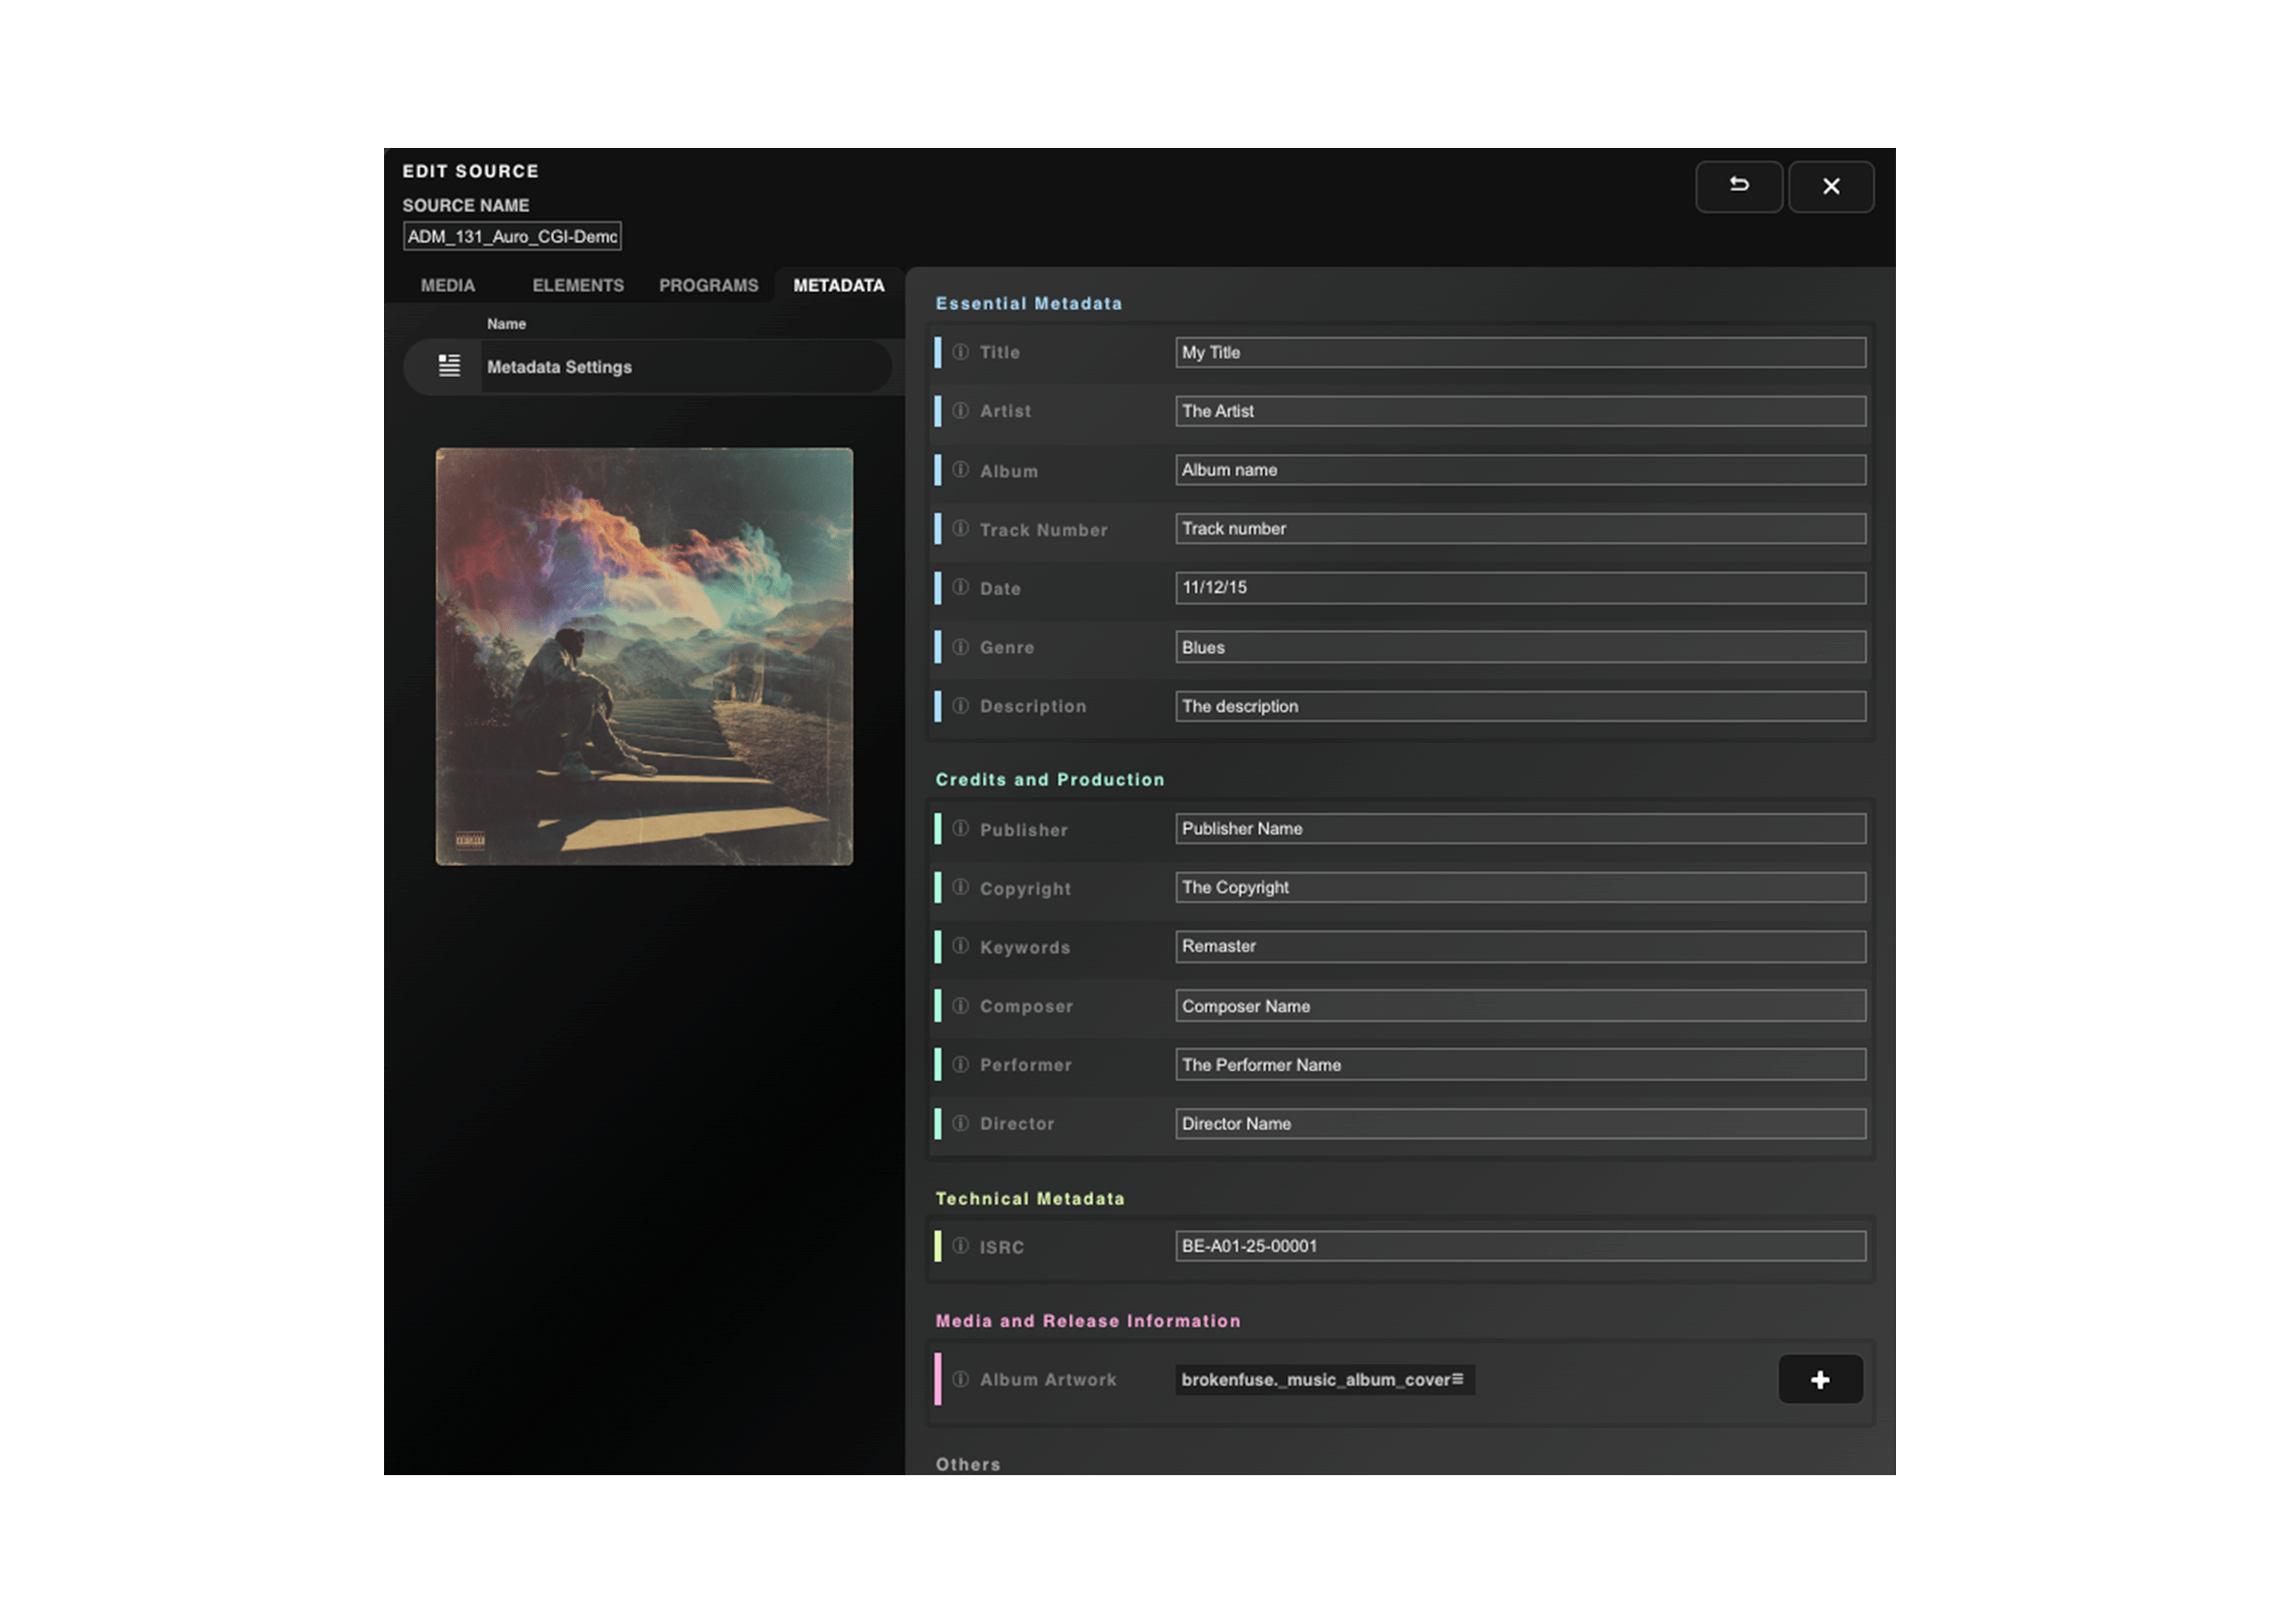
Figure 3.1.2.4 – 1 | Overview of the Metadata Tab
Most metadata types are text-based, except for the cover image, which can be in either
.jpg or .png format. The cover image can be added directly from the Metadata
Tab by clicking the “+” button in the Media category. This action
automatically creates the corresponding image media entry in the Media Tab. Likewise, it is
possible to first add an image in the Media Tab and then link it in the Metadata
Tab by selecting it from the corresponding drop-down menu.
All metadata are embedded in the final encodings for .wav and .flac
formats when using the Auro-Codec, Auro-Headphones, or
Convert configuration types. Auro-CX encodings do not yet support
metadata—this functionality will be added in a future update.
The metadata included in the final encoding are managed through the Metadata
Management table in the global settings (see Chapter 3.9).
3.1 Albums Menu
Some playback systems support gapless playback of album sequences. Building one may require splitting a continuous
audio file into individual tracks using an EDL file — typically exported from mastering DAWs or mixing DAWs such as
Pro Tools — or organizing existing sources into an album. Additionally, loudness standards sometimes require
compliance at the album level, not just per-track.
To adress these needs, the Albums Tab makes it practical to manage track timing, configure playback behavior, apply
metadata consistently
across all tracks, and handle loudness compliance for the entire album in one place.
The Albums Menu creates, edits, duplicates, and deletes albums. The Add New Album
button imports files directly as new sources and groups them into an album. Albums can be filtered by name,
selected for the Queue List, and displayed in a table showing duration and track count. Single-file sources can
import an EDL (Edit Decision List) to split the file into multiple tracks. The Albums table includes edit buttons
for track timing, playback settings, and track metadata management.
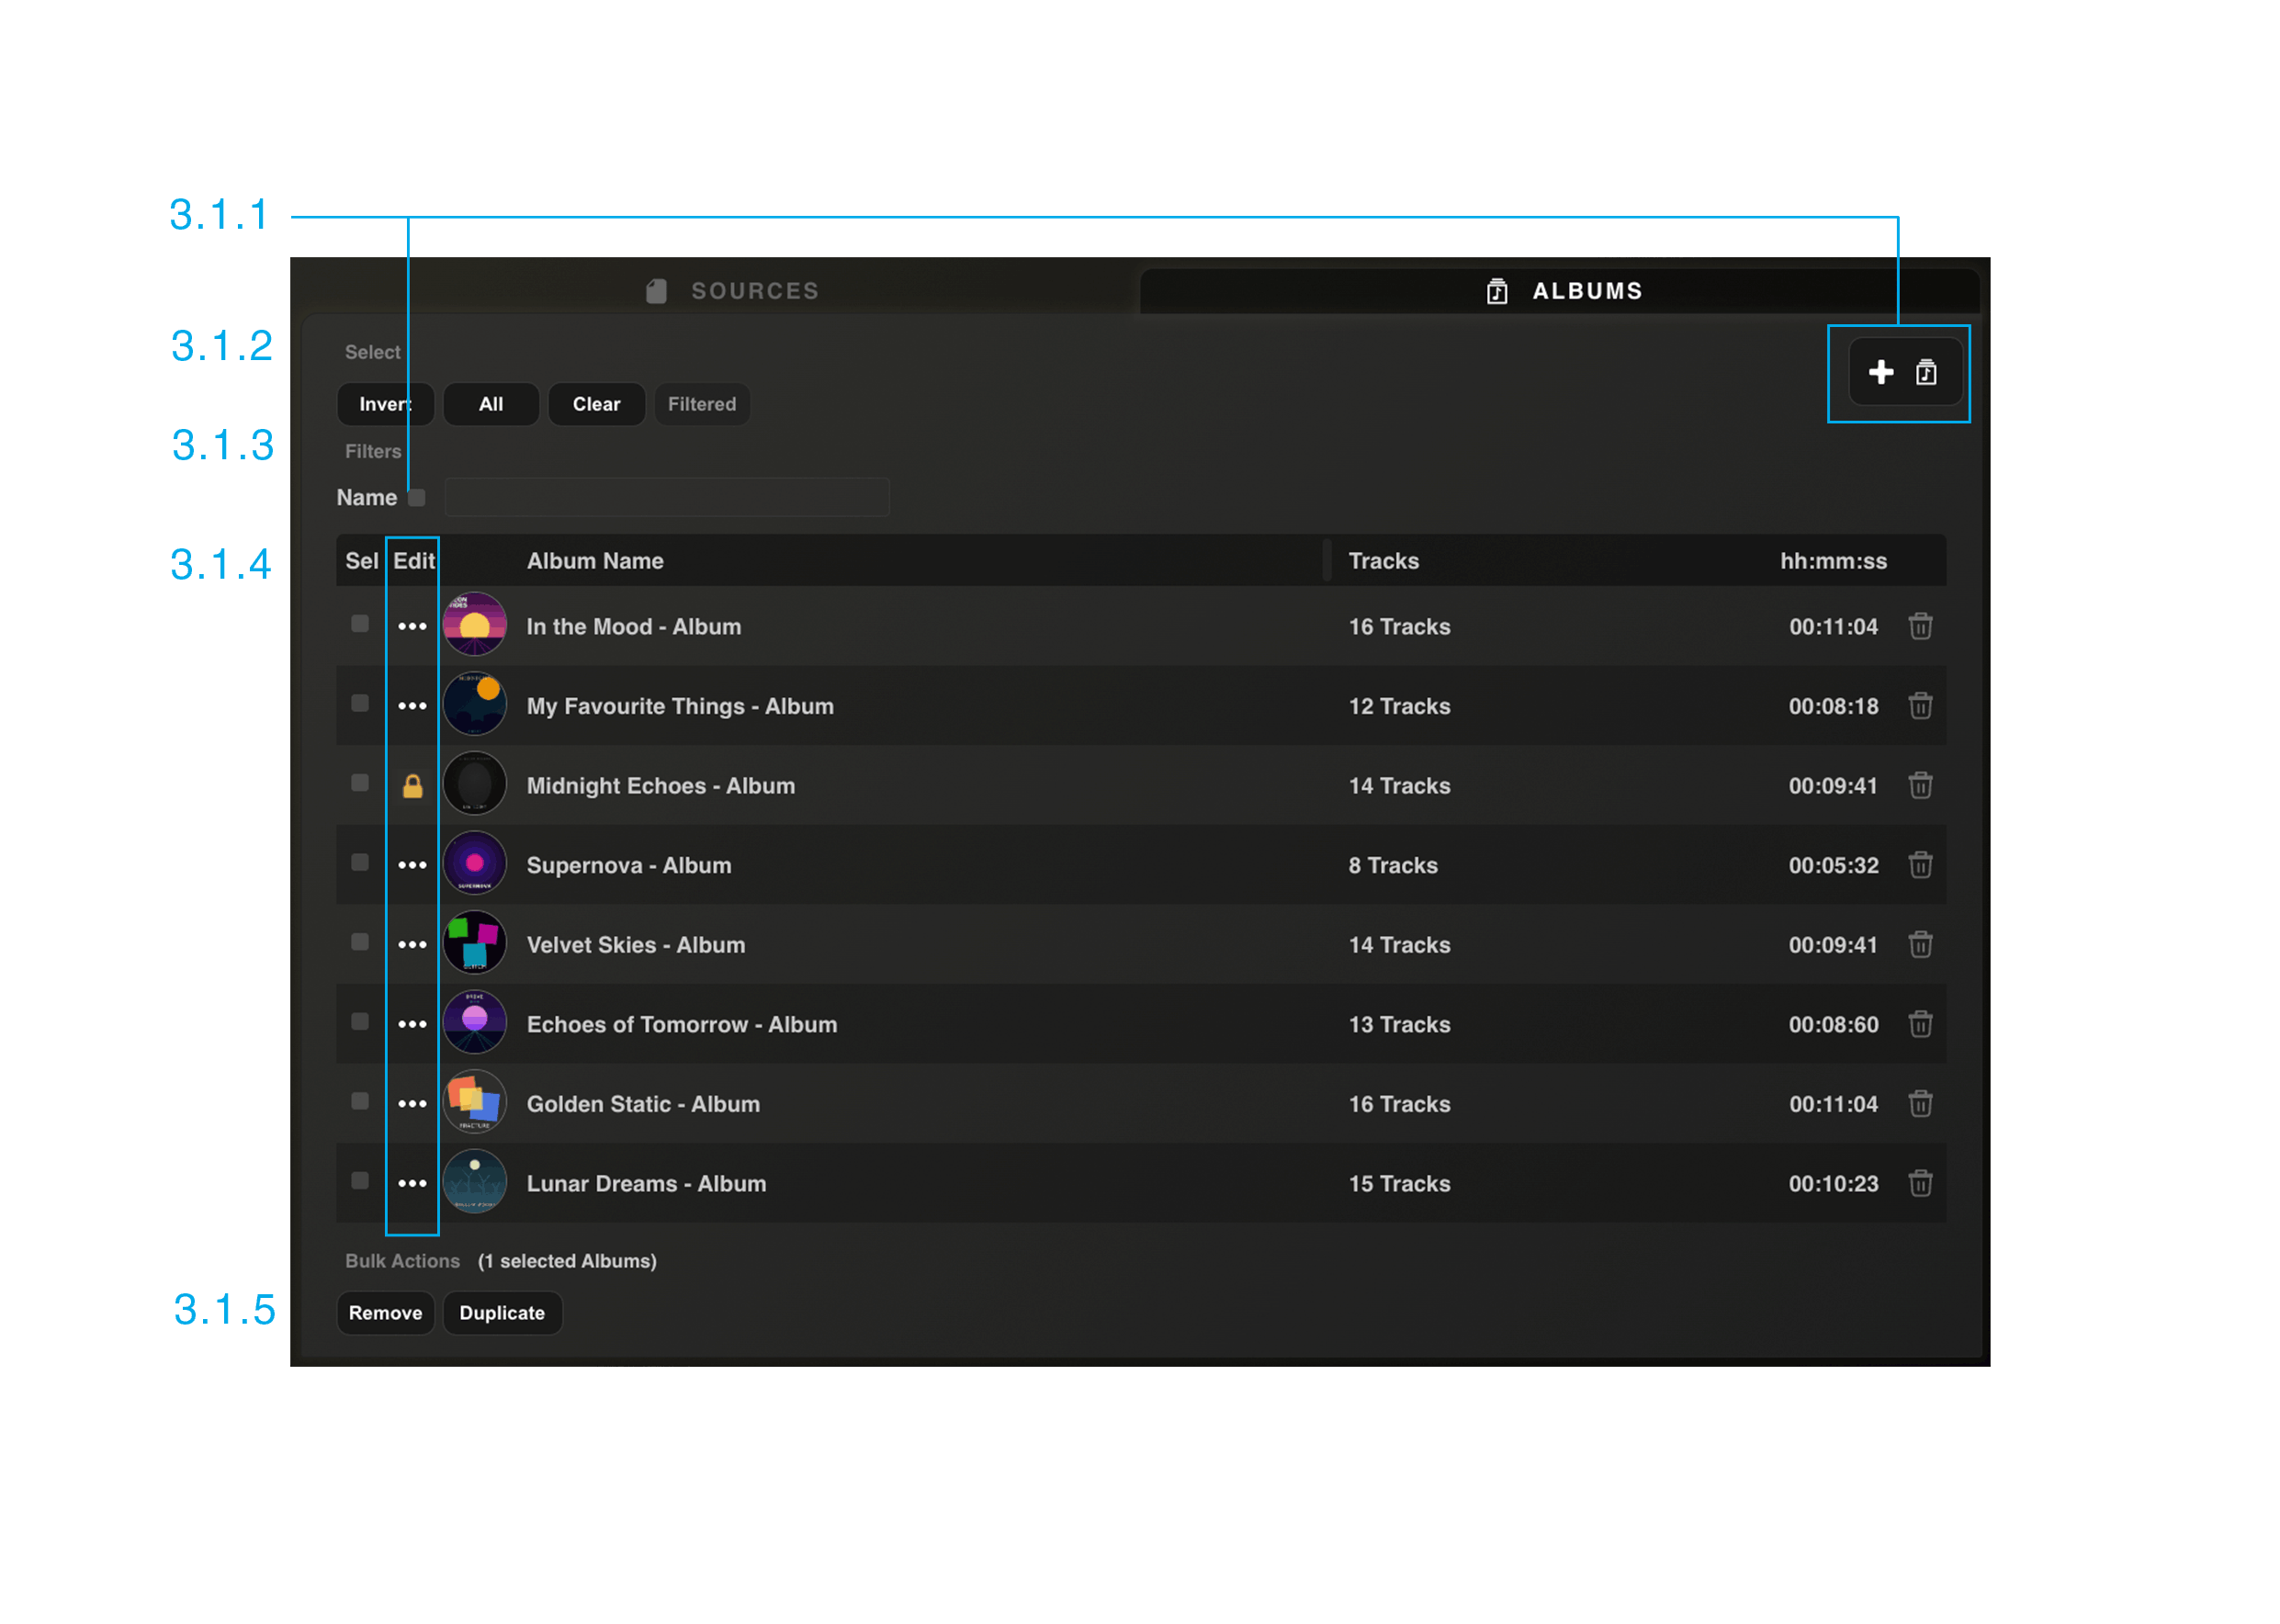
Figure 3.1.1.1 – 1 | Source Menu – Main View
3.1.1 Management Buttons:
•  Add Album Button: Pressing the Add New Album button opens a modal with
three options: From Sources List, From File(s), and From Folder. Each option covers a different import
scenario:
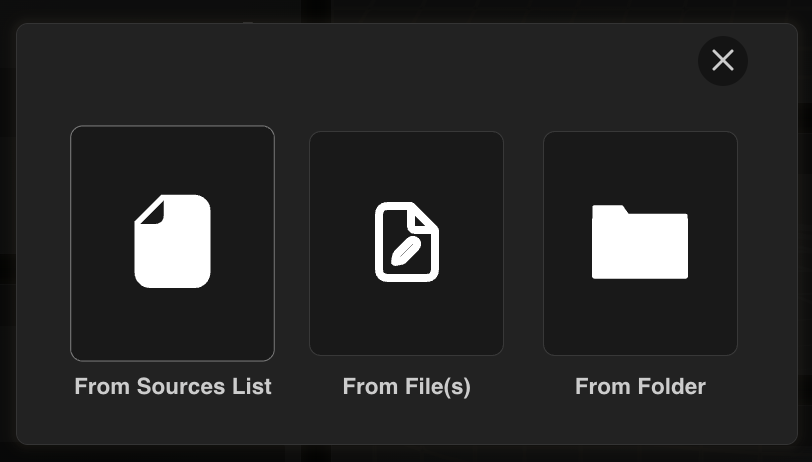
Figure 3.1.3.1.1 – 1 |Creating a new album in the Albums Tab
→ From Sources List
Sources already imported and configured through the Source Tab are common candidates for album tracks —
their layout, elements, and metadata are already set. Selecting from the Sources List reuses that existing
configuration instead of re-importing and reconfiguring the same media. Select one or more sources, then
press “Create Album” to group them into a new album.
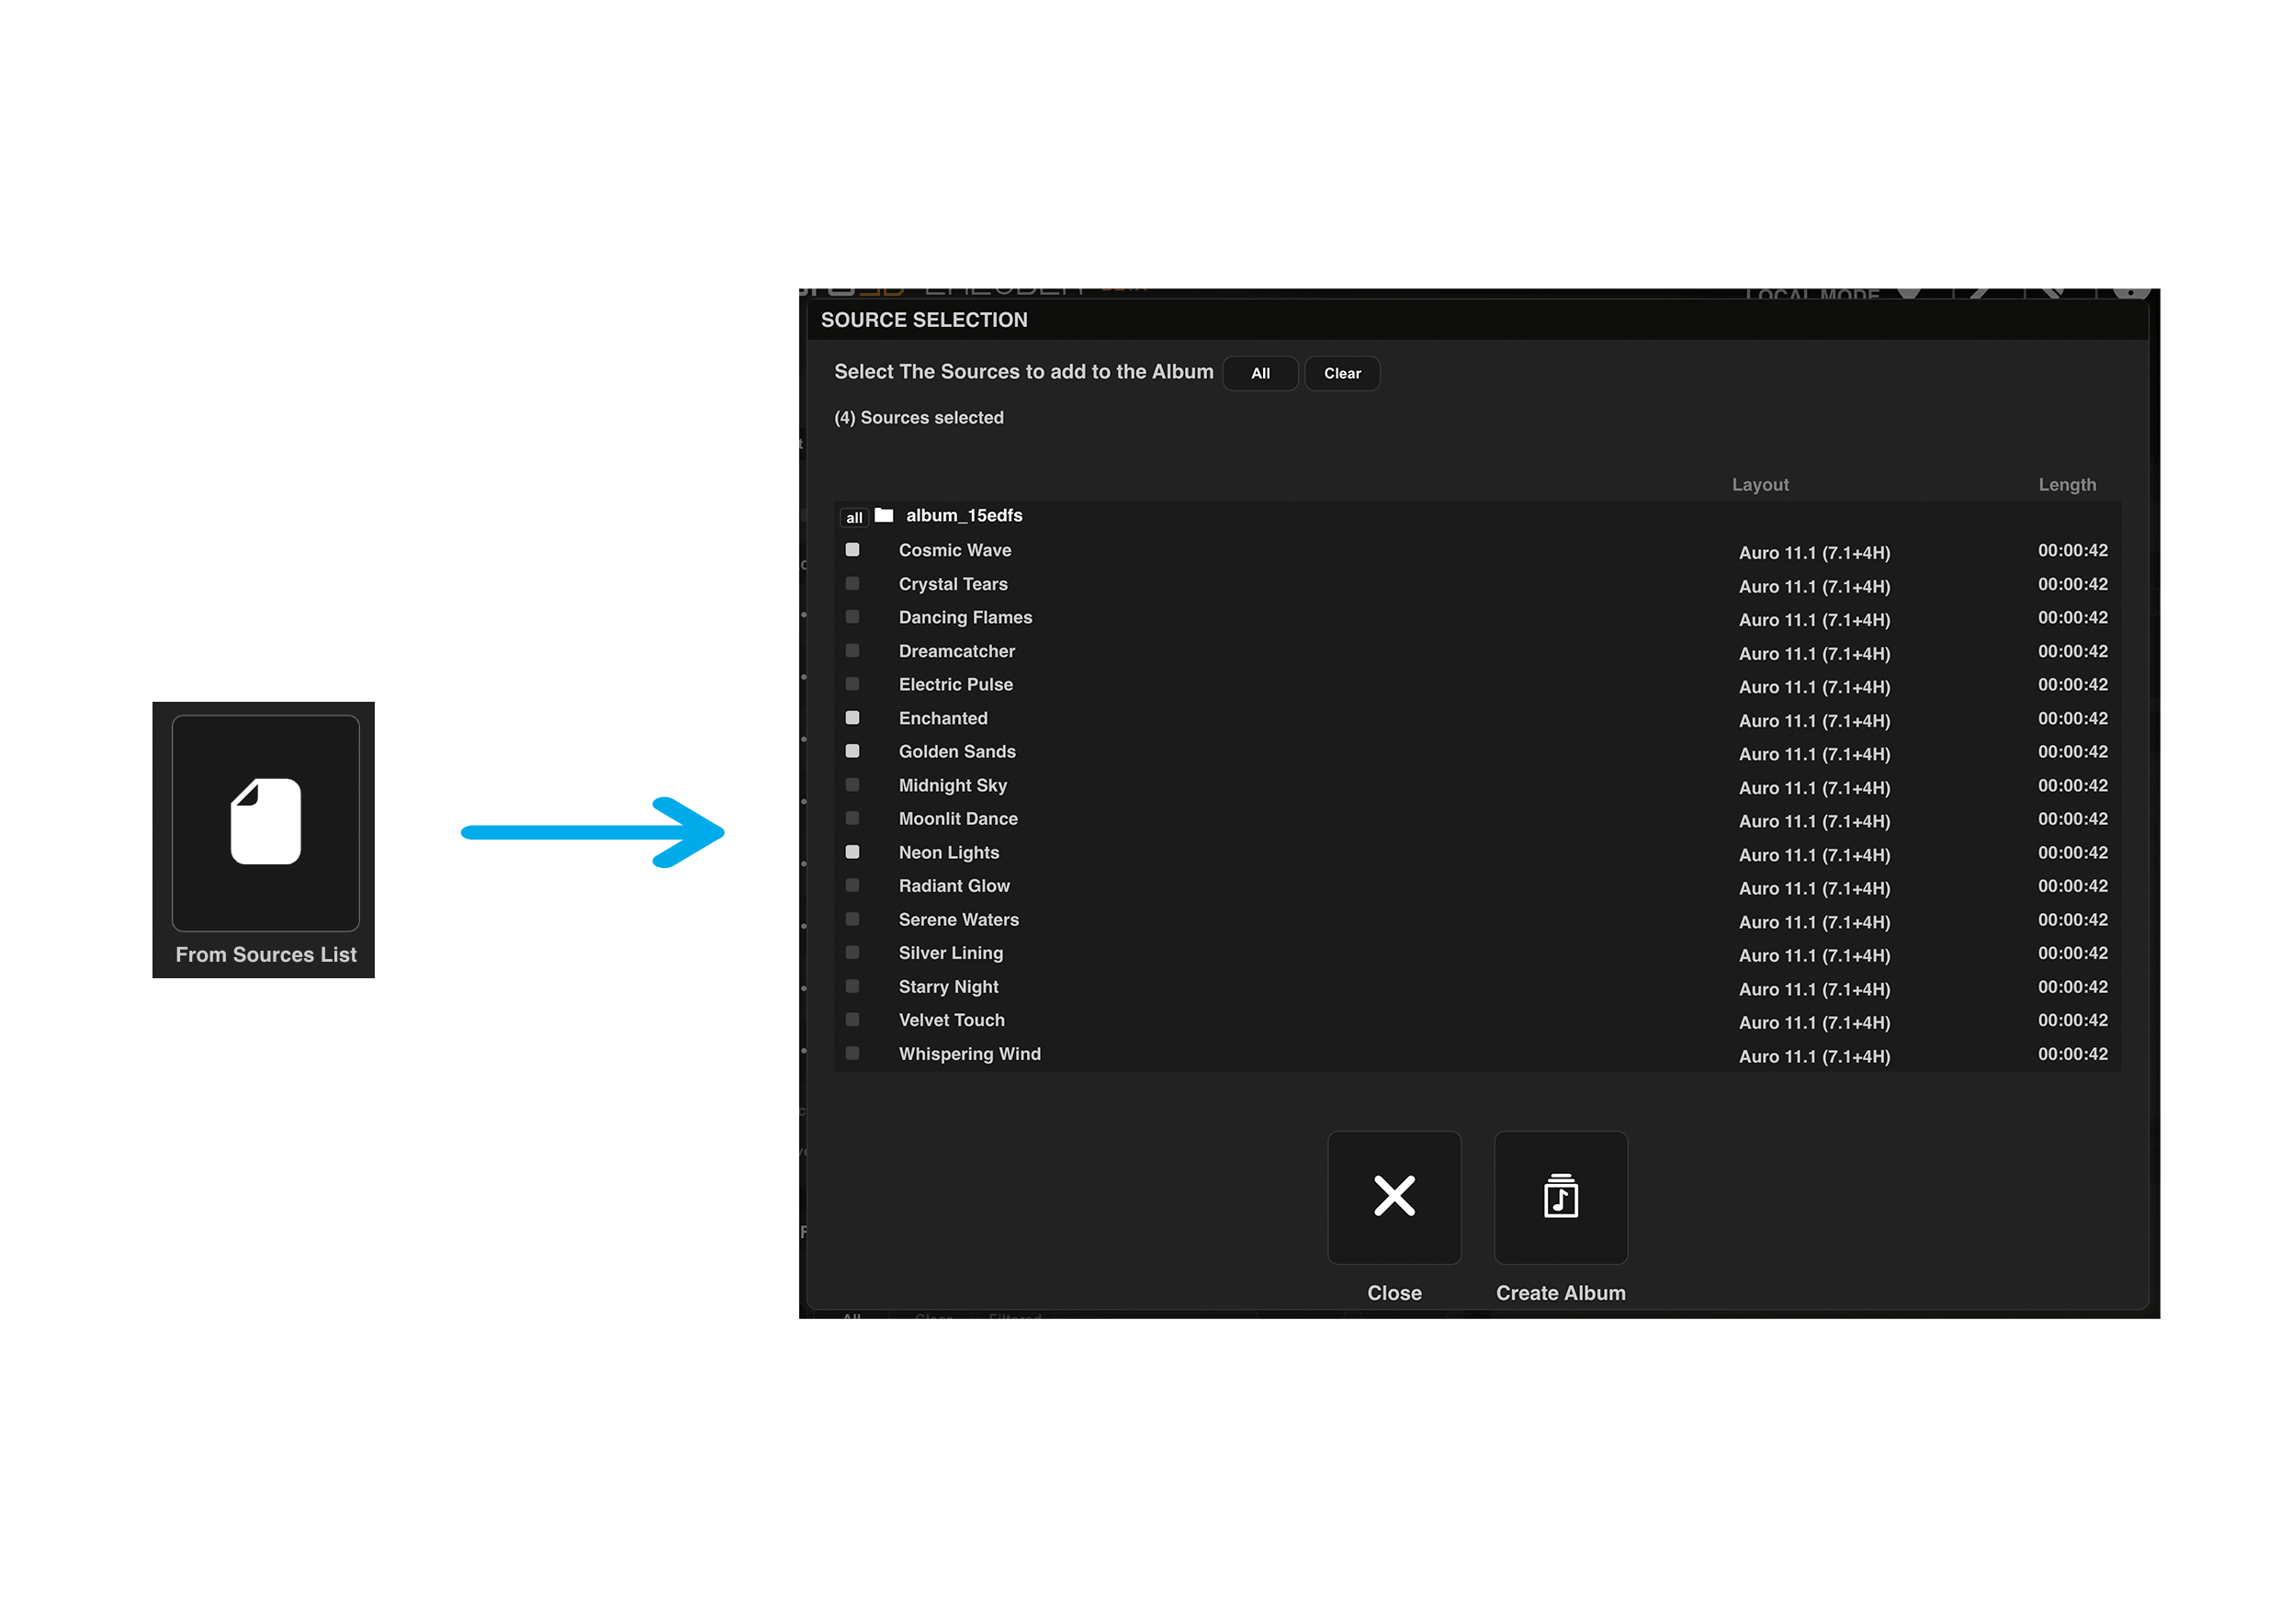
Figure 3.1.3.1.1 – 2 | Creating a New Album from the Sources List
→ From File(s)
Each interleaved WAV or ADM file maps one-to-one to a track, so nothing further needs to be defined before
import: one or multiple files can be selected directly, without first creating a source. The corresponding
sources are
automatically created in the background and automatically grouped into an album, and can be reviewed like
any other sources in the Source Table in the Source Tab.
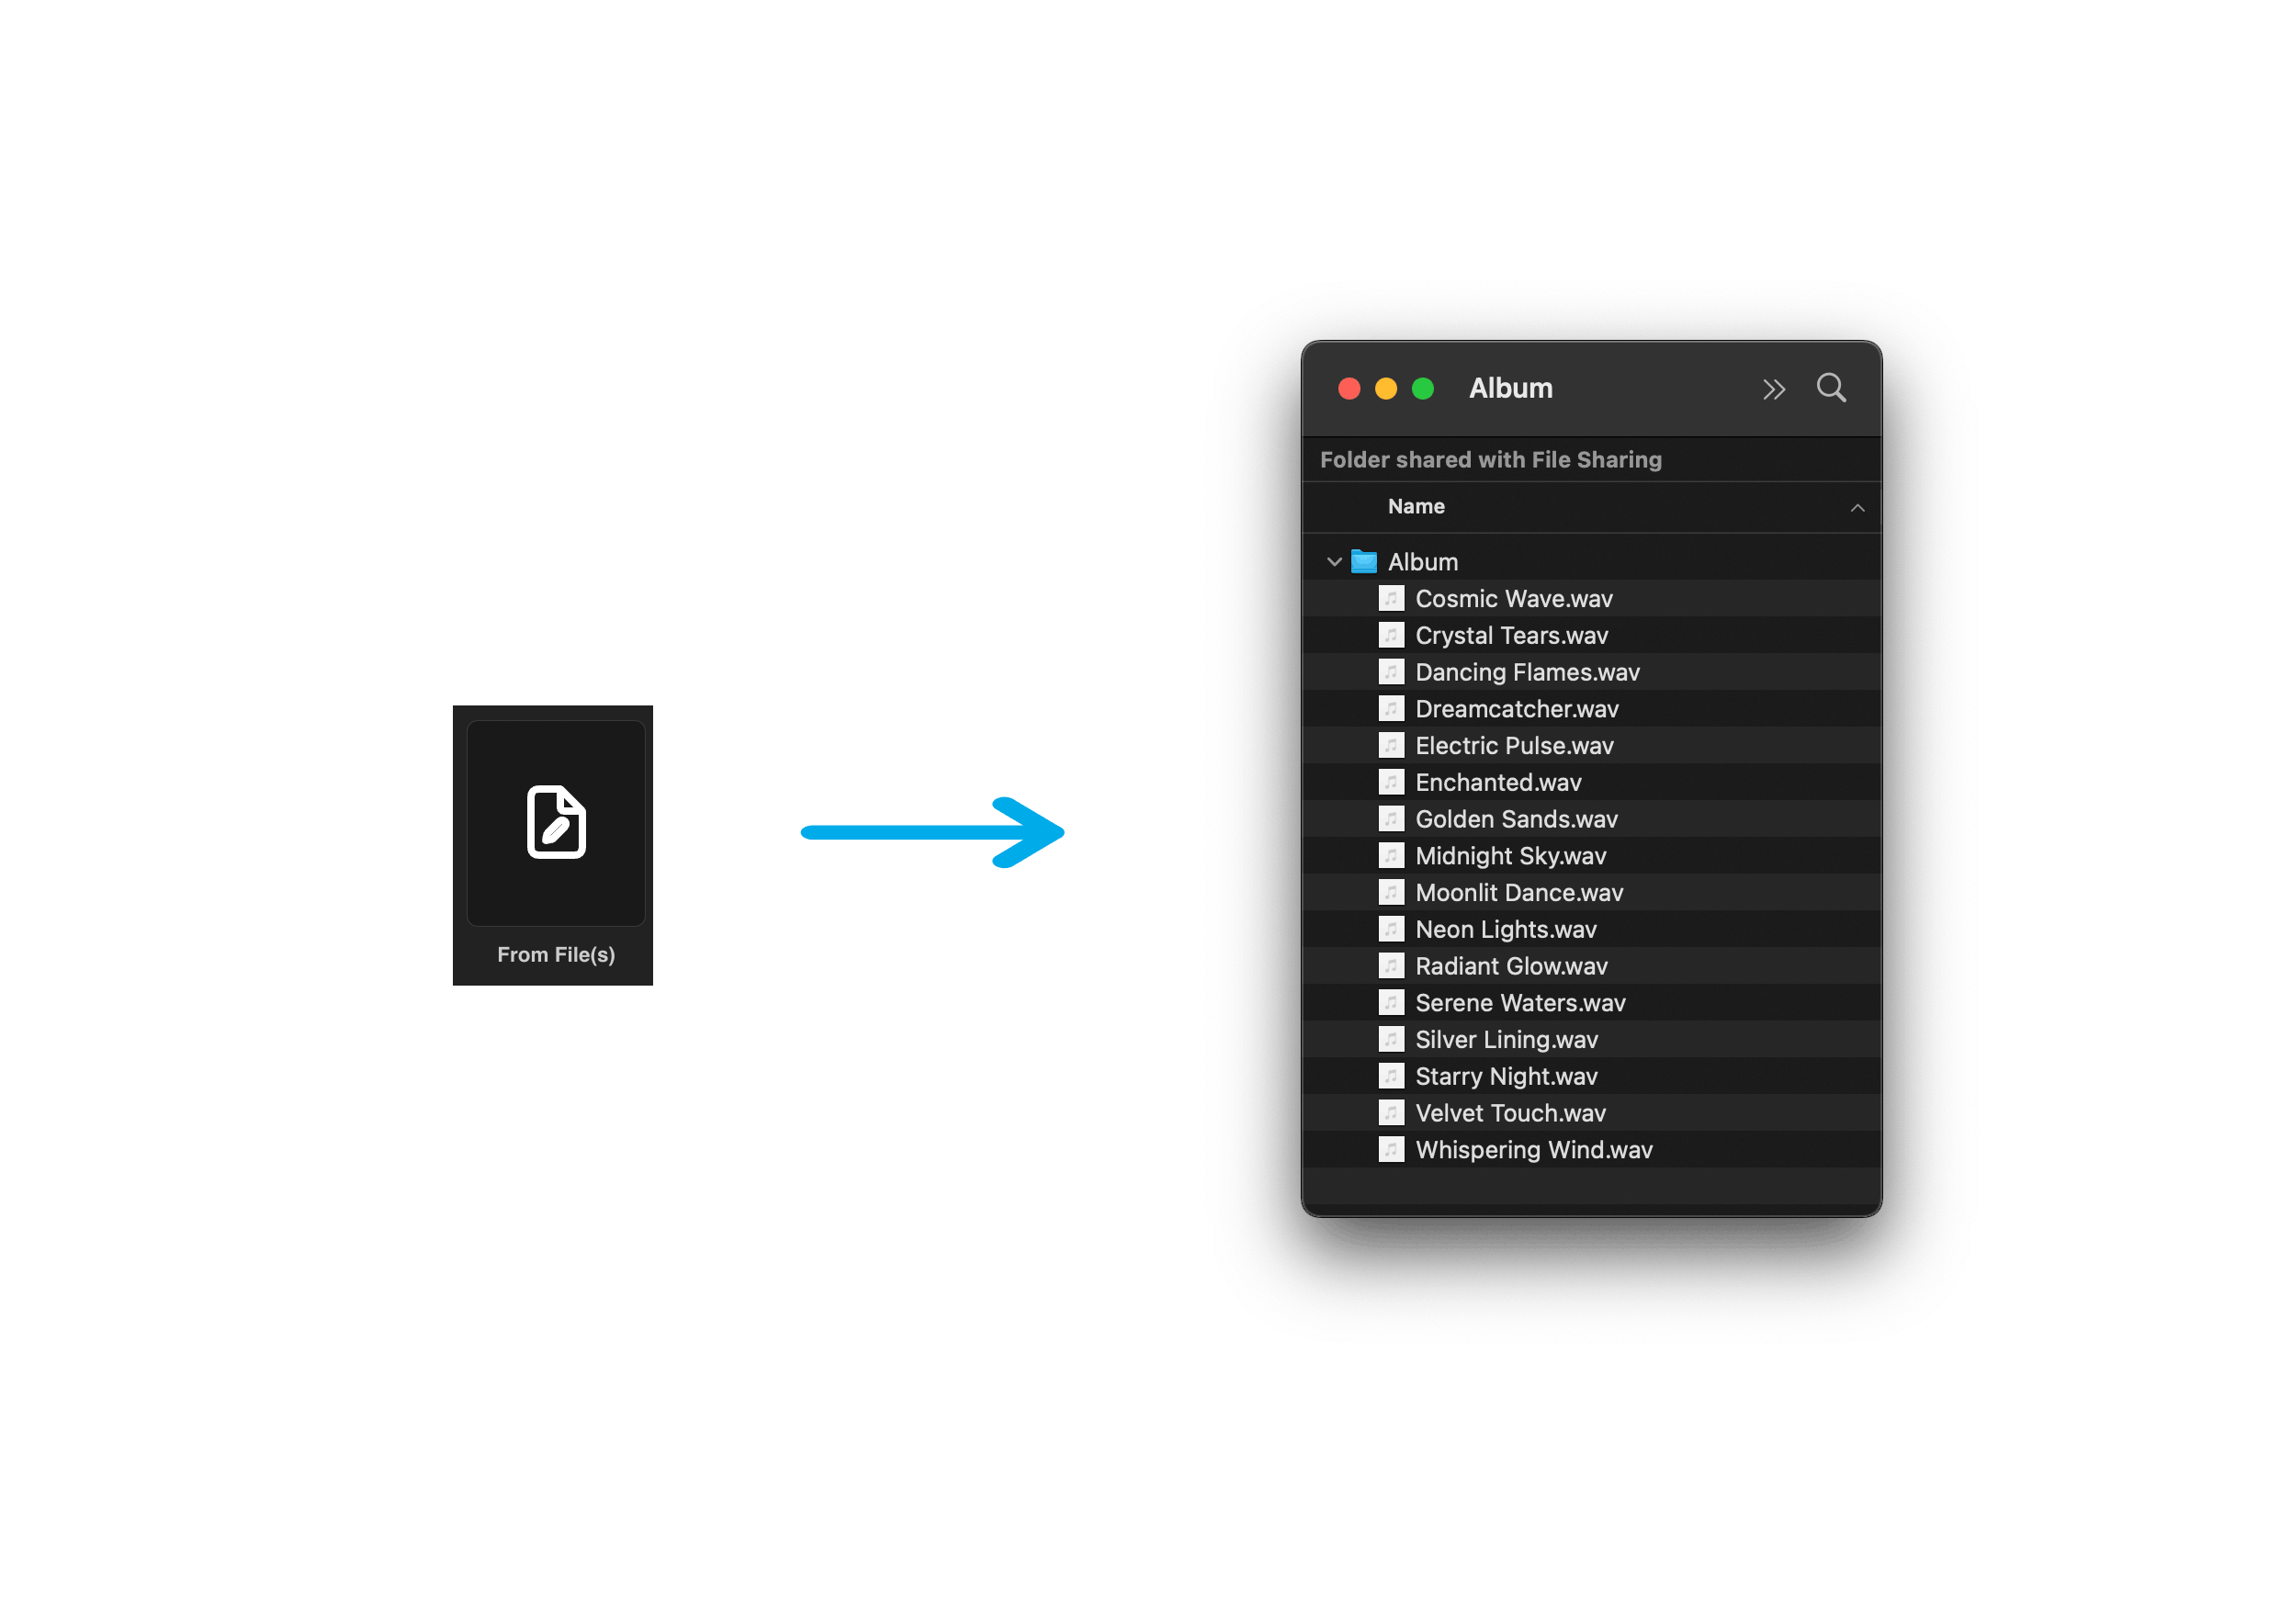
Figure 3.1.3.1.1 – 3 | Creating a New Album from File(s)
When improting From File(s), a multi-mono WAV file cannot be resolved this way, since one mono file is only a
single channel of
a track, and a flat file selection gives no way to know which other mono files complete it. Selecting mono
files through this option therefore triggers an unsupported content warning in the table; this case is
covered instead by the “From Folder” option below. Since all tracks in an album are expected to share the
same sample rate and layout, the selected files are checked against each other once imported. If a
mismatch is found, the warning “Not All Tracks Share the Same Sample
Rate or The Same Layout” is displayed.
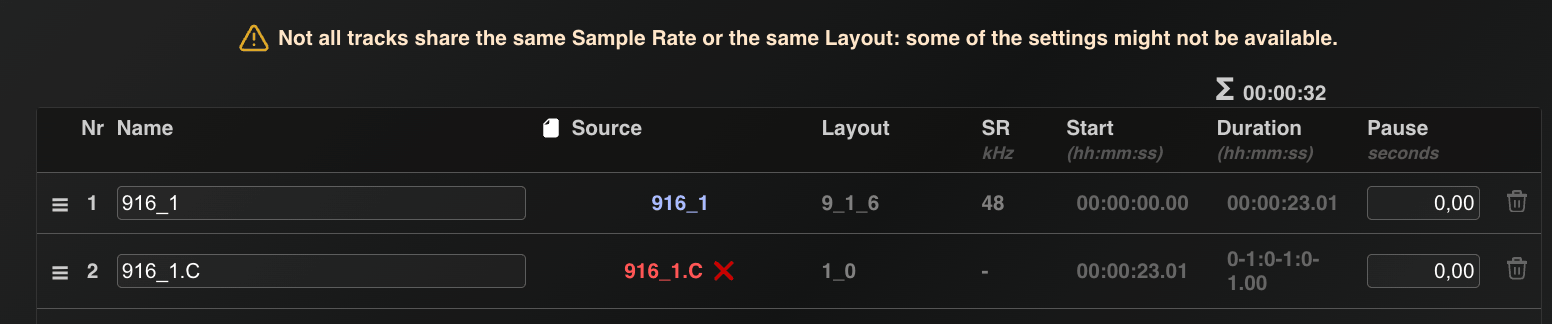
Figure 3.1.3.1.1 – 4 | Unsupported Content Warning for Multi-Mono WAV
Files
→ From Folder
Reconstructing a track from multi-mono WAV files requires grouping the right set of channel files together,
which a flat file selection cannot express. The From Folder option relies on folder structure instead: each
subfolder represents one track and contains the mono WAV files for its channels. Selecting the parent
folder containing all the track subfolders lets the system regroup each set of mono files back into a
complete multi-channel source per track. The resulting composition is shown in a preview window for
verification before pressing “Create Album” to add the album to the system.
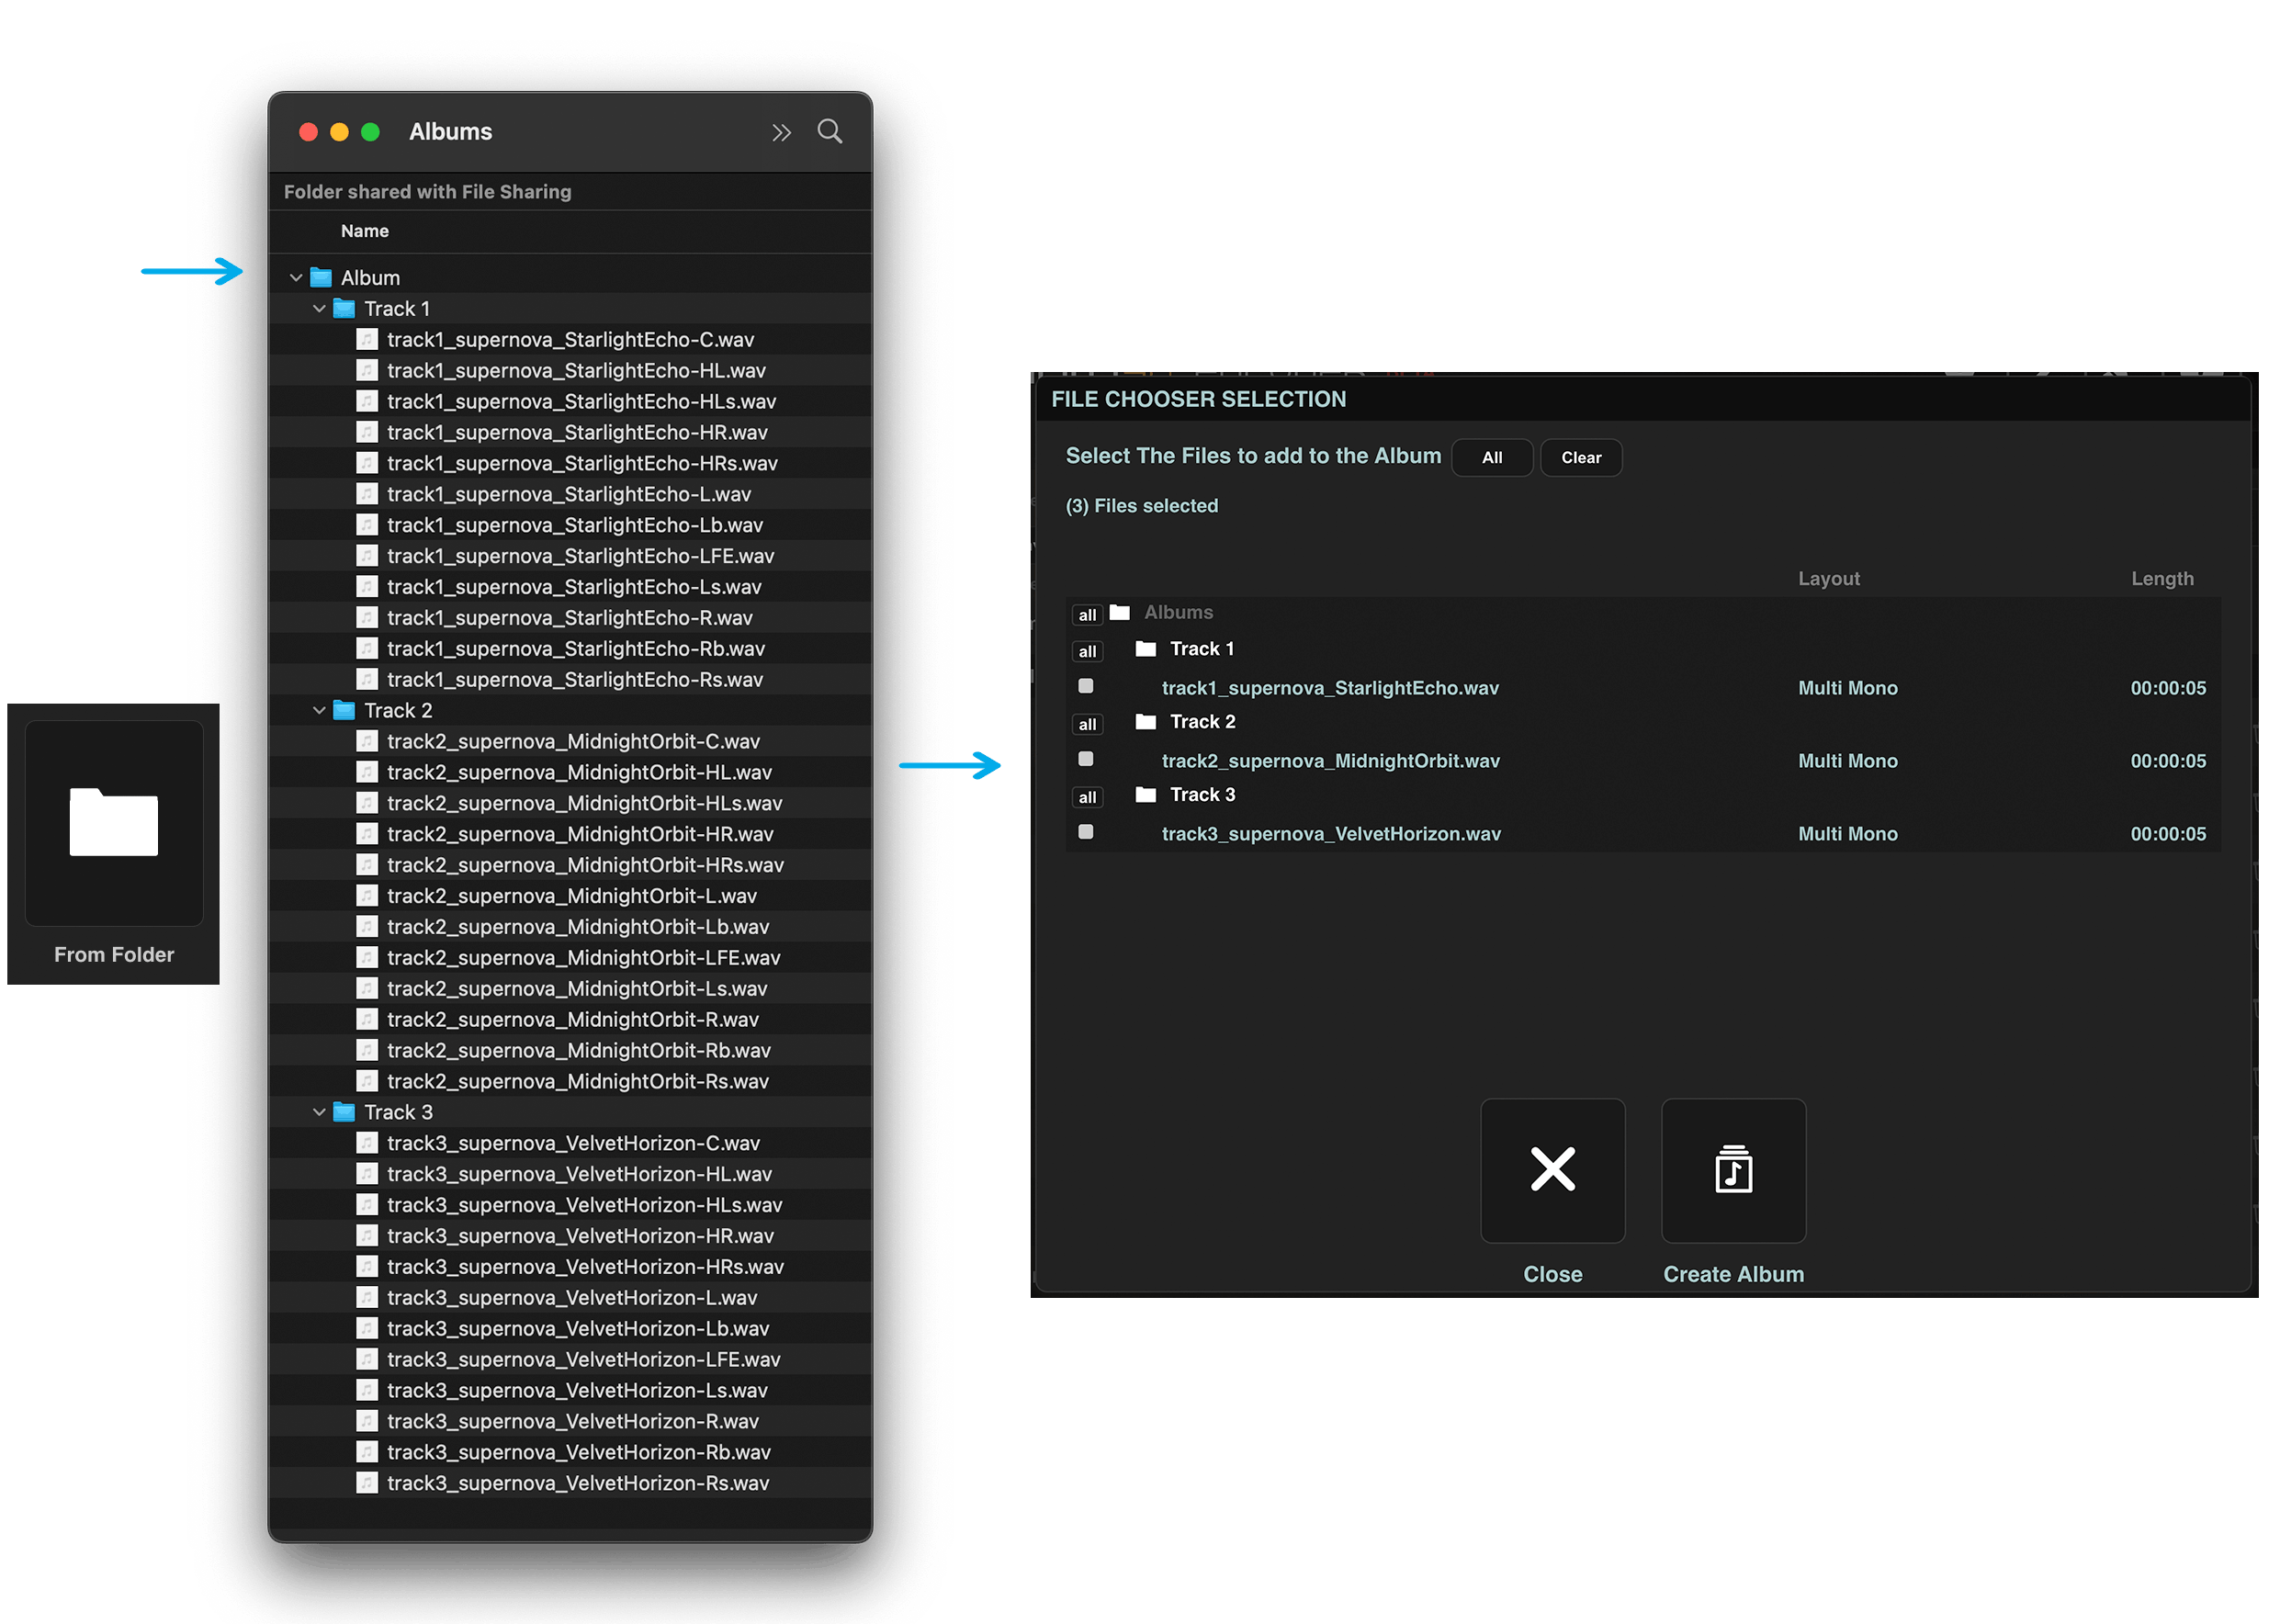
Figure 3.1.3.1.1 – 5 | Creating a New Album from a Folder
• Edit Button: The Edit Button transitions the Albums Menu from Main View to
Edit View, allowing modifications to the selected album. This includes editing track order and timing in the
Track Editor Tab, configuring album playback behavior in the Settings Tab, and reviewing metadata shared across
all tracks in the Shared Metadata Tab. If the album is currently in use by any encodings in the Queue List, a
“ALBUM IN
USE” label appears in the top left corner of the Edit View, and a padlock icon replaces the
edit icon in the albums table in Main View. This
design prevents accidental changes or deletions of albums involved in ongoing encoding tasks.
3.1.2 Select Buttons
In addition to the selection checkboxes within the Albums Table in the Albums Main
View, a set of Select Buttons is available to facilitate more advanced selection methods:
• Select Invert Button: Unselects the currently selected albums
in
the Albums Table and selects the currently unselected ones. • Select All Button:
Selects all existing albums in the Albums Table. • Select Clear Button: Unselects
all
existing albums in the Albums Table. • Select Filtered Button: Selects the albums
that match the current name set in the Filters Field.
3.1.3 Filters Field
The Filters Field allows for filtering of existing albums in the Albums Table within
the Main View. Currently, the available filter is the Name Filter, which can be activated by selecting the
checkbox next to the ‘Name’ label under the Filters section. Once the Name checkbox is selected, a custom word
can be entered in the Filter Field, and upon pressing the ‘Select Filtered’ button, only albums matching the
specified name will be displayed in the Albums Table.
3.1.4 Albums Table
The Albums Table provides functionality to select, edit, and delete existing
albums.
Its simple interface facilitates the encoding workflow, enabling quick and efficient addition of selected
albums to the encoding process via the prominent ‘ADD’ button in the Control Section. In combination with the
current configuration in the Configurations menu, these added albums create new sessions in the Encoder Queue
list, awaiting encoding initiation by pressing the large ‘START’ button in the Control Section. The Albums
Table
consists of six columns, each serving a distinct purpose:
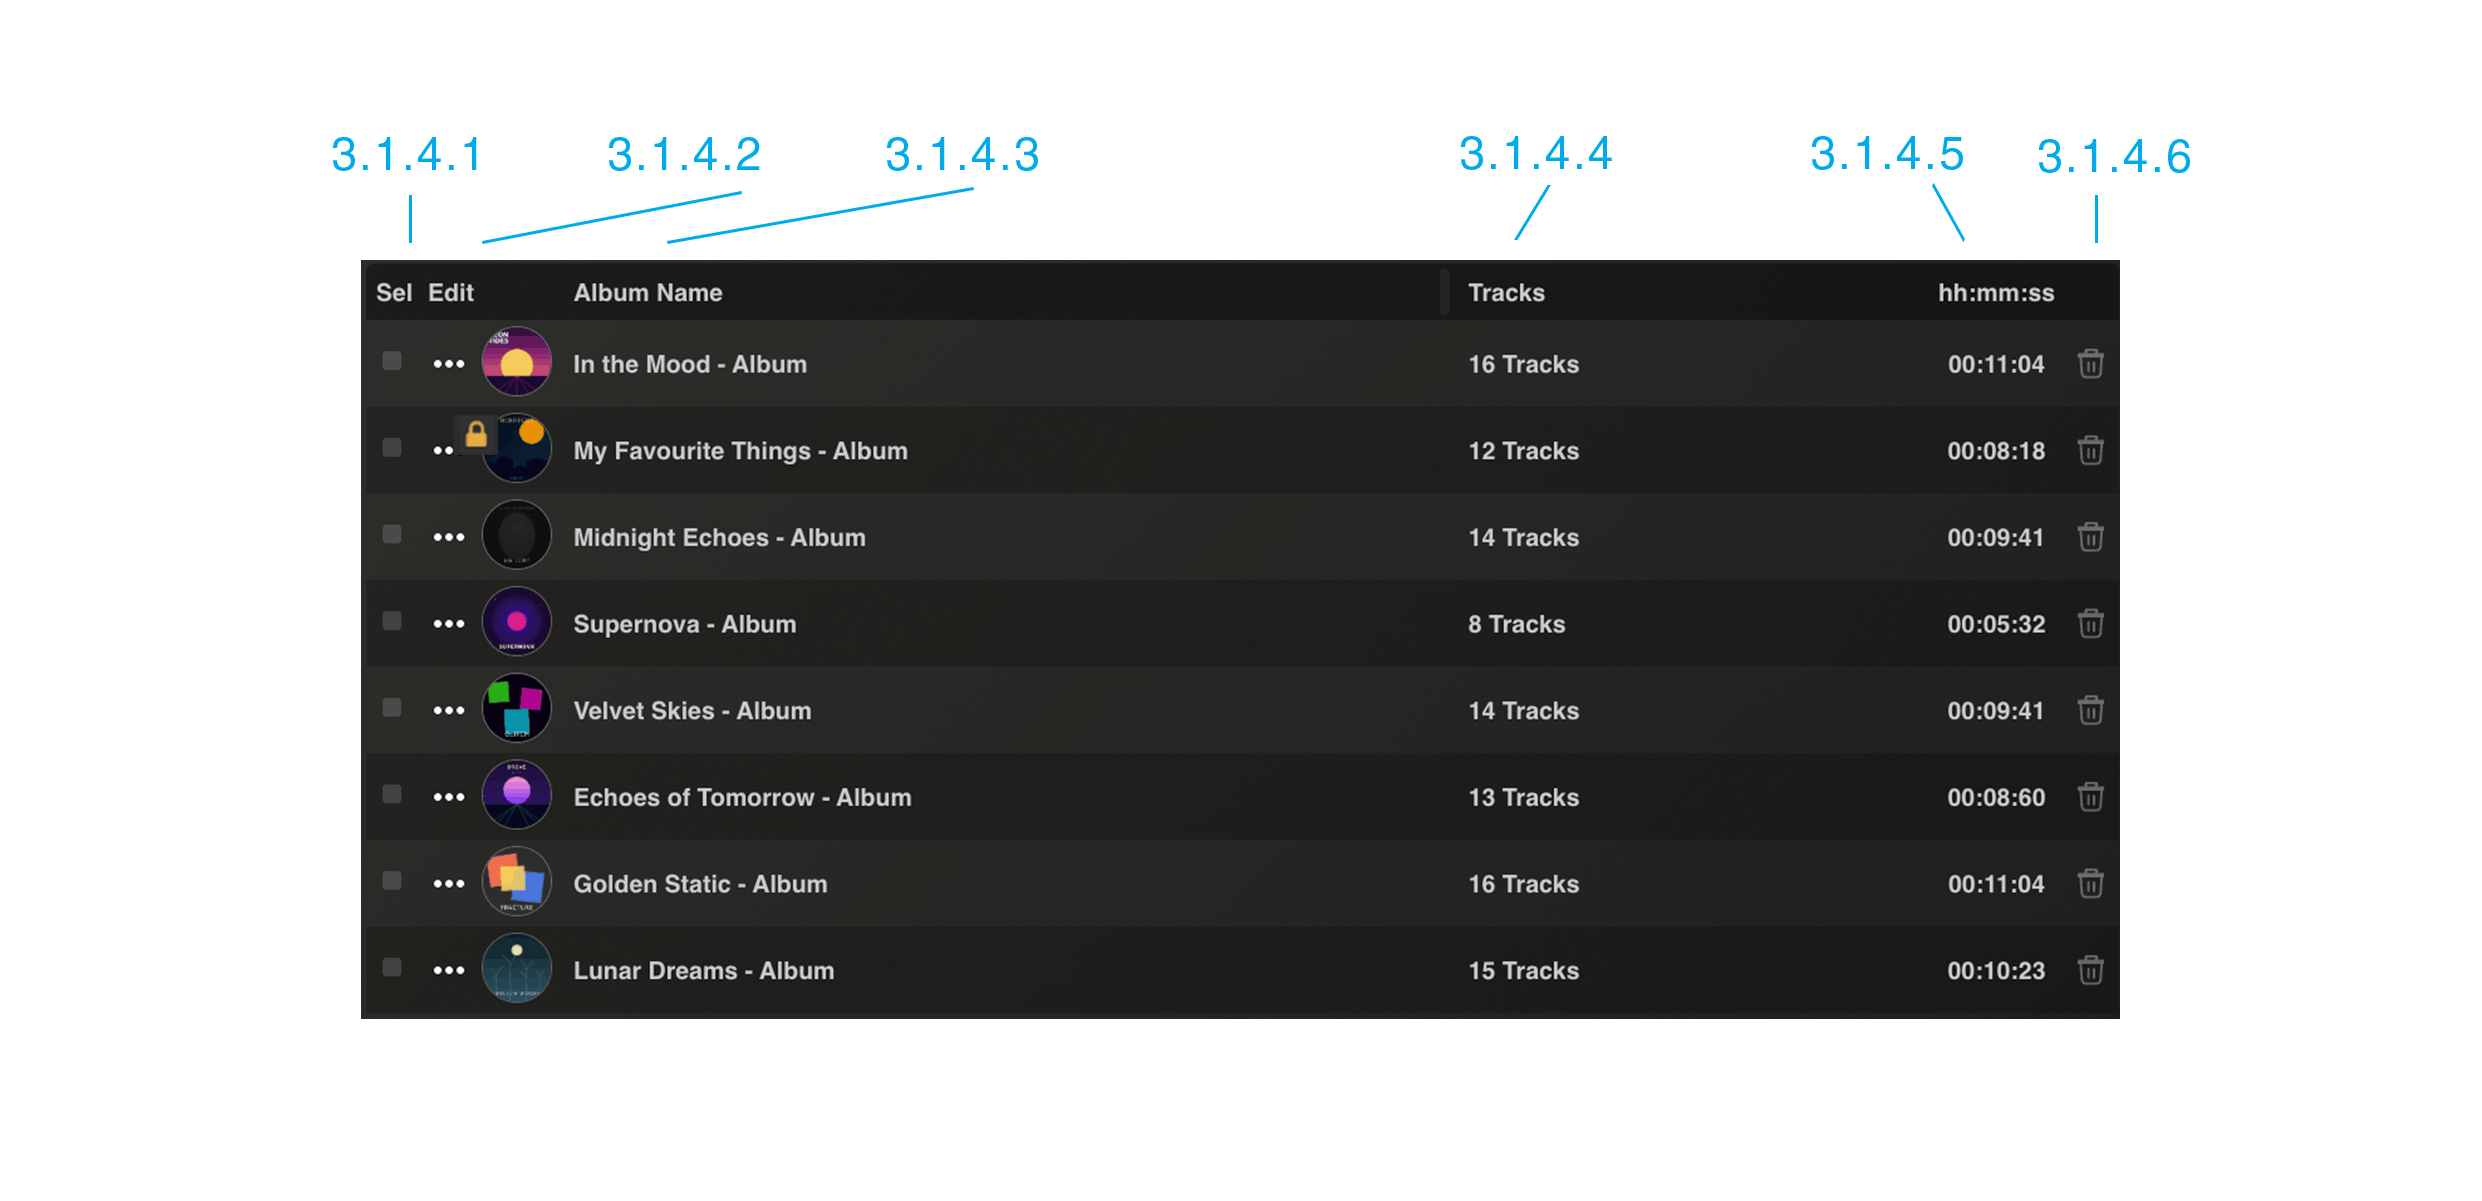
Figure 3.1.1.1.4 – 1 | Albums Table in the Main View
• 3.1.4.1 Select Column: Allows selection of albums to be added
to
the Queue List. Selected albums can also be deleted or duplicated via the Bulk Actions.
•
3.1.4.2 Edit Column: Opens the Edit View of the corresponding album. If the selected
album
is currently in use by any encodings in the Queue List, a “ALBUM IN
USE” label is displayed at the top left corner within the Edit View, along with a
padlock
icon replacing the edit icon in the Albums Table in the Main View.
These visual indicators highlight that the album is currently inaccessible for deletion or modification
until
it is no longer in use in the Queue List. This design feature prevents accidental alterations or deletions
of
albums engaged in ongoing encoding tasks.
• 3.1.4.3 Album Name Column:
Displays
the custom Album Name of the corresponding album.
• 3.1.4.4 Tracks
Column: Displays the number of tracks contained in the corresponding album. If the file of a
track no longer exists in the system, a “Missing Files” message is displayed
next to the track number in the Tracks Column. Note that this detection is only performed when restarting
the server.

Figure 3.1.1.1.4 – 2 | Missing Files Message in the Tracks Column
• 3.1.4.5
Length
Column: Displays the total duration of the corresponding album.
• 3.1.4.6 Delete Column: Enables the
permanent
deletion of the corresponding album.
3.1.5 Bulk Actions
Bulk Actions allow the application of specific actions to multiple selected albums
simultaneously.
• The Remove Button: Permanently removes all selected albums
from
the Albums Table (without deleting their corresponding media files on the local system). Note that albums
marked as “ALBUM IN USE” cannot be deleted until they
are
no longer in use.
• The Duplicate Button: Allows duplication of all selected albums.
Each duplicated album is added to the Albums Table with a new identifier, preserving the original data
while
creating a copy for further modification or use. Note that when duplicating albums within a folder
structure,
each album is duplicated at its corresponding position within that structure.
4. Albums Tab – Edit View
The Albums Edit View is accessible upon creating a new album with the “Add New Album”
button, or upon editing an existing album by pressing the “Edit Button” located in the Albums Table. The
top left corner of the Edit View includes the Album Name Field, which serves the purpose of defining a distinctive
name for each album. Upon saving the album, the specified name becomes an accessible item within the Albums Table
in the Main View.
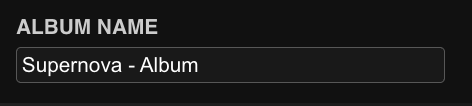
Figure 3.1.2 – 1 | Albums Menu – Edit View – Album Name Field
An album consists of a set of tracks whose order and timing can be edited in the Track
Editor Tab (E), accompanied by album-specific playback options, such as gapless playback, track
merging, and pre-roll, defined in the Settings Tab (F), and optionally by metadata shared across
all tracks, defined in the Shared Metadata Tab (G):
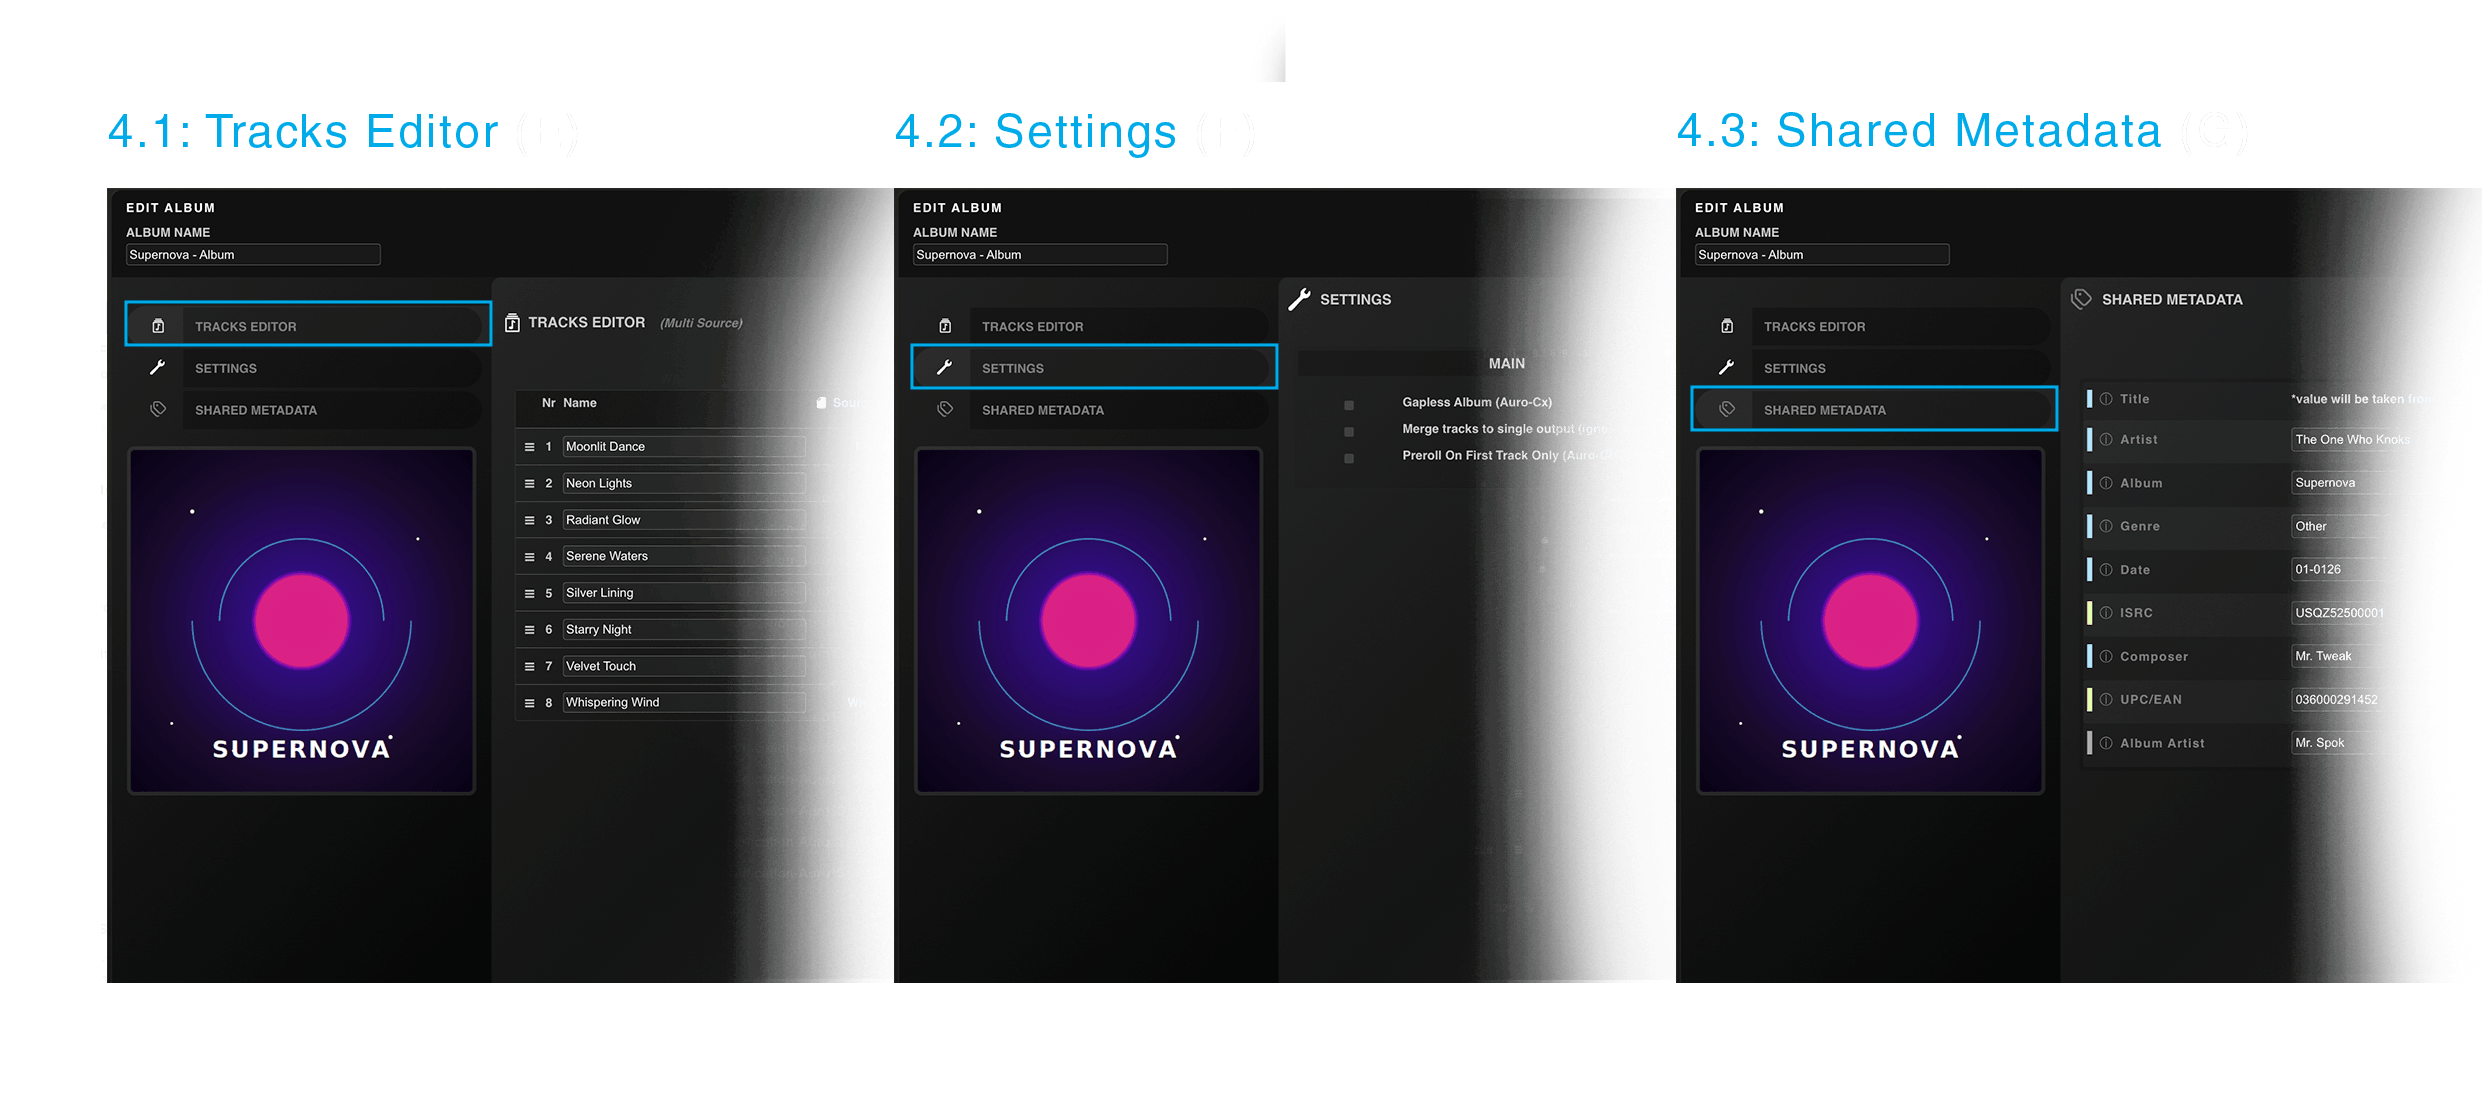
Figure 3.1.2 – 2 | Albums Menu – Edit View Tabs
Creating a new album in the Albums Tab typically involves selecting or importing the
source tracks that make up the album, editing their order and timing in the Track Editor Tab
(E), setting album-specific playback options, such as gapless playback, track merging, and
pre-roll, in the Settings Tab (F), and managing metadata shared across all tracks in the Shared
Metadata Tab (G):
4.1 Track Editor Tab
The Track Editor Tab allows editing of the order and timing of the tracks in the album.
The table, elements, and options presented in this tab depend on the type of album: Single Source or Multiple
Source. Both album types can originate from any of the import methods described earlier: From Sources List,
From File(s), or From Folder.
4.1.1 Multiple Source Album Type
An album becomes a Multiple Source Album when it is created from more than one source —
for example by selecting several entries From Sources List, or importing several files or a folder of files.
This type is fixed at creation and cannot be changed afterward. Unlike a Single Source Album, where every track
is cut from a single shared media file and therefore inherently shares the same sample rate and layout, each
track in a Multiple Source Album is backed by its own independent source file. The Track table reflects this:
alongside the track
name and duration, it exposes a Source, Layout, and Sample Rate column per track, so that any mismatch between
tracks – which are expected to share the same sample rate and layout – can be reviewed directly in the table,
together with options to edit the timing, order, and composition of the album.
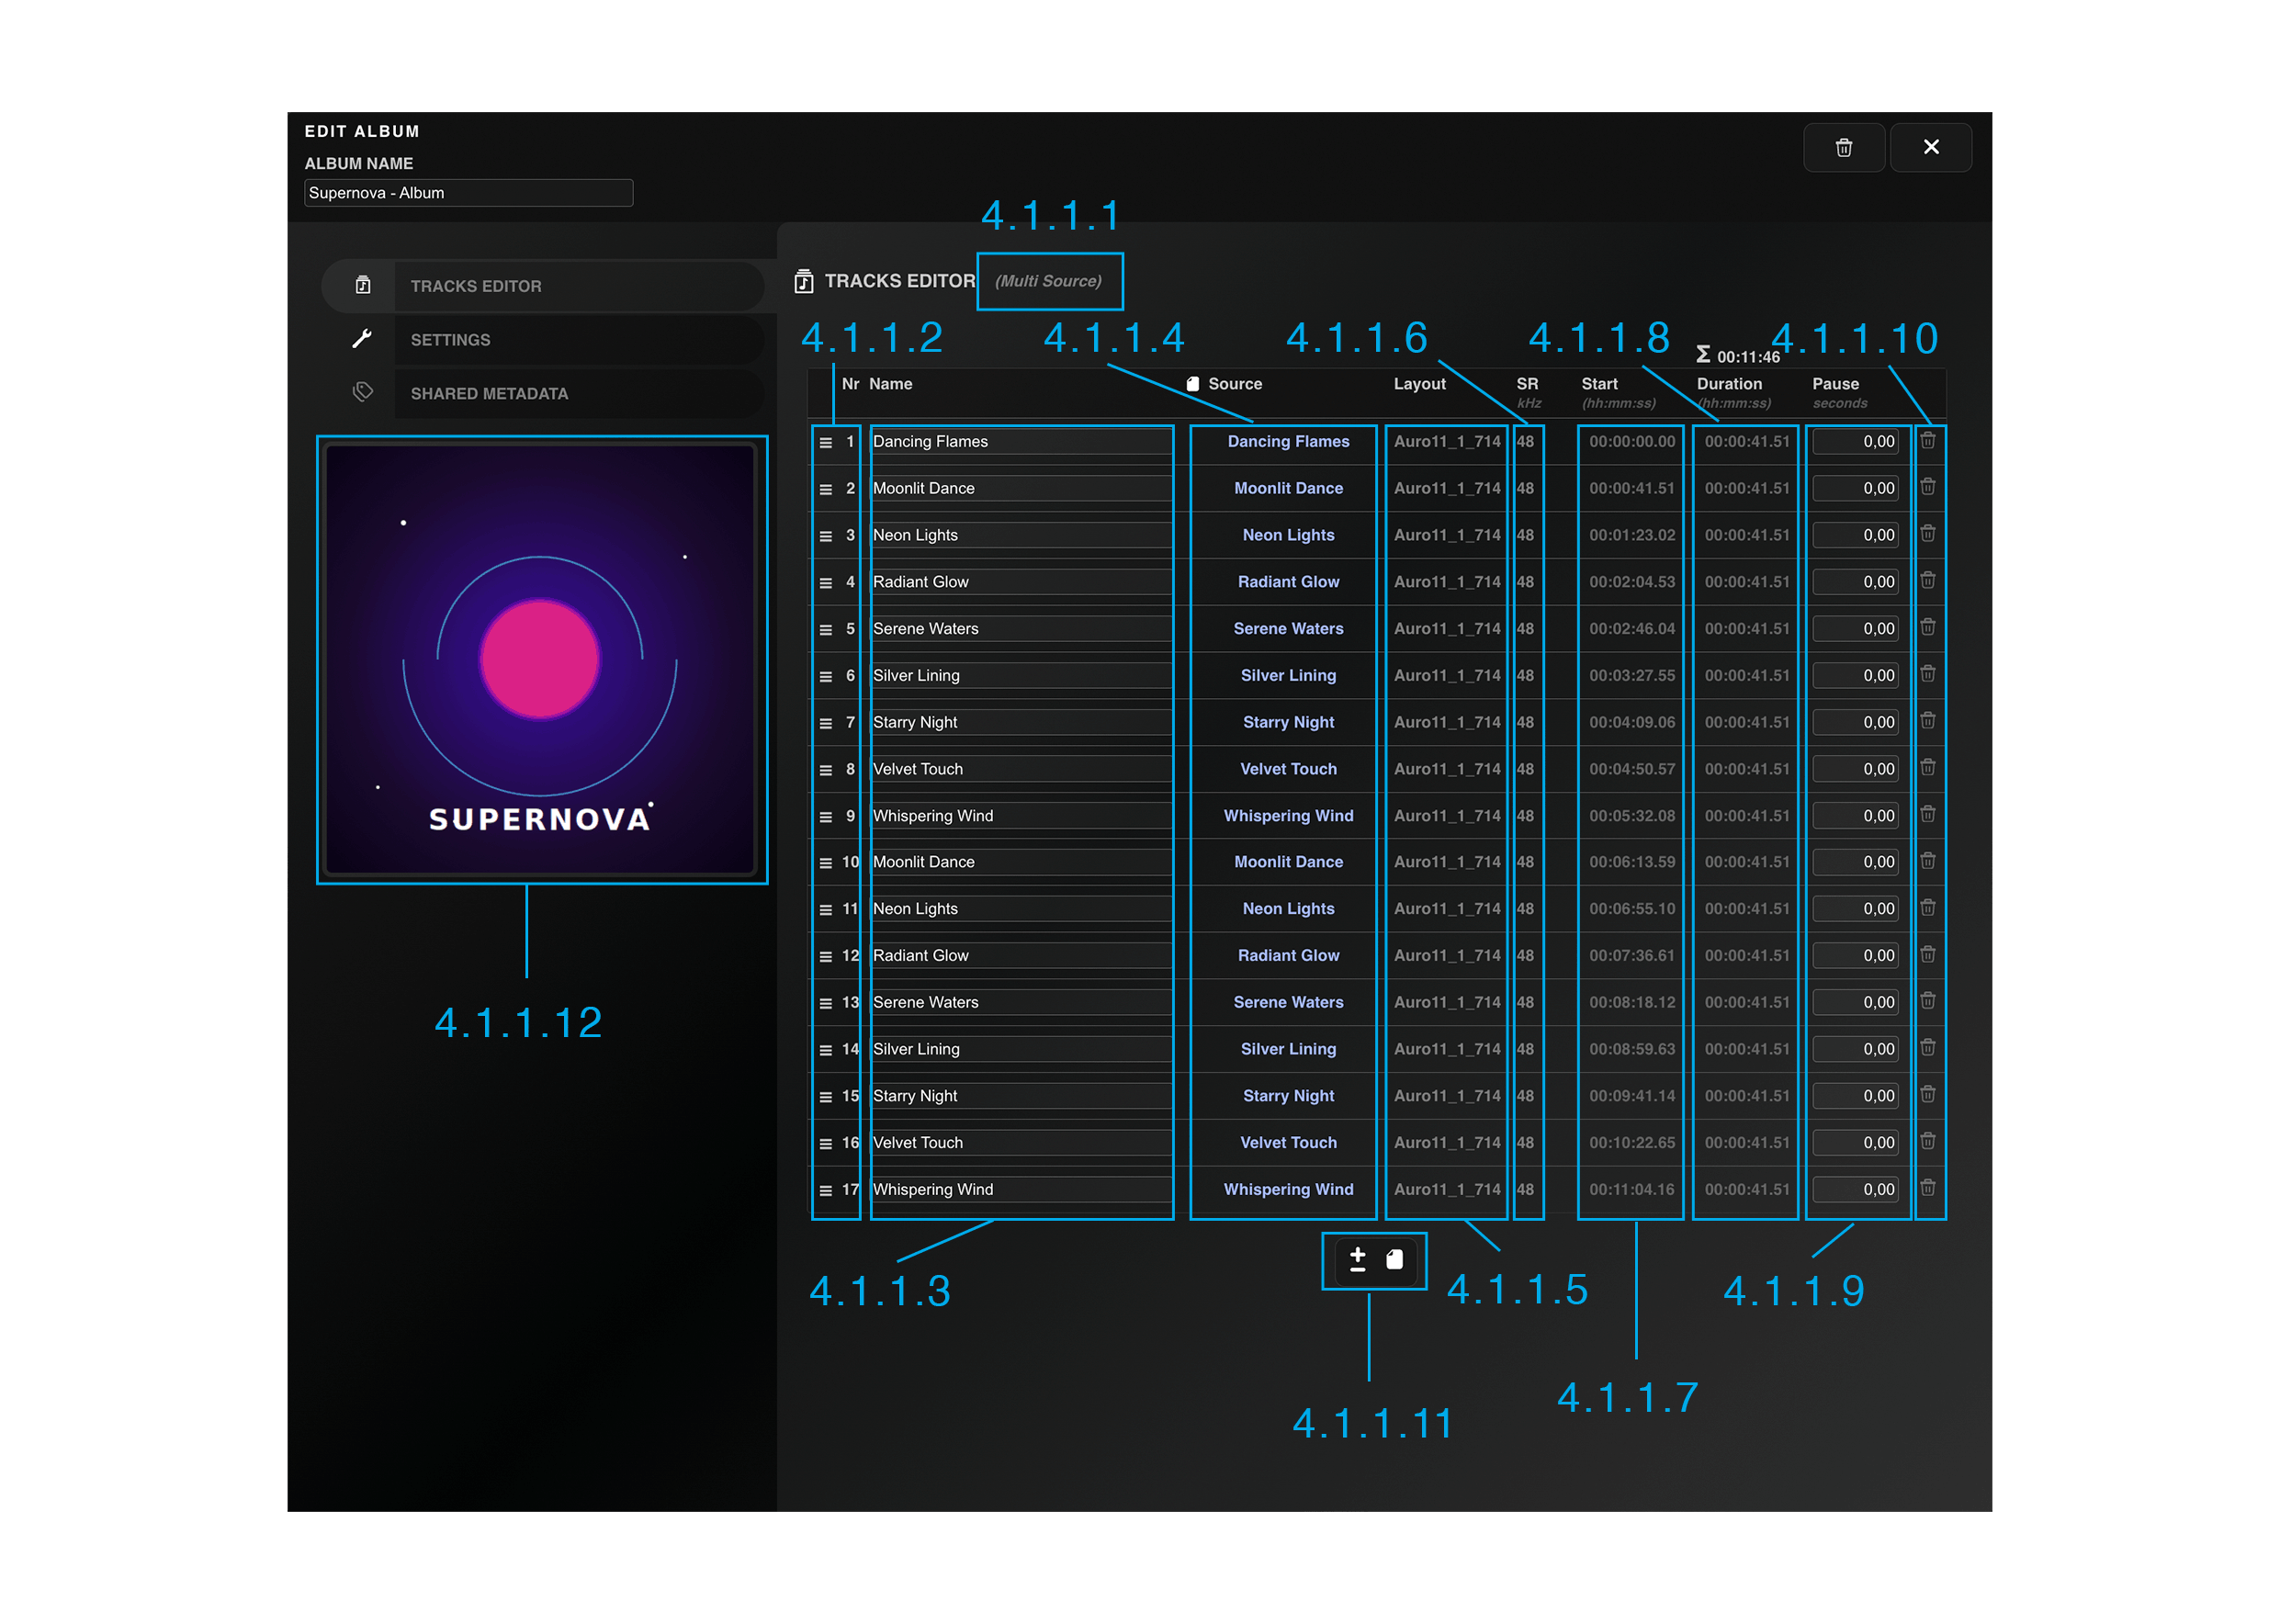
Figure 3.1.2 – 4 | Multiple Source Album Tracks
• 4.1.1.1 Album Type Indicator: Displays whether the album is a
Single Source or a Multiple Source Album, a type set when the album is created and fixed thereafter.
• 4.1.1.2 Track Number Column: Displays the position of the track in
the album, together with a grip icon that lets the track be dragged to a new position to reorder the album.

Figure 3.1.2 – 5 | Reordering Tracks via Drag and Drop
• 4.1.1.3 Track Name Column: Displays the name of the track.
•
4.1.1.4 Source Column: Displays the name of the track’s source and opens its Edit View –
identical to the Source Tab’s, with two additions: next to the source name, a clear indication shows whether
the source is part of an existing album, and on the Metadata page, each metadata field
indicates whether its current value originates from the Album level (set in the shared metadata tab in the edit
view of albums), from a Default value (defined in the global settings), or from a custom value set at the source
level, shown respectively in blue, grey, and white.
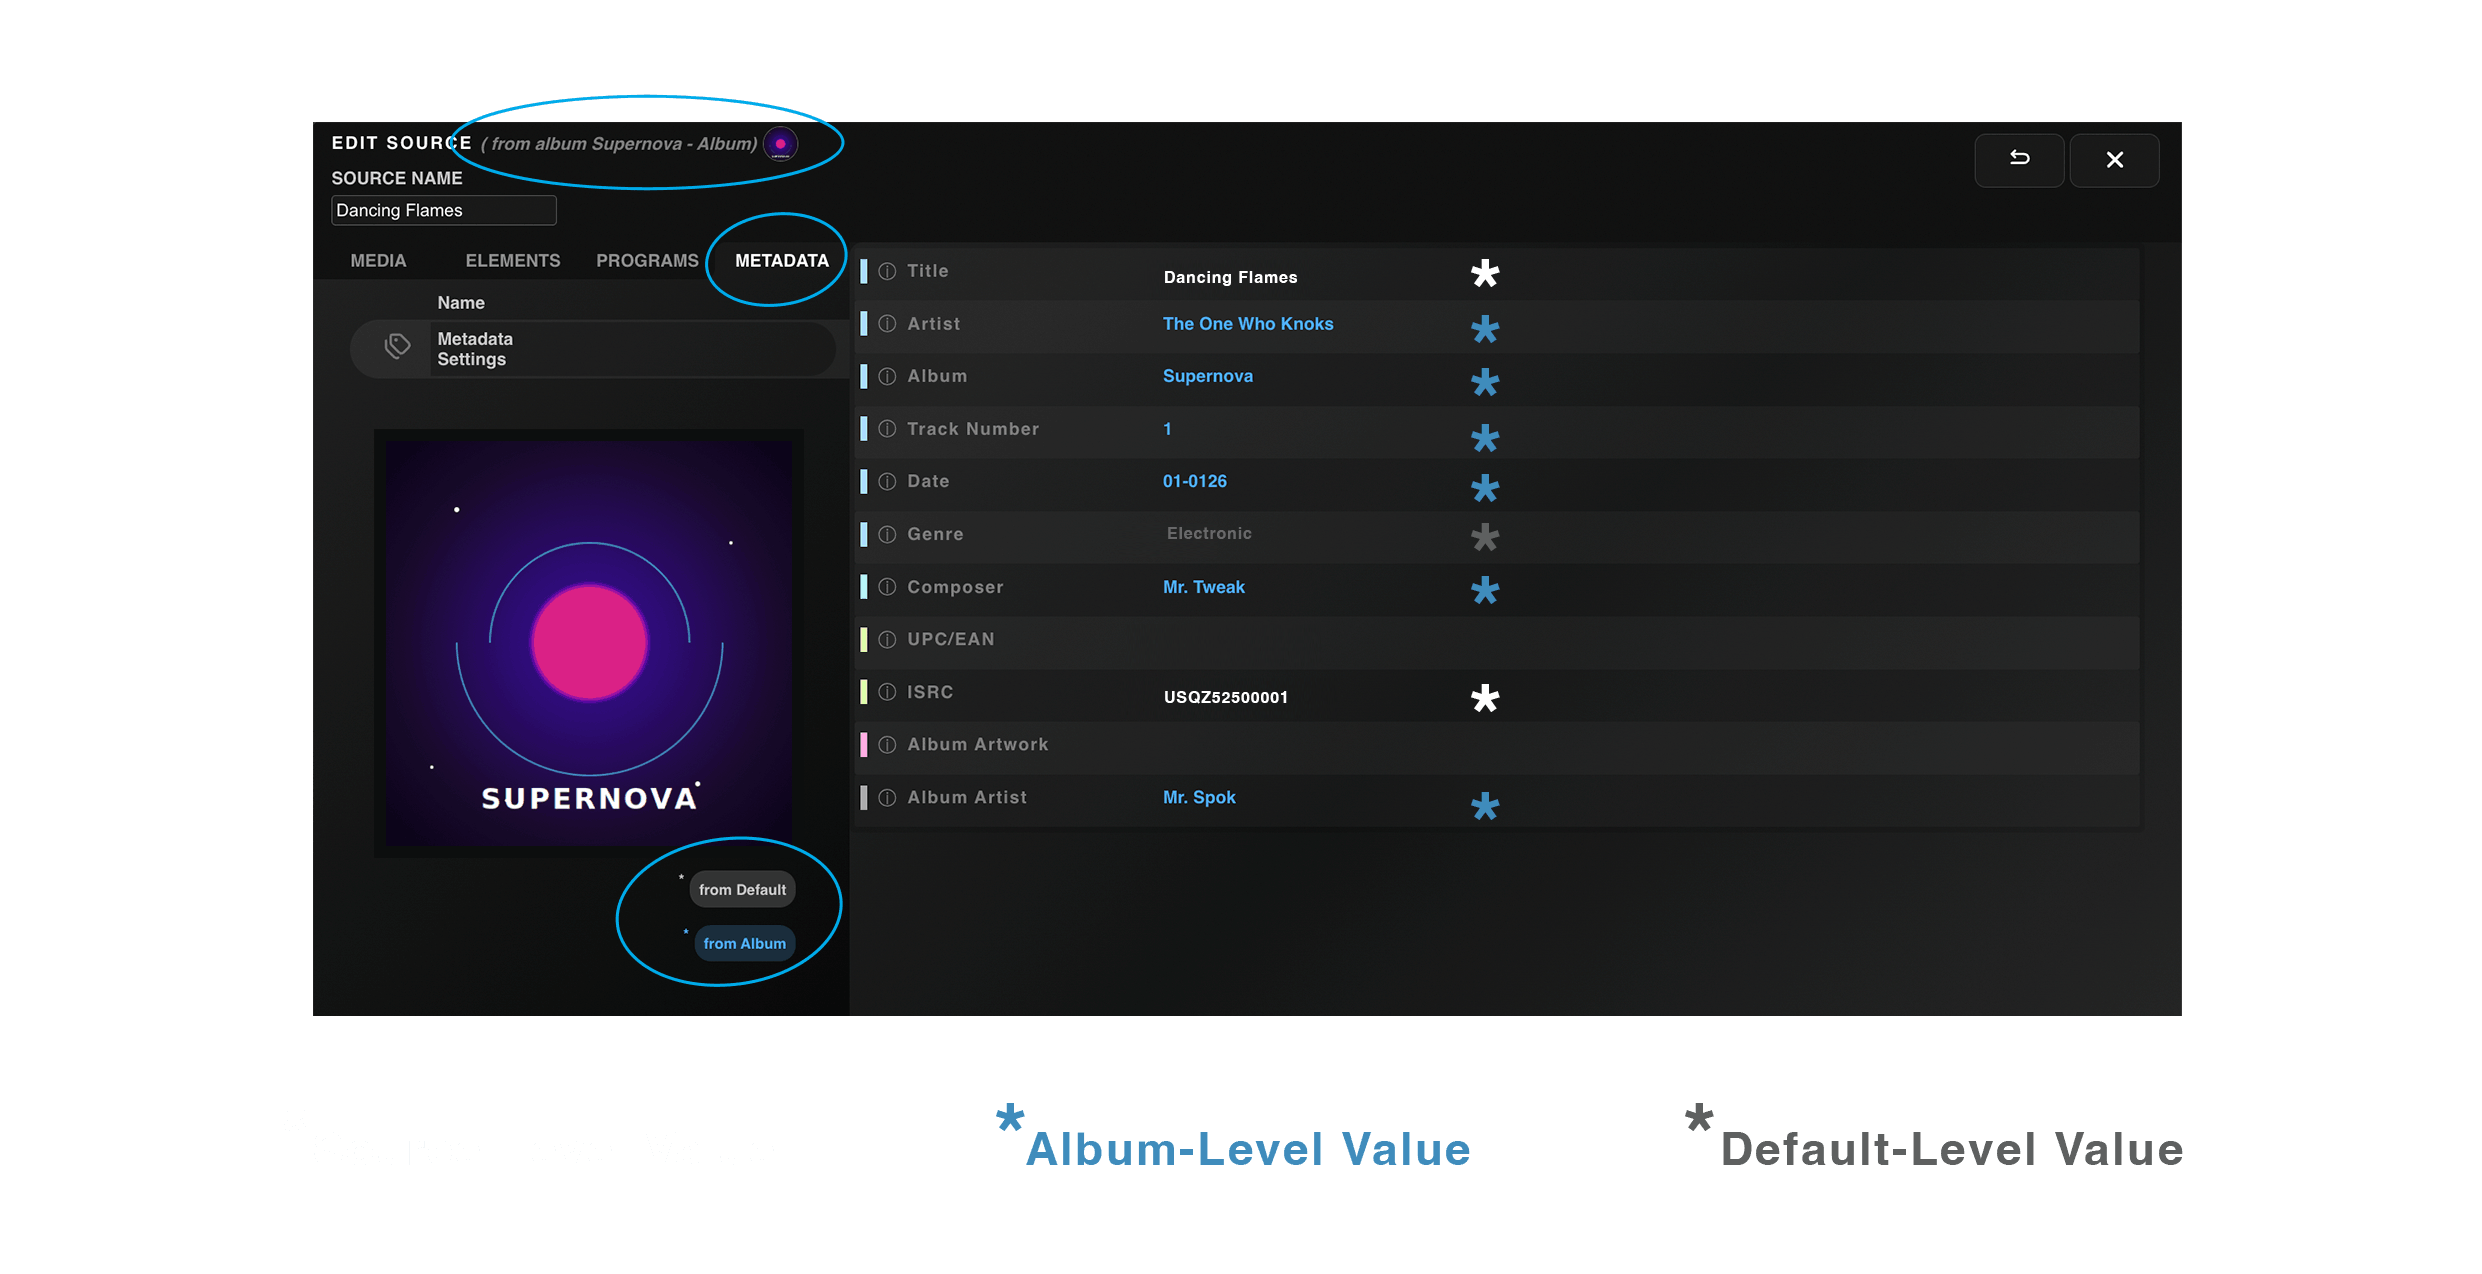
Figure 3.1.2 – 6 | Source Edit View Opened from an Album – Album Membership
and Metadata Origin Indications
• 4.1.1.5 Layout Column: Displays the layout of the track’s source, so a mismatch
with the other tracks in the album can be spotted directly in the table.
• 4.1.1.6 Sample
Rate Column: Displays the sample rate of the track’s source, for the same reason as the Layout
Column.
• 4.1.1.7 Start Time Column: Displays the timestamp at which the track
starts on the album’s timeline. This value is derived from the cumulative duration of the preceding tracks
and pauses, and updates automatically whenever the album is reordered or edited.
•
4.1.1.8 Duration Column: Displays the duration of the track. The column header additionally
displays the running total (Σ) duration of the whole album.
• 4.1.1.9 Track Pause
Column: Defines a pause, in seconds, inserted after the track, before the next one begins. This
provides a per-track override of the gapless or merging behavior otherwise configured for the album in the
Settings Tab.
• 4.1.1.10 Delete Column: Removes the track from the album. This
does not delete the underlying source itself, which remains available in the Source Tab or in other albums.
• 4.1.1.11 Manage Source Button: Opens the same source selection dialog used to
create the album – From Sources List, From File(s), or From Folder – to add further sources to the album, or
to select and remove sources already present in the table.
• 4.1.1.12 Album Artwork
Field: Lets artwork be added, replaced, or removed for the album, independently of any cover image
embedded in an individual track’s source file.
4.1.2 Single Source Album Type
An album becomes a Single Source Album when it is created from a single source,
typically continuous audio material that needs to be split into multiple tracks with the help of an EDL file.
This type is fixed at creation and cannot be changed afterward; an album built from more than one source is a
Multiple Source Album instead (see Chapter 4.1.1).
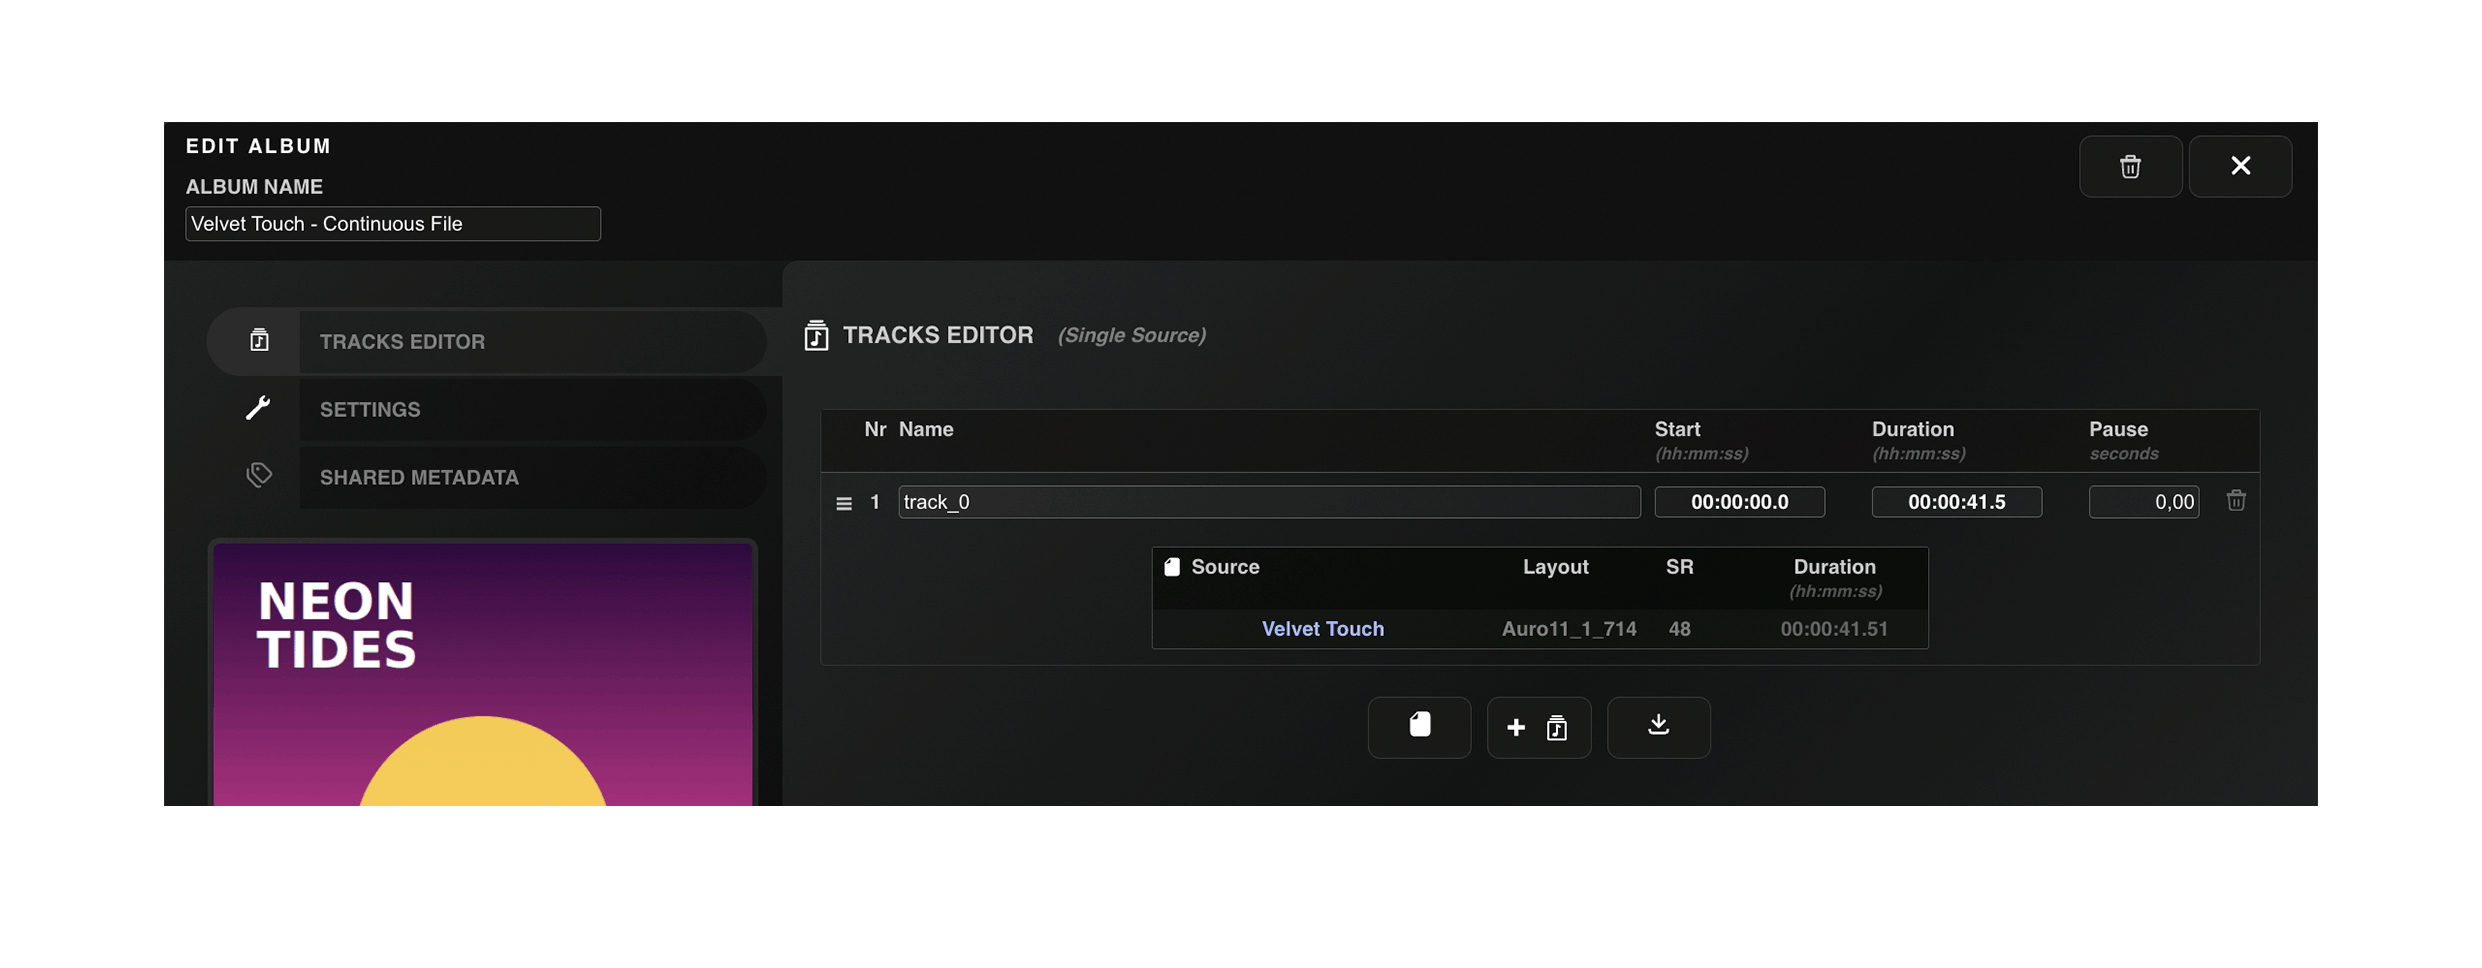
Figure 3.1.2 – 7 | Single Source Album Tracks
Since every track is cut from the same file, the Track Editor for a Single Source Album
does not need to repeat a Source, Layout, or Sample Rate column for each track: that information is shared by
the whole album and shown once, while individual tracks are only defined by their name, start time, duration,
and pause.
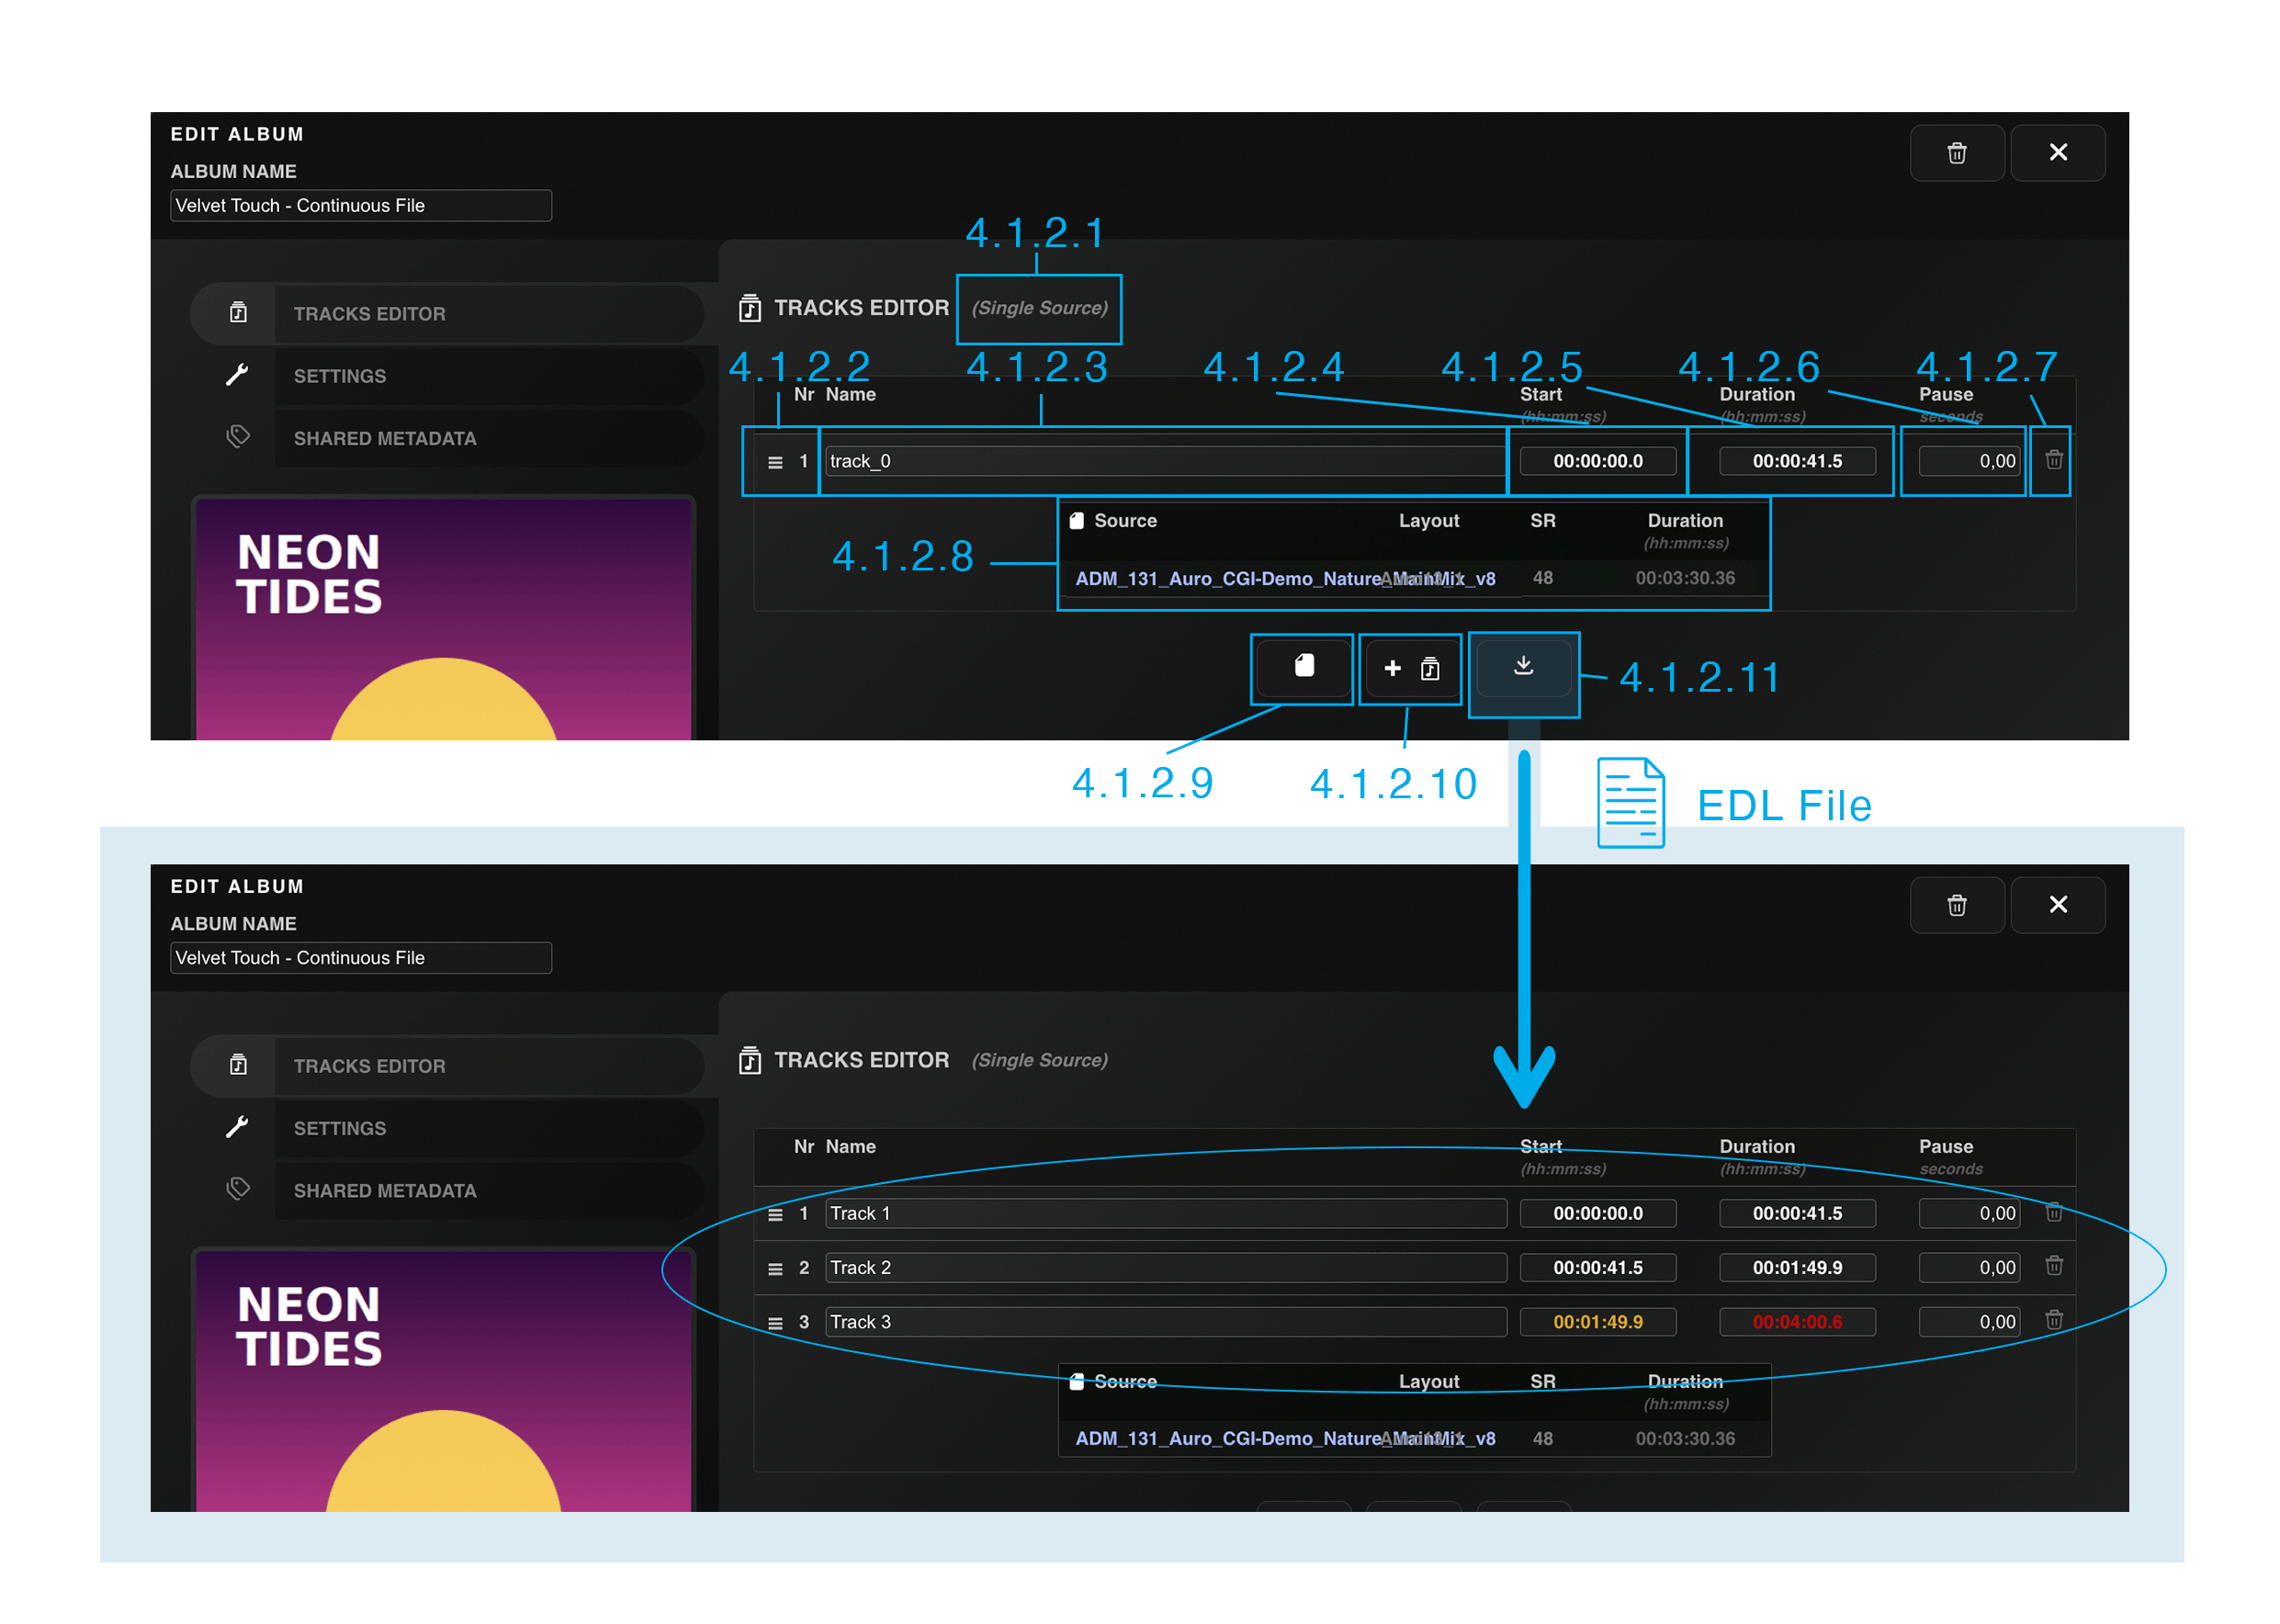
Figure 3.1.2 – 8 | Track Editor of a Single Source Album, and the Resulting Tracks
after Importing an EDL File
• 4.1.2.1 Album Type Indicator: Displays “(Single Source)” next to
the Track Editor title, reflecting the album type set when it was created.
• 4.1.2.2 Track Number Column: Displays the position of the track in the album, together
with a grip icon that lets the track be dragged to a new position to reorder the album.
•
4.1.2.3 Track Name Column: Displays the name of the track, which can be renamed directly in
the field.
• 4.1.2.4 Start Time Column: Displays the timestamp at
which the track starts on the album’s timeline.
• 4.1.2.5 Duration Column:
Displays the duration of the track. The column header additionally displays the running total (Σ) duration
of the whole album.
• 4.1.2.6 Pause Column: Defines a pause, in
seconds, inserted after the track, before the next one begins. This provides a per-track override of the
gapless or merging behavior otherwise configured for the album in the Settings Tab.
•
4.1.2.7 Delete Column: Removes the track from the album. The delete icon is located
within the Pause Column field for space efficiency.
⚠️ Note: The Start and Duration values can be edited manually or
generated automatically from an EDL file, and are checked against the source’s actual length. A value shown
in yellow should be reviewed, as it may be inaccurate; a
value shown in red denotes an invalid timecode, one that
exceeds the total duration of the source file.
• 4.1.2.8 Simplified Track Row & Source Information: Because all
tracks share the same
source, the Track Name field extends over the space that a Multiple Source Album would use for its per-track
Source, Layout, and Sample Rate columns. Instead, this shared information—including the Source name, Layout,
Sample Rate, and total Duration—is displayed once in a dedicated Source section below the track table,
providing a cleaner, more compact view of the single-file album. Clicking on the Source name opens its Edit
View,
identical to the Source Tab’s, with two additions: next to the source name, a clear indication shows whether
the source is part of an existing album, and on the Metadata page, each metadata field indicates whether its
current value originates from the Album level (set in the shared metadata tab in the edit view of albums), from
a Default value (defined in the global settings), or from a custom value set at the source level, shown
respectively
in blue, grey, and white.
• 4.1.2.9 Select Source
Button: Replaces the source currently used to build the album’s tracks with another one.
• 4.1.2.10 Add Track Button: Manually creates a new track on the shared source, to be
positioned and timed by hand — an alternative to generating the full track list at once from an EDL file
(4.1.2.11).
• 4.1.2.11 Import EDL Button: Imports an EDL (Edit Decision List)
file to automatically generate the album’s tracks, with their start times and durations, in a single operation.
An EDL is an XML file that contains timecode and track information, typically exported from professional DAWs
(Digital Audio Workstations) such as Pro Tools, Nuendo, or Reaper. This file format enables precise track
segmentation of continuous audio material without manual entry of timecodes.
4.2 Settings Tab
The Settings Tab configures album-specific playback and encoding behaviors that differ
from standard per-track processing. Album-level operations require specialized handling because the relationship
between consecutive tracks introduces requirements not present in isolated source encoding—continuous playback
without audible gaps, unified output files spanning multiple tracks, and pre-roll optimization strategies that
account for sequential track boundaries. These options address the technical constraints imposed by different
codec architectures and streaming delivery scenarios, where track segmentation, decoder state management, and
loudness compliance must be reconciled with the structural demands of album-format content.
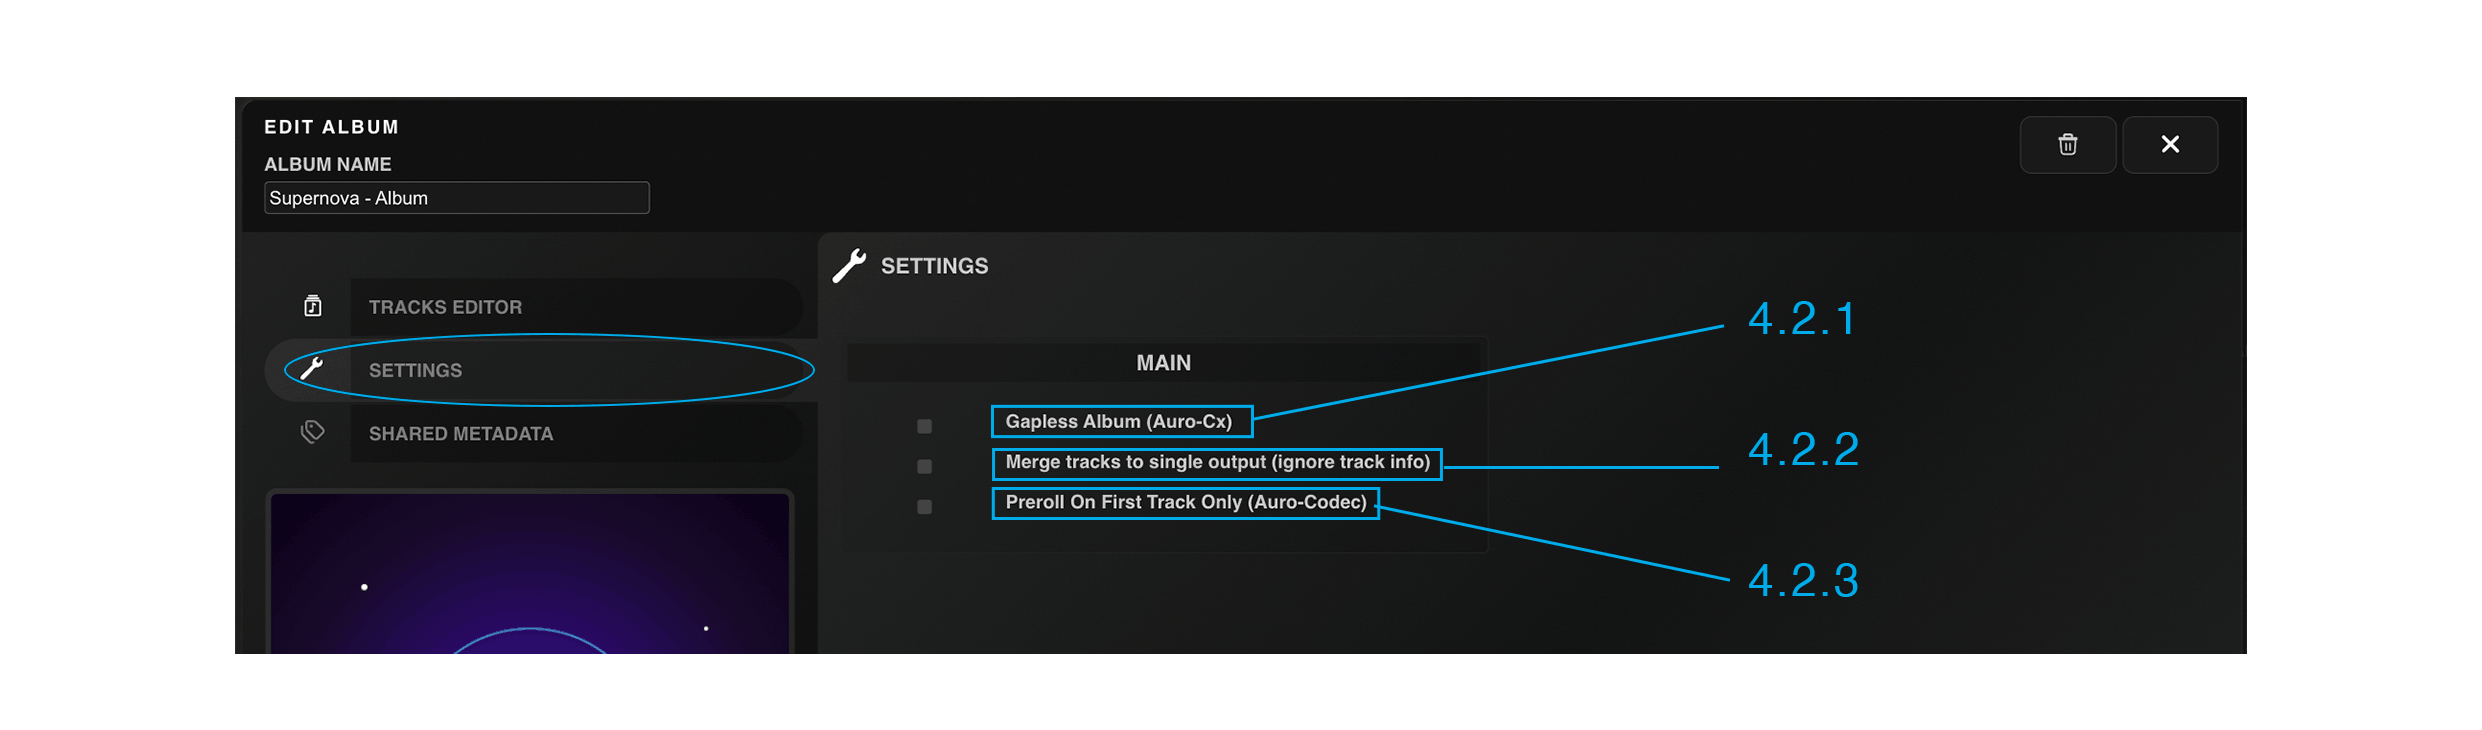
Figure 4.2 – 1 | Settings Tab in Albums Edit View
When an album is added to the Queue List, the system generates dedicated album sessions
for each encoding type defined in the selected Configuration Set, even when all sessions originate from the same
Config Set. This session-per-encoder architecture ensures that codec-specific album behaviors—gapless playback for
Auro-CX, pre-roll handling for Auro-Codec, or track merging for Convert—are processed independently according to
the distinct requirements of each encoder type. With no album settings selected, each album session displays all
individual tracks as separate entries in the Queue List, reflecting the default discrete-track processing mode:
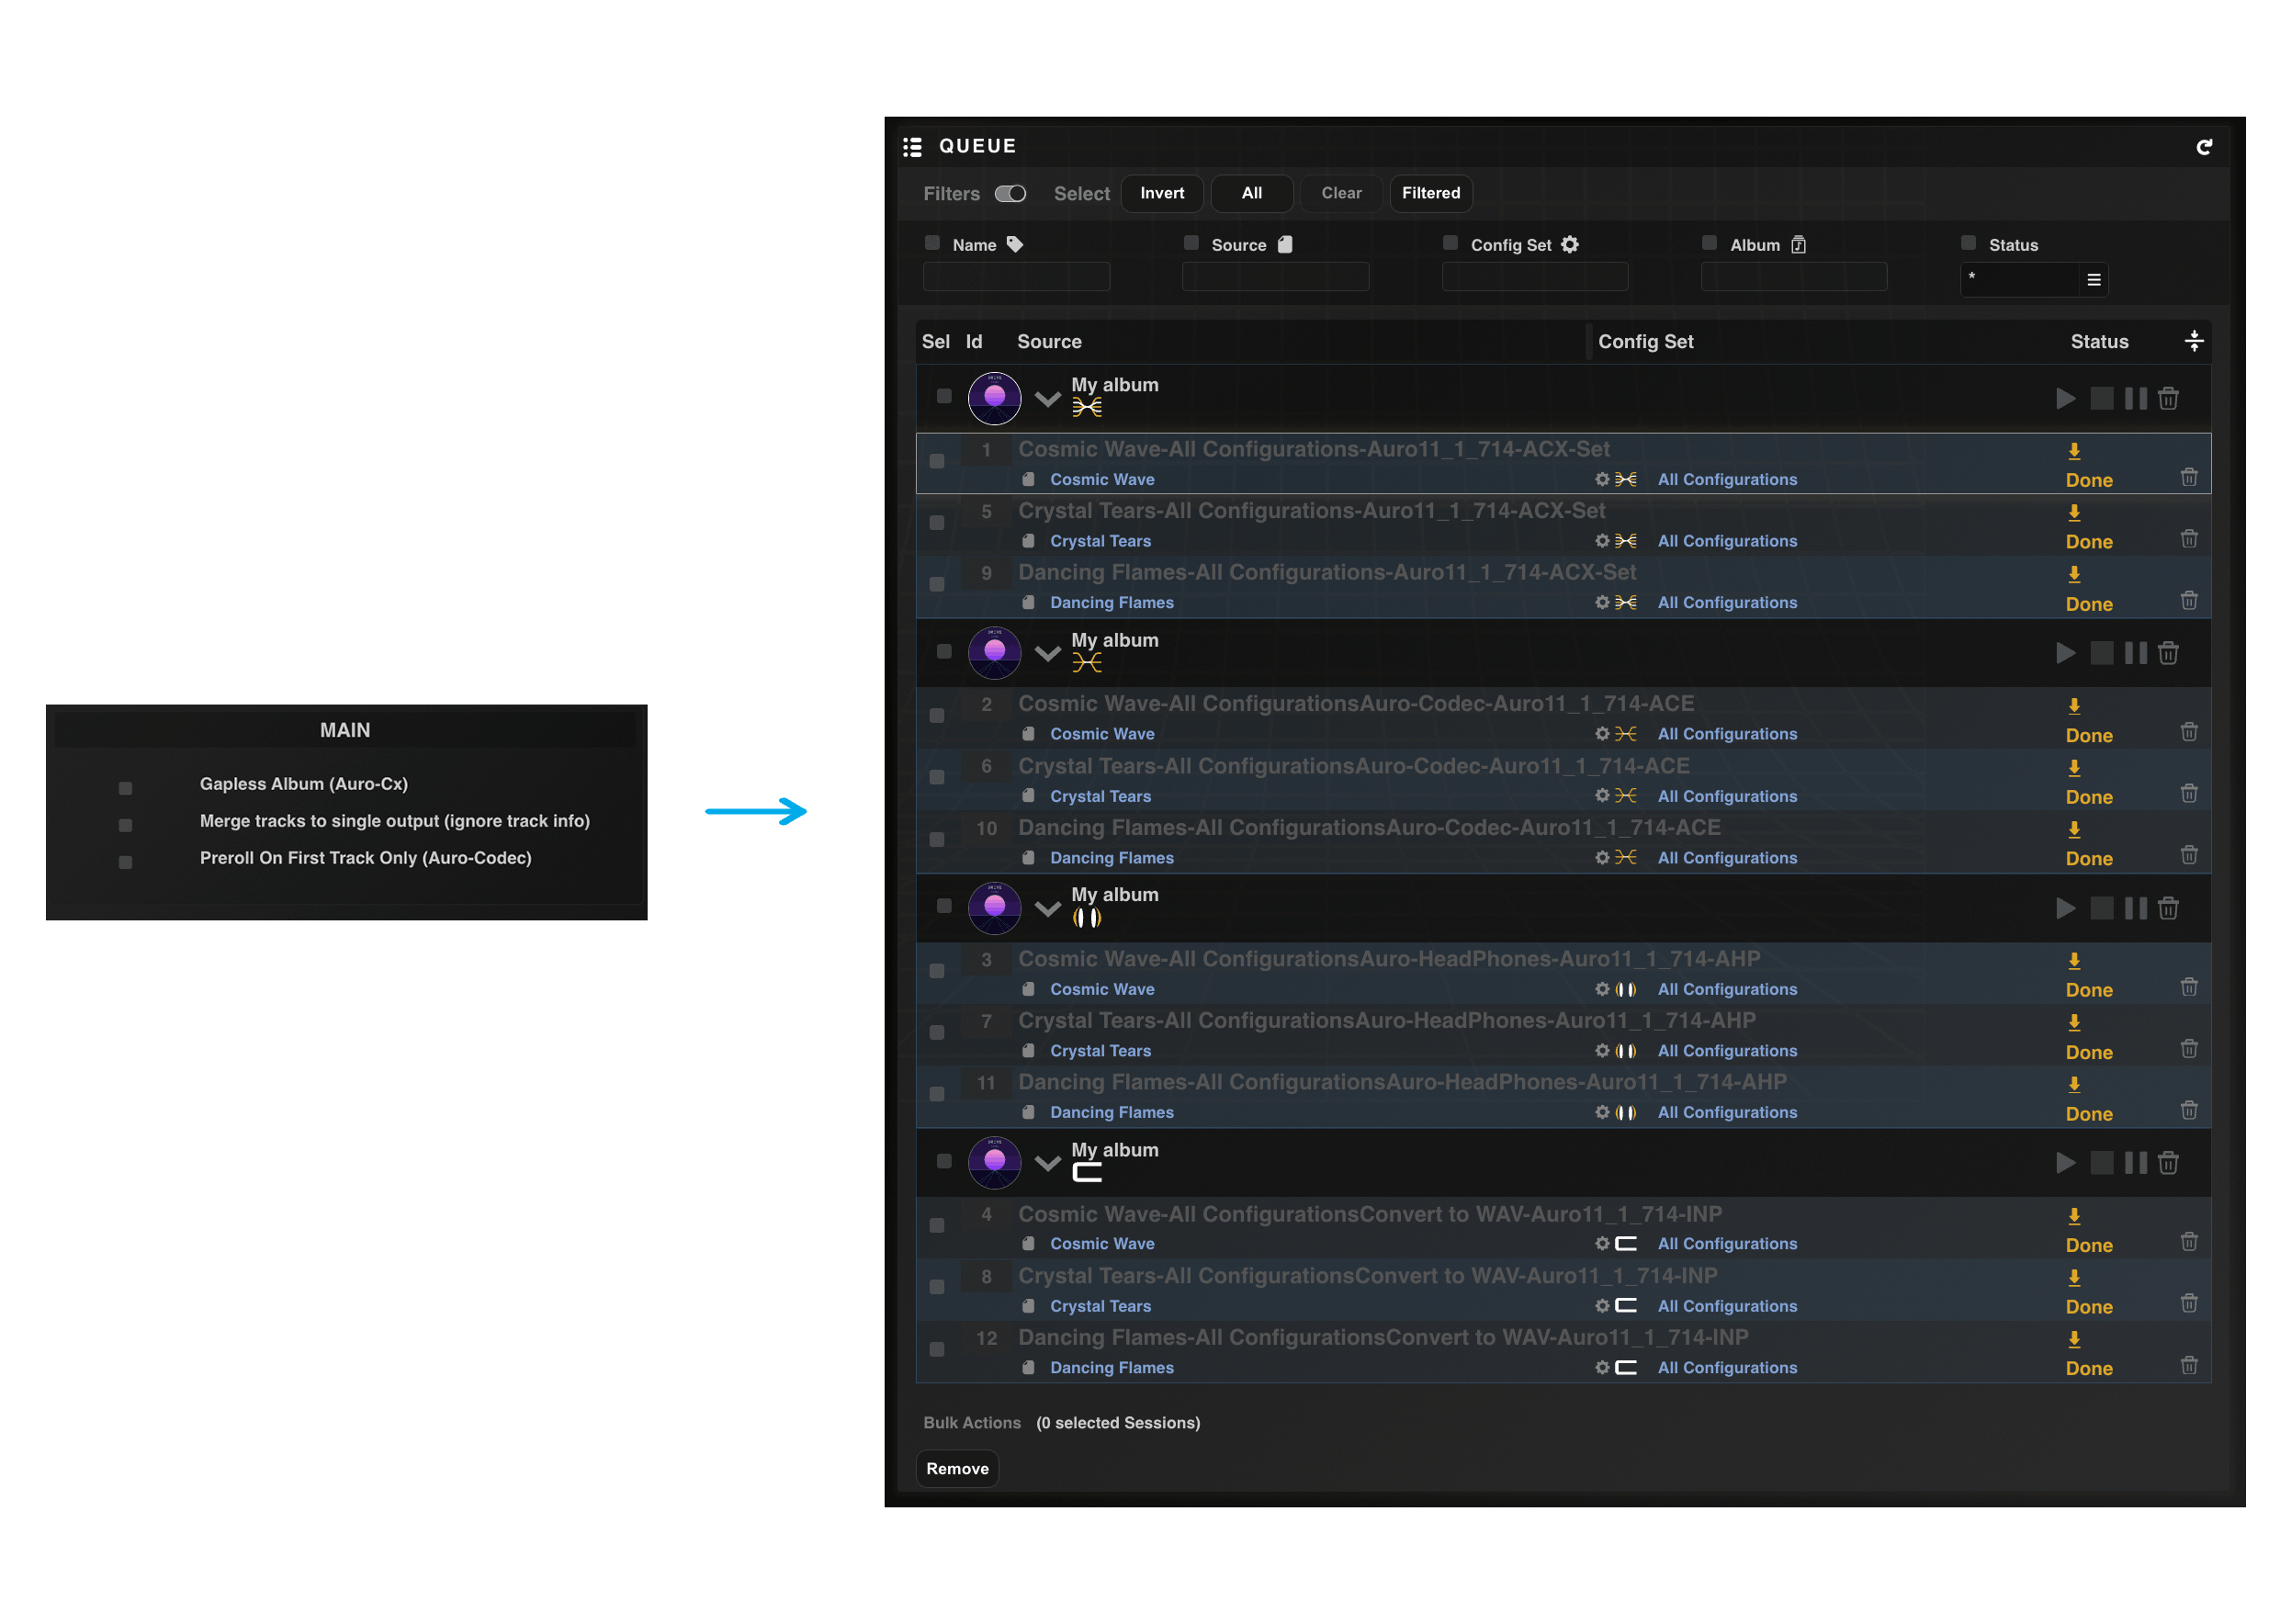
Figure 4.2 – 2 | Album Sessions in Queue List with No Settings Selected
4.2.1 Gapless Album (Auro-CX)
The Gapless Album option is exclusively applicable to Auro-CX encoding sessions. When
enabled, the Auro-CX decoder is instructed to maintain decoder state continuity across track boundaries,
eliminating
the audible discontinuities that typically occur when playback systems reset decoder parameters between discrete
files. This continuity is essential for content where musical or narrative material flows across track
divisions—live
recordings, continuous mixes, concept albums, or any multi-track sequence derived from a single continuous audio
file that has been segmented via an EDL file or manual timeline editing. The approach is not limited to these
scenarios; any album where inter-track silence is compositionally intentional rather than a playback artifact can
benefit from gapless encoding.
When Gapless Album is selected, the Auro-CX album session in the Queue List collapses to
a single entry, reflecting the unified encoding process. Multiple output files are still written—one per track—but
they carry metadata and codec state information that signals the decoder to preserve continuity during sequential
playback. The unified session representation accurately reflects the gapless nature of the encoding operation,
where
all tracks are processed as a continuous stream rather than independent encoding tasks:
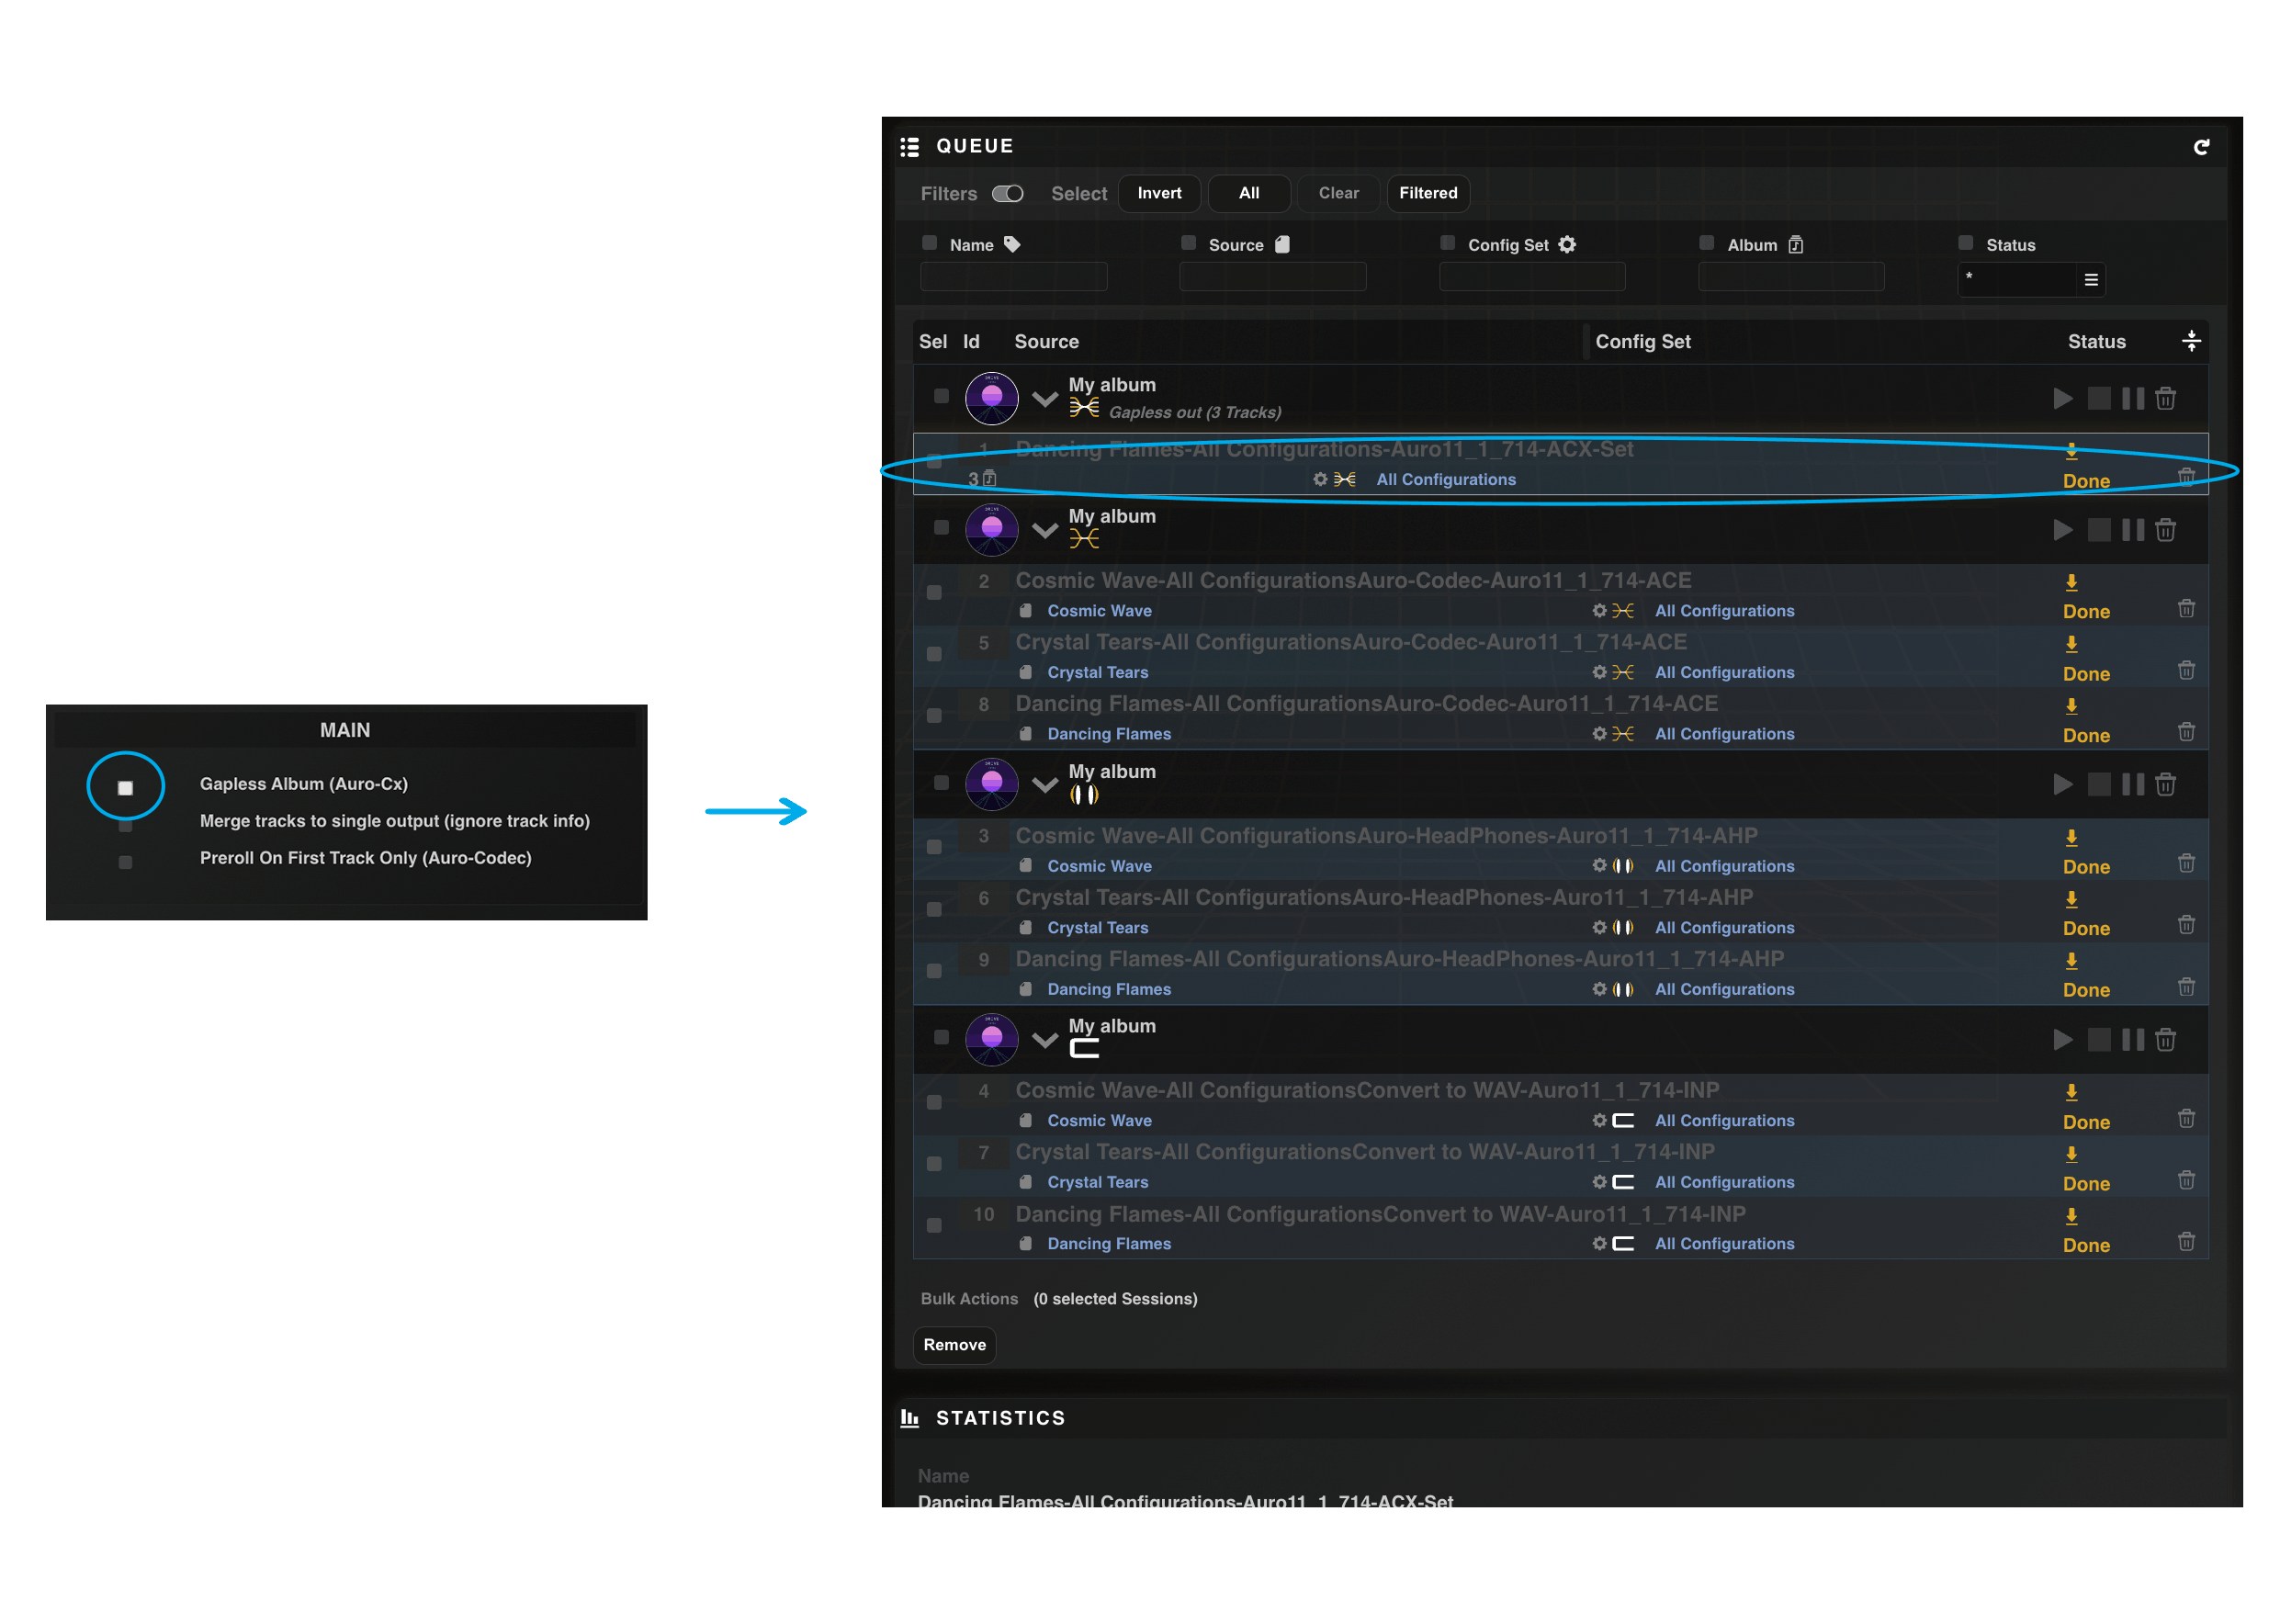
Figure 4.2.1 – 1 | Gapless Album Session Showing Single Unified Entry
Despite the unified encoding session, per-track loudness measurements remain accessible.
The Inspector Panel provides individual track loudness values alongside the album-level loudness (if Album
Loudness
measurement is enabled in the Shared Settings of the Configuration Set). This separation allows verification of
per-track compliance and dynamic range analysis within the gapless album context:

Figure 4.2.1 – 2 | Inspecting Per-Track and Album Loudness in a Gapless Album
Session
4.2.2 Merge Tracks to Single Output (Ignore Track Info)
The Merge Tracks to Single Output option is available across all encoding types—Auro-CX,
Auro-Codec, Convert, and Auro-Headphones. When enabled, all tracks within the album are concatenated into a single
continuous audio file, discarding individual track boundaries and metadata. This mode is required when the
delivery
format or playback system does not support multi-file album structures, or when the album must be treated as an
indivisible content unit—archival masters, broadcast playout, or continuous playback scenarios where track
indexing
is not supported or desired.
Unlike the Gapless Album option, which preserves track files while ensuring seamless
transitions during playback, Merge Tracks produces a single output file containing the entire album sequence. In
the Queue List, each album session displays a single merged entry rather than individual track entries, reflecting
the unified output structure:
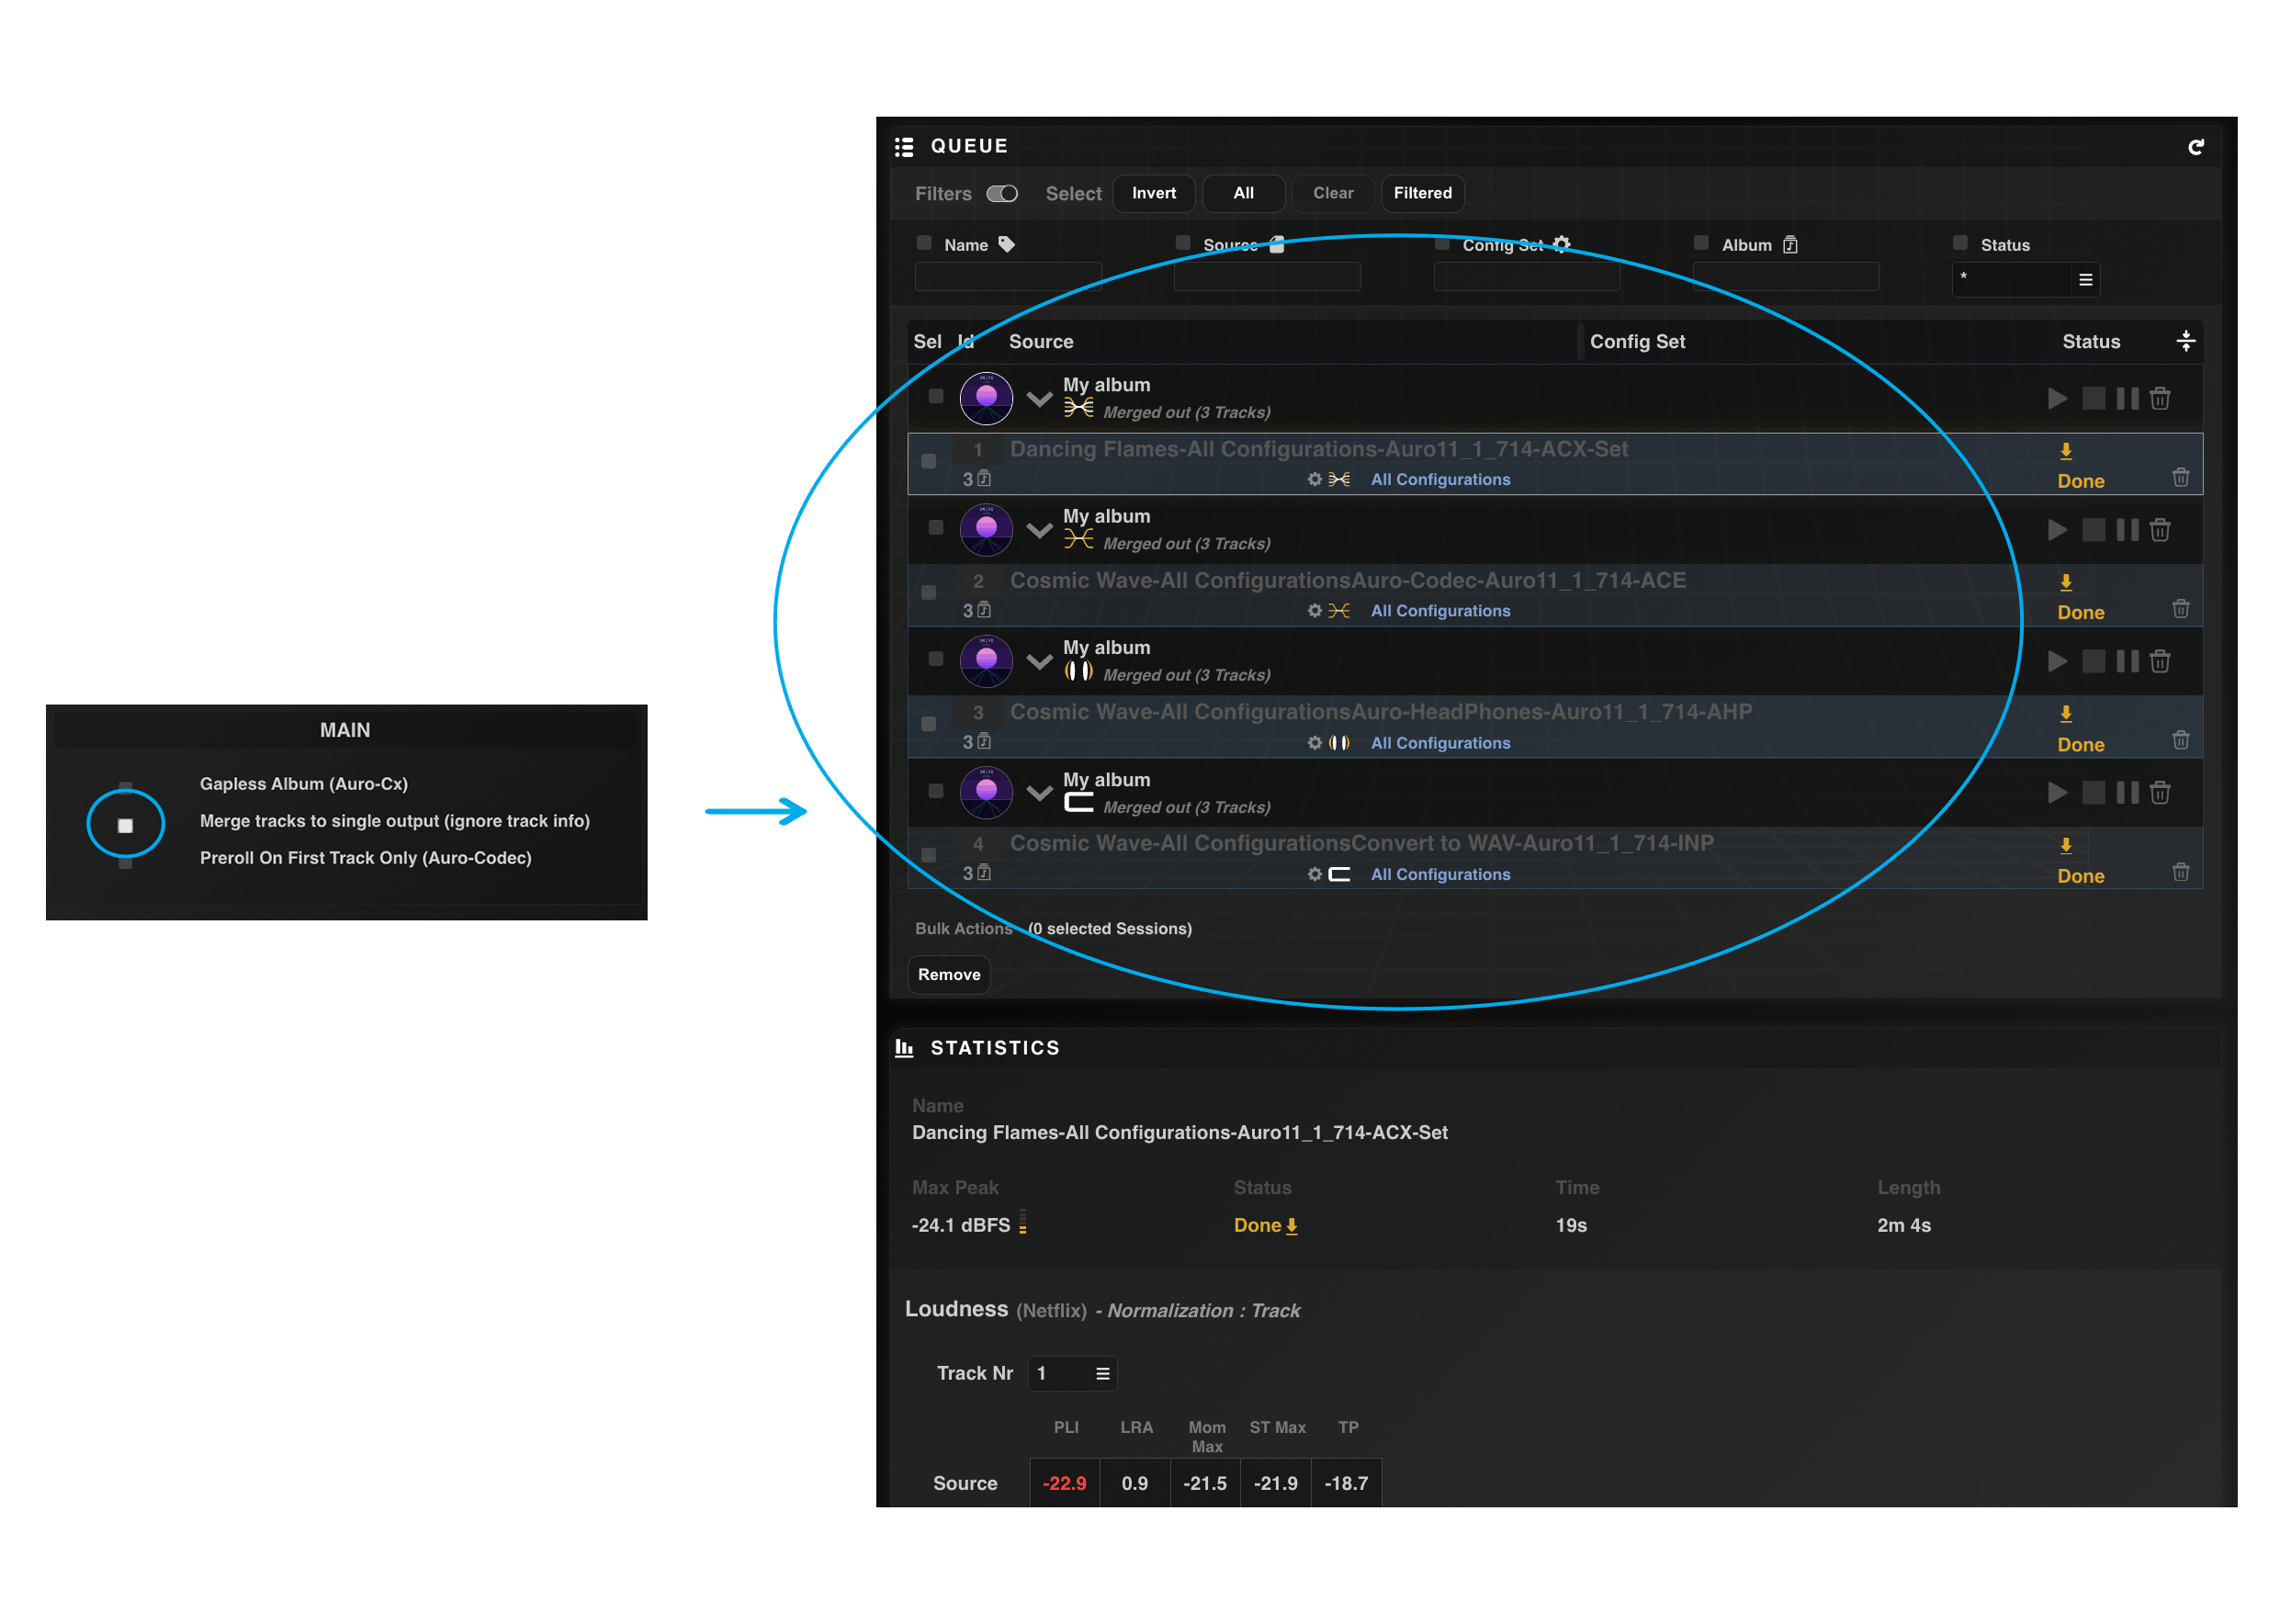
Figure 4.2.2 – 1 | Merged Album Session Showing Single Continuous Output
Remark: Metadata assignment for merged output follows a hierarchical
fallback structure. The continuous output file inherits metadata values defined at the album level in the Shared
Metadata Tab. When a metadata field is not specified at the album level, the system retrieves the corresponding
value from the first track’s source metadata. If neither album-level nor first-track metadata is present, the
default value defined in the global settings is applied. This ensures that merged output always carries complete
metadata regardless of how individual track sources were configured.
4.2.3 Preroll On First Track Only (Auro-Codec)
The Preroll On First Track Only option is exclusively applicable to Auro-Codec encoding
sessions. Auro-Codec encoding incorporates a configurable pre-roll segment—a brief period of silence prepended to
the encoded file to ensure decoder stability and eliminate transient artifacts during
playback initialization. In standard per-track encoding, each track receives its own pre-roll, which is
appropriate
for isolated playback but introduces unnecessary redundancy in album contexts where tracks are played
sequentially.
When Preroll On First Track Only is enabled, the pre-roll is applied exclusively to the
first track of the album. Subsequent tracks are encoded without pre-roll, reducing total file overhead and
avoiding
audible discontinuities or timing shifts that could occur if pre-roll were inserted at every inter-track boundary.
The pre-roll duration is defined in the Shared Settings section of the Configuration Set, in the Edit
Configuration
Set window:
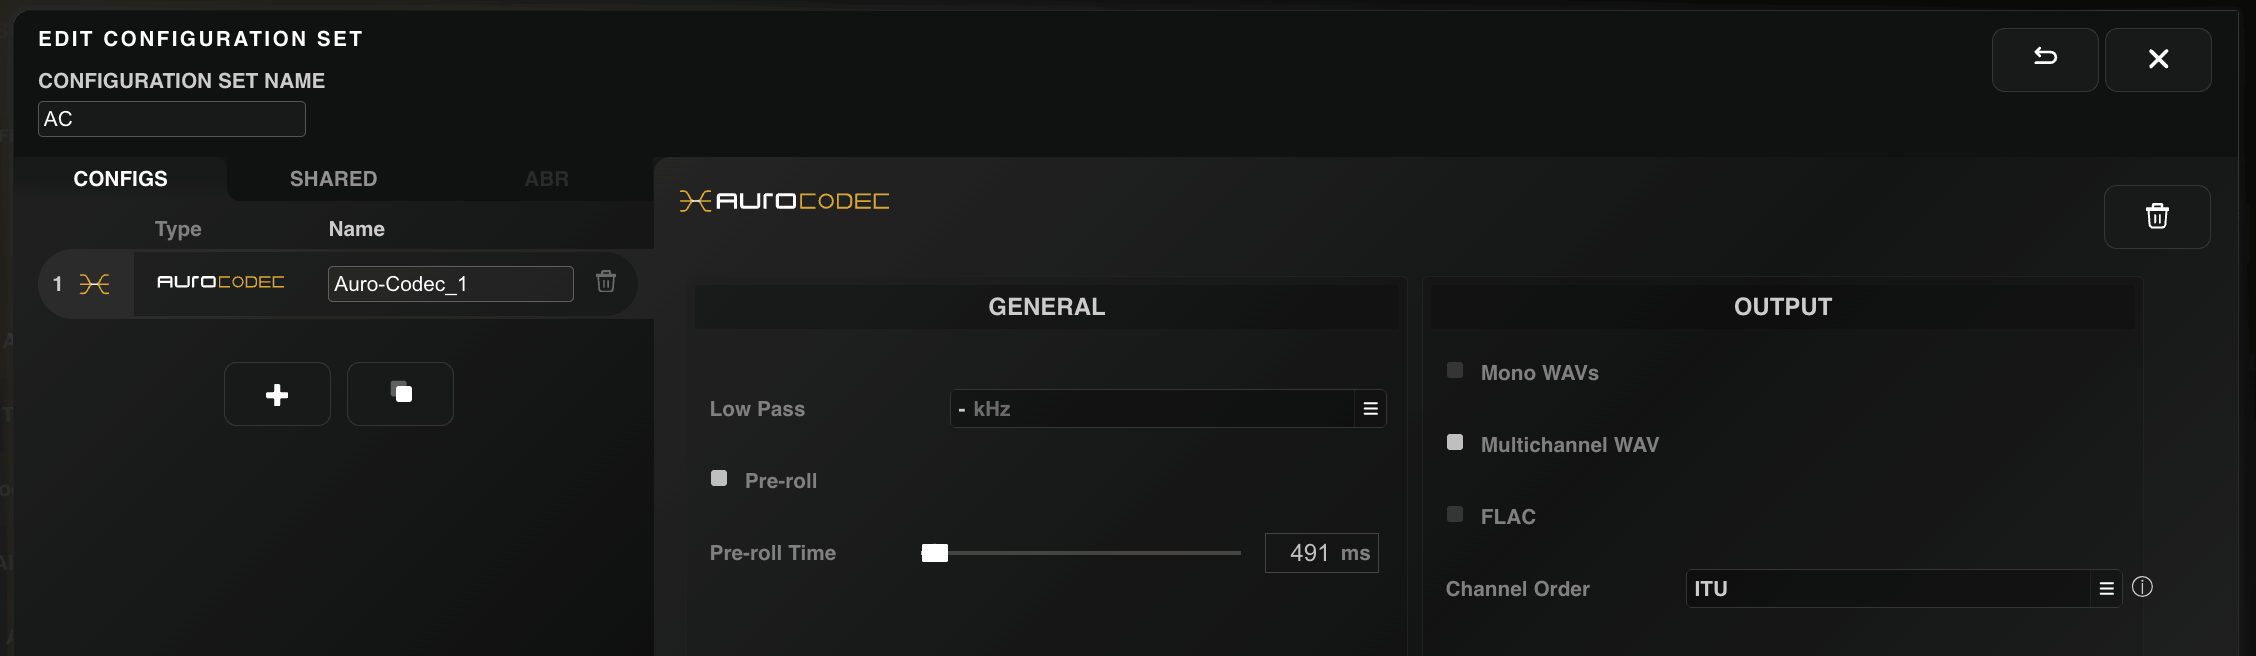
Figure 4.2.3 – 1 | Preroll Parameter in Configuration Set Shared Settings
4.3 Shared Metadata Tab
The Shared Metadata Tab enables the definition of album-level audio metadata tags that
are propagated across all tracks within the album. This centralized metadata management approach addresses the
redundancy inherent in per-track metadata assignment for album content, where fields such as album title, artist,
genre, and release date are identical for every track and should not require repetitive entry or risk
inconsistency
across the track set. By defining these shared properties once at the album level, metadata integrity is enforced
while reducing configuration overhead.
Track-specific metadata fields—Track Number and Track Title—are explicitly excluded from
album-level assignment, as these identifiers are inherently unique to each track and must be defined at the
individual source level. All other metadata fields configured in this tab override corresponding values present in
individual track sources, establishing the album-level value as the authoritative reference for that field.
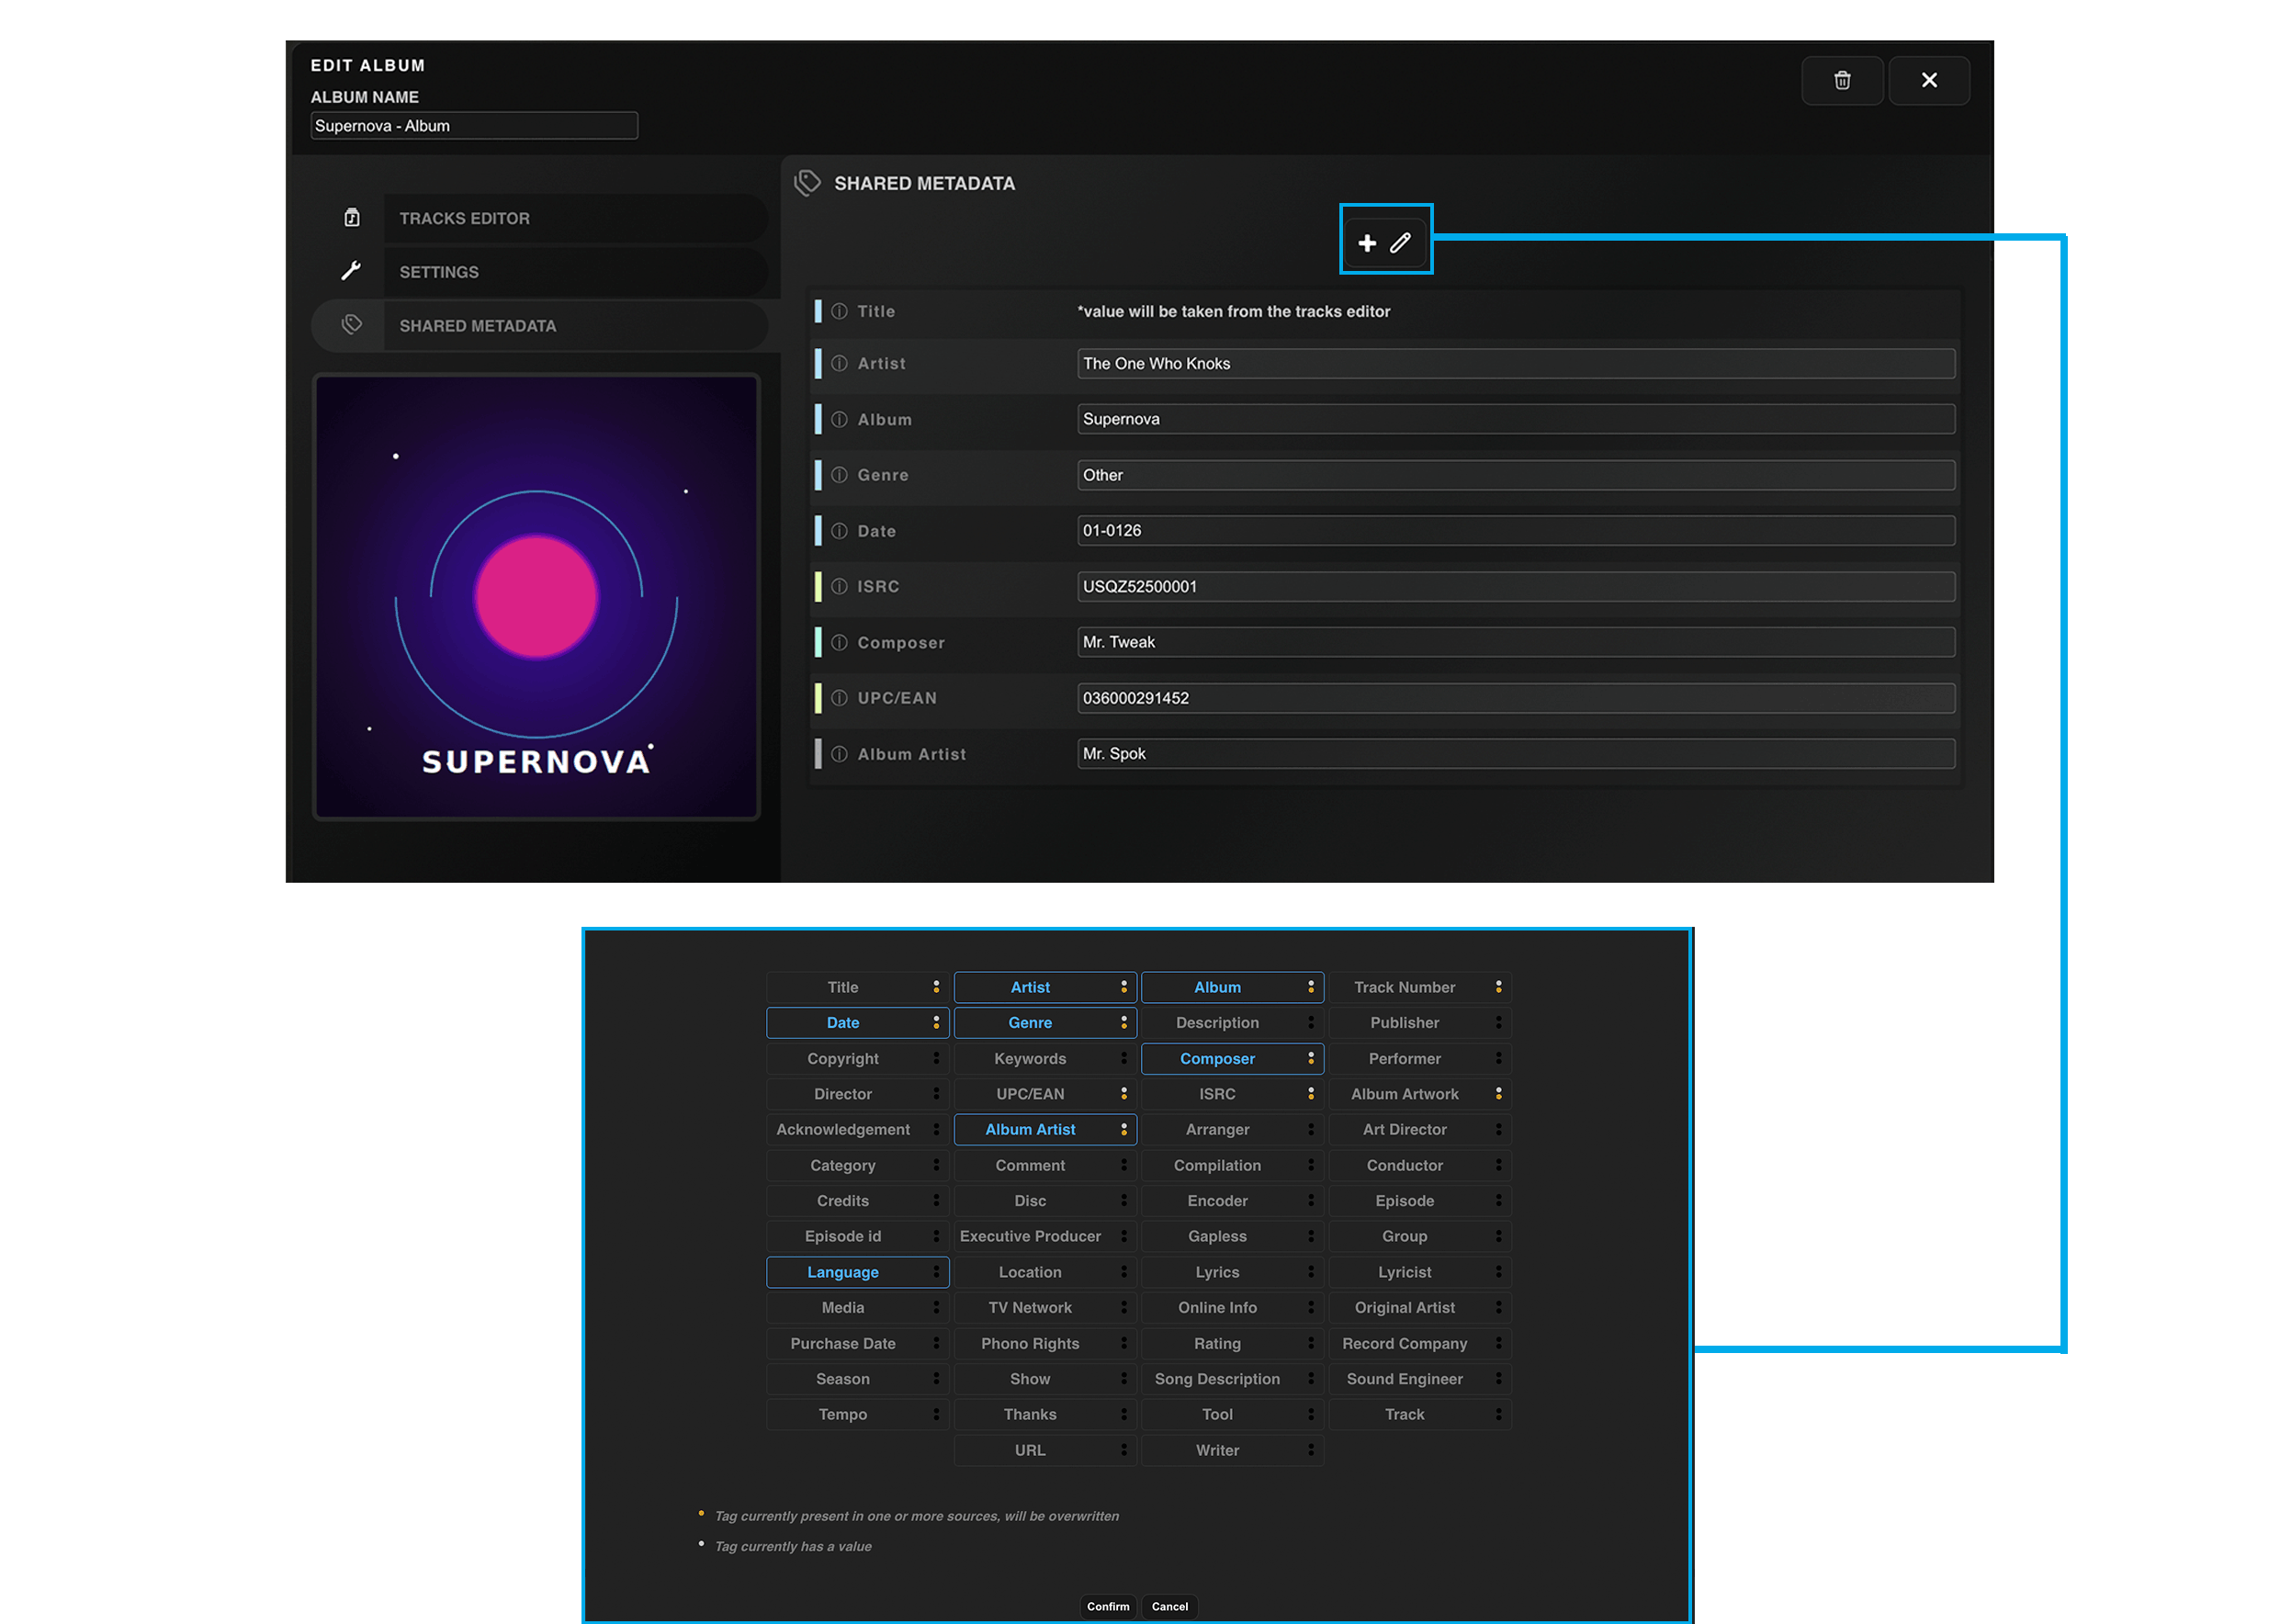
Figure 4.3 – 1 | Shared Metadata Tab and Edit Metadata Modal
The set of metadata fields available for album-level assignment is determined by the
Metadata Management configuration in the global settings, specifically within the Album tab of the Metadata
Management category (see Chapter 3.9). This global configuration defines which metadata tags are relevant for
album-format encoding and ensures consistency across projects. However, the Shared Metadata edit modal allows
per-album customization: additional metadata fields can be included for a specific album even if not enabled
globally, and globally enabled fields can be excluded if not applicable to the selected album. This flexibility
accommodates project-specific requirements without requiring modification of the global metadata schema.
The edit modal incorporates status indicators—LED-style markers—that communicate the
current metadata state for each field, providing visibility into which values will be overwritten and which are
newly assigned at the album level:
• Yellow LED: Signals that the
metadata tag is currently
present in one or more individual track sources. Setting a value for this field at the album level will
overwrite the existing source-level values for all tracks, replacing them with the album-level value. This
LED alerts the user to potential data replacement and ensures that album-level assignment is intentional
rather than inadvertent.
• White LED: Indicates that the metadata field
currently holds a value at the album level. This value will be applied to all tracks in the album during
encoding, regardless of whether individual sources contain their own values for this field.
This indicator system ensures that metadata inheritance and override behavior is
transparent, allowing precise control over which fields are managed at the album level and which remain at the
track level. When combined with the hierarchical metadata fallback structure (album level → source level →
global defaults), the Shared Metadata Tab provides a robust mechanism for managing complex album-format metadata
requirements.