Select and Inspect the Audio Source
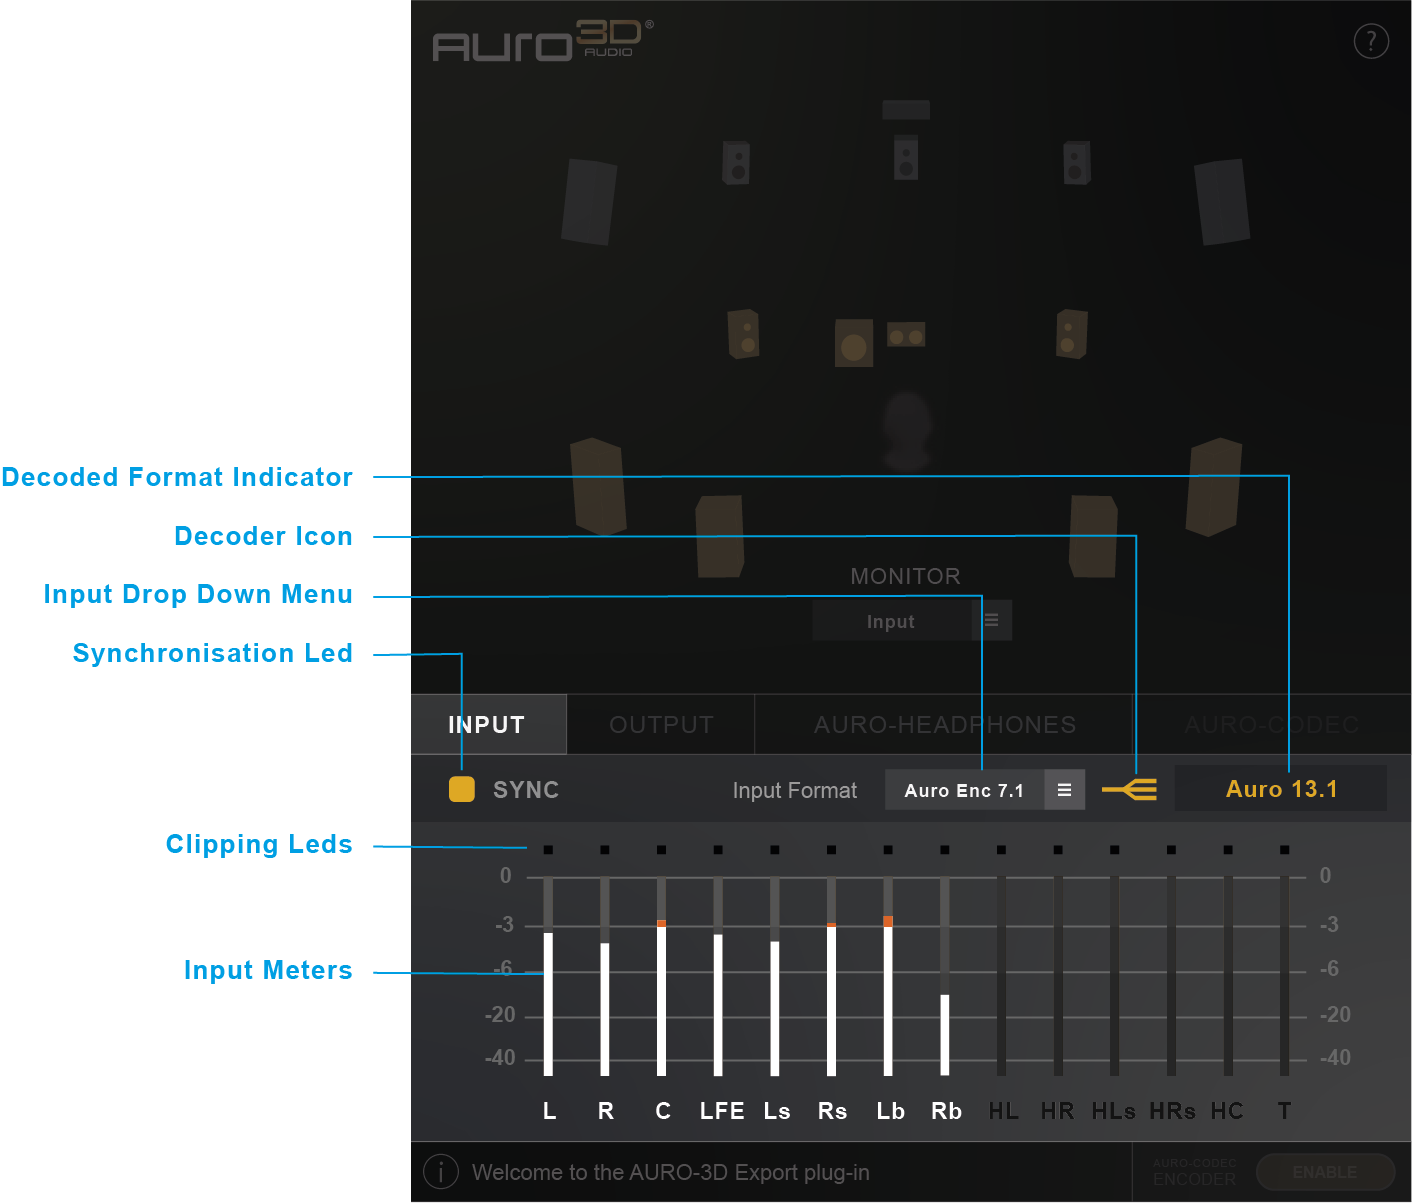
The Input Menu allows to select the type of audio source, displays input meters and indicates the status of the decoding process when relevant:

Figure 3 – 4 | Input Menu Overview
The available options in the Input Drop Down Menu depend on:
• The type of DAW
• The DAW configuration
• The DAW track format
• The activated CTS Licenses
Input Drop Down Menu
The Input Drop Down Menu allows to select the type of audio source that will be processed by the AURO-3D Export plugin.
There are two main types of audio source:
• Immersive Format Type:
Defines the desired format to be used for mixing in 3D in the project (e.g. Auro 9.1, 7.1.2, etc.).
Once an immersive format is selected in the Input Drop Down Menu, the options in the Monitor Drop Down Menu switch to Mixing Mode.
• Auro-Codec Encoded Content Type: (Only available with the Auro-Codec Encoder License)
Defines the format of the Auro-Codec Encoded content that can be decoded in the project (e.g. Auro Enc 7.1, Auro Enc 5.1).
Once an Auro-Codec Encoded format is selected in the Input Drop Down Menu, the options in the Monitor Drop Down Menu switch to QC Mode.
Input Meters
The total number of displayed Input Meters is defined by the track format.
The number of active Input Meters depends on the selected input source from the Input Drop Down Menu.
Each meter is labelled by its corresponding audio channel and dynamically indicates the input level in dBFS.
The colours of the input meters highlight which audio channels are currently active:
• White Input Meter: The input meter is active and expects audio to be received.
• Black Input Meter: The input meter is not active and should not receive audio.
Note that the amplitudes of unexpected audio signals can still modulate the levels of Black Input Meters.
In this way, it is possible to notice potential routing problems that are not relevant with the current input configuration.
e.g. The Input format is set to Auro Enc 7.1 (energy expected in the 8 first channels) but an unexpected signal is routed to channel number 11.
→ The decoding process is jeopardised and the unexpected signal causing the problem can be spotted thanks to the modulating Black Input Meter.
Clipping Leds
The colour of the Clipping Led indicates if the corresponding input channel is clipping or not.
It is possible reset Clipping Leds by clicking them.
• Red Clipping Led: The corresponding input channel did clip.
• Black Clipping Led: The corresponding input channel did not clip.
Synchronisation Led
The Synchronisation Led only appears when an Auro Encoded Content format is selected in the Input Drop Down Menu.
The colours of the Synchronisation Led indicates if the decoding process is active or not during playback:
• Yellow Synchonisation Led: The Auro-Codec Encoded content is successfully detected and the Auro-Codec Decoder is successfully synchronised.
• Grey Synchronisation Led: The Auro-Codec Encoded content is not detected nor synchronised with the Auro-Codec Decoder.
Decoder Icon
The colour of the Decoder Icon indicates if the decoding process is functioning or not during playback:
• Yellow Decoder Icon: The decoding process is functioning.
• Grey Decoder Icon: The decoding process is not functioning.
Decoded Format Indicator
The Decoded Format Indicator Indicates the type of format that is decoded from the selected Auro-Codec Encoded content during playback.
If the Auro-Codec decoder did not manage to decode any formats, the Decoded Format Indicator displays “n.a”.


